
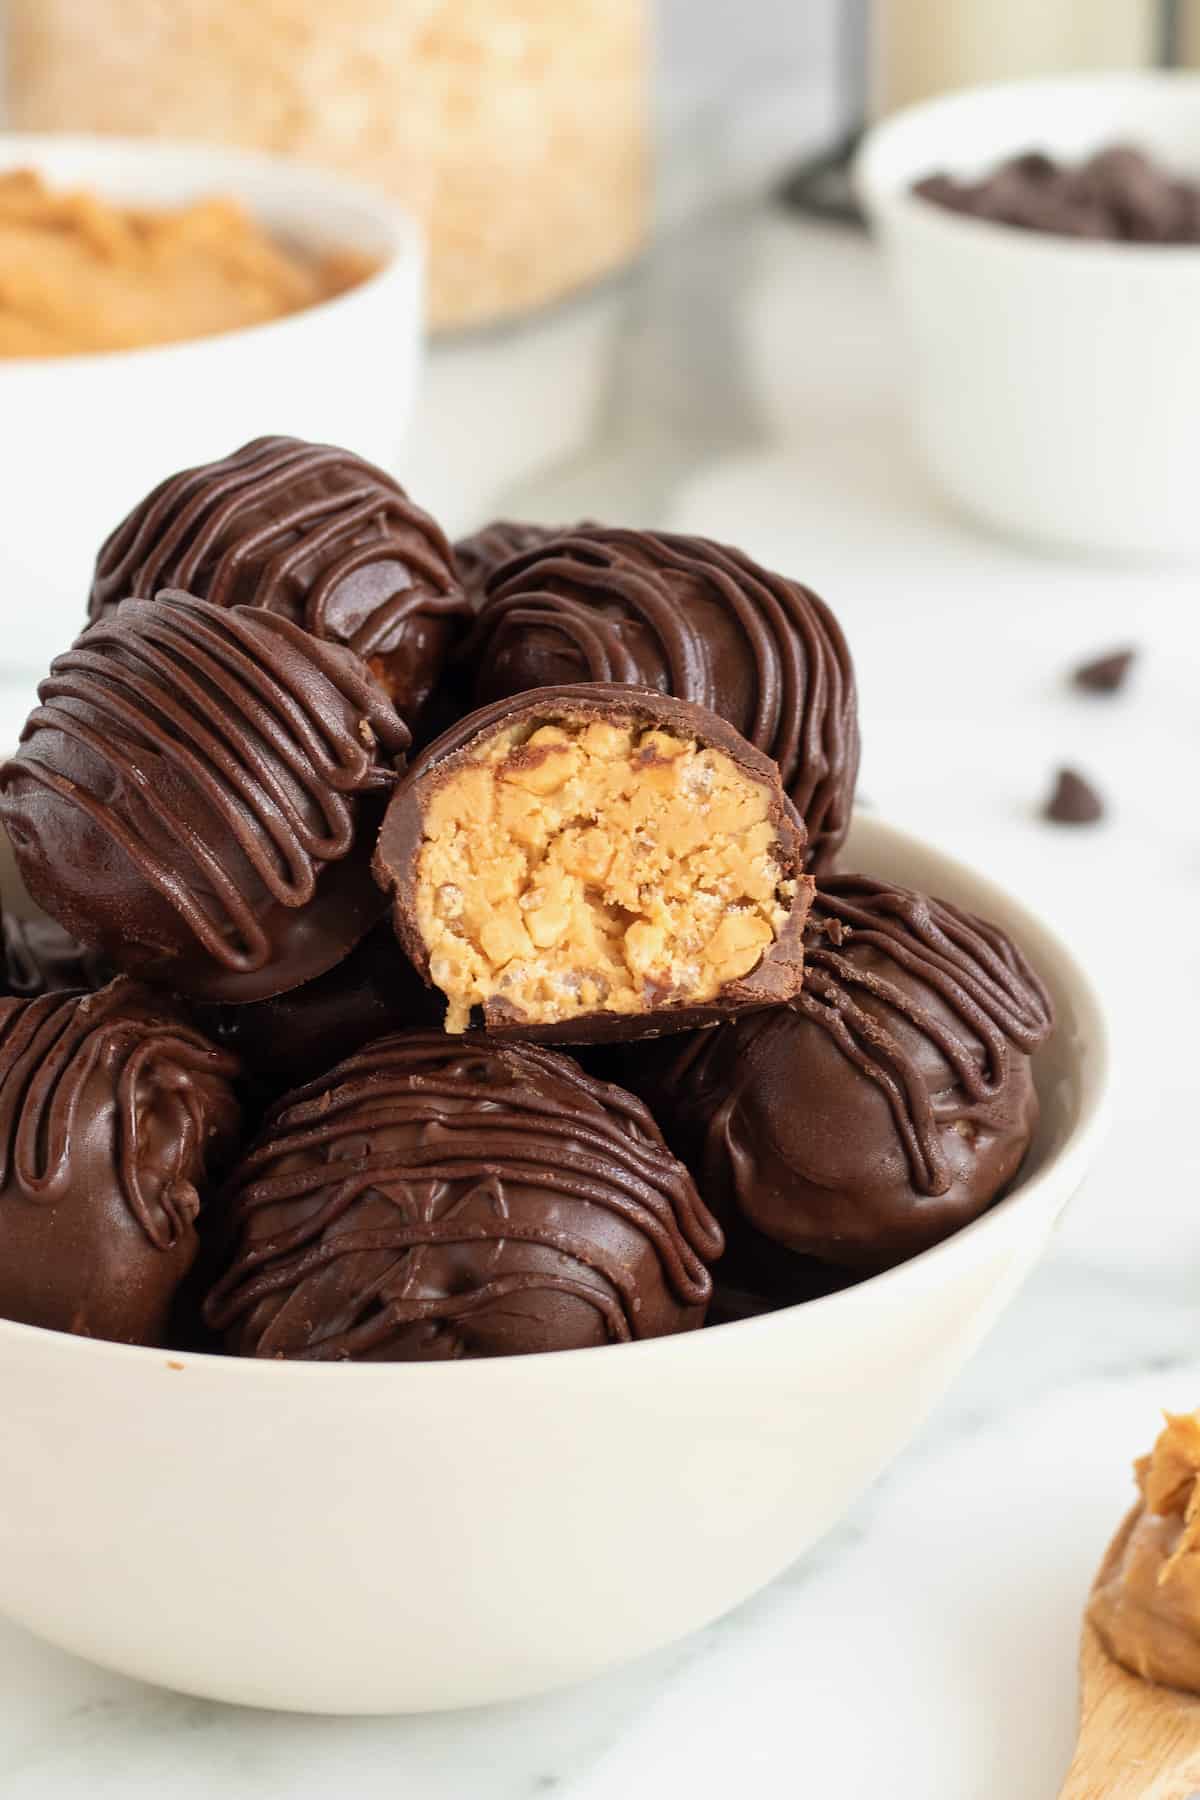
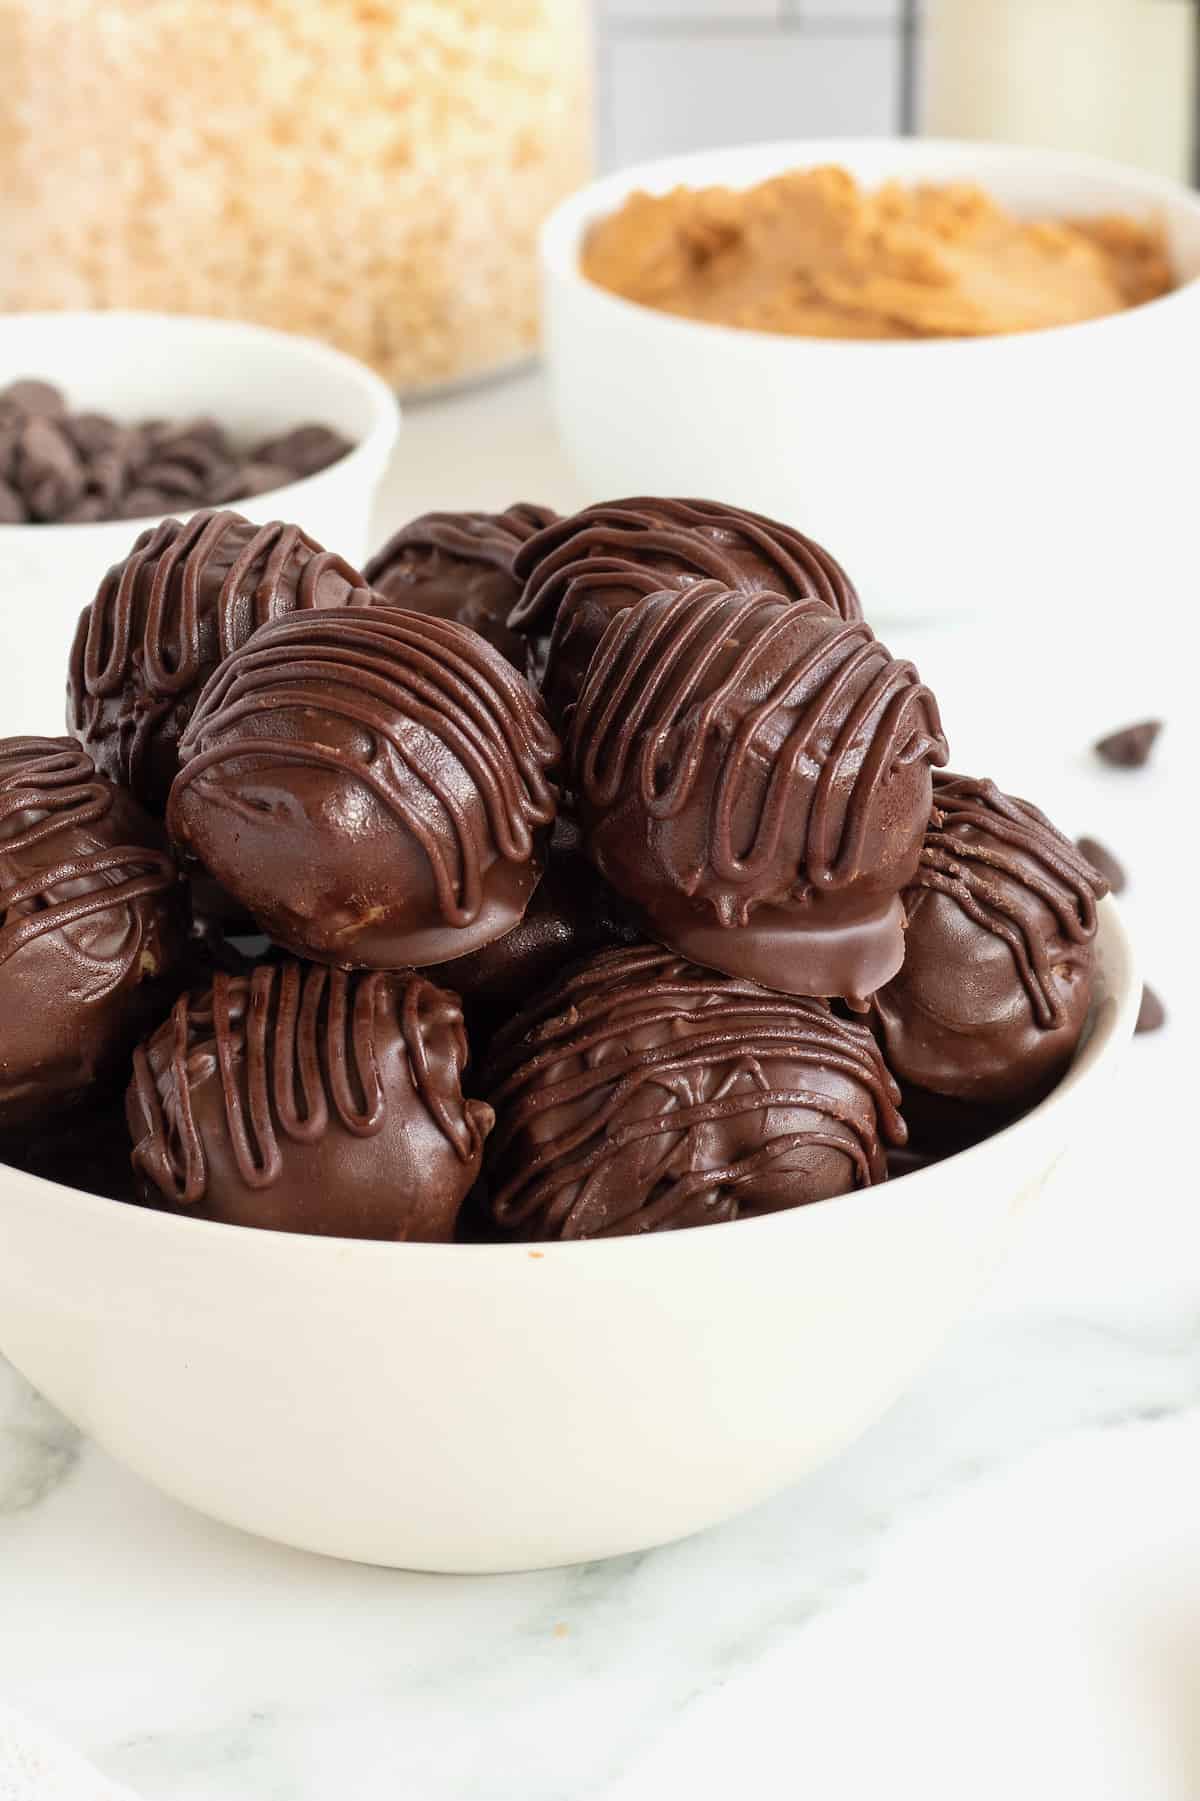
Crunchy peanut butter and crispy cereal inside a chocolate shell make these Chocolate Peanut Butter Balls one scrumptious holiday favorite we crave year ’round!
Have a Ball with These Tiny Treats
Just about the time grocery stores start putting out their Christmas goodies, I start to get a hankering for our family’s favorite Chocolate Peanut Butter Balls recipe. For as long as I can remember, they’ve been a family holiday tradition.
Shortly after Thanksgiving, we put on a holiday movie, gather everyone in the kitchen, and have the best time together rolling these delicious little balls! They’re such a family favorite that we make a double–or triple–batch to get us through the holiday season. They freeze great!
With crunchy peanut butter and crispy rice cereal inside a semi-sweet chocolate shell, these tiny treats are perfect for gifting, Christmas cookie exchanges, keeping in a jar on the counter, leaving out for Santa, and decking out dessert trays. But you don’t need to wait until the holidays to enjoy them. They make a delightful, delicious, totally craveable treat any time of the year!
The best part is, they’re delicious at any temperature. You can eat them at room temp, cold or even frozen. Oh my gosh, they’re so good. And because everyone’s preference is different, we make a ton and keep some in the freezer, some in the fridge and some at room temp. That way, they’re always handy just the way we like ’em!
They keep great at room temp for about one week, in the refrigerator for 3-4 weeks or in the freezer for up to 3 months. If you’re defrosting them from frozen, leave them loosely covered at room temperature to defrost completely.
Can I Use Natural Peanut Butter?
You can swap out the processed peanut butter for natural, but there are a few things to keep in mind:
- Texture. The texture of natural peanut butter is a bit on the runny side. Keep your natural peanut butter chilled as long as possible before adding it to your batter, and be sure to stir it really well before measuring. Or use a no-stir natural creamy peanut butter, like I do for most of my baking recipes!
- Salt. Secondly, if your natural peanut butter is unsalted, you might need to adjust the amount of salt in your baking.
- Sweetness. It’s certainly unsweetened, so the end product may not be as sweet as you expect, either. You may want to adjust the amount of sugar according to your tastes.
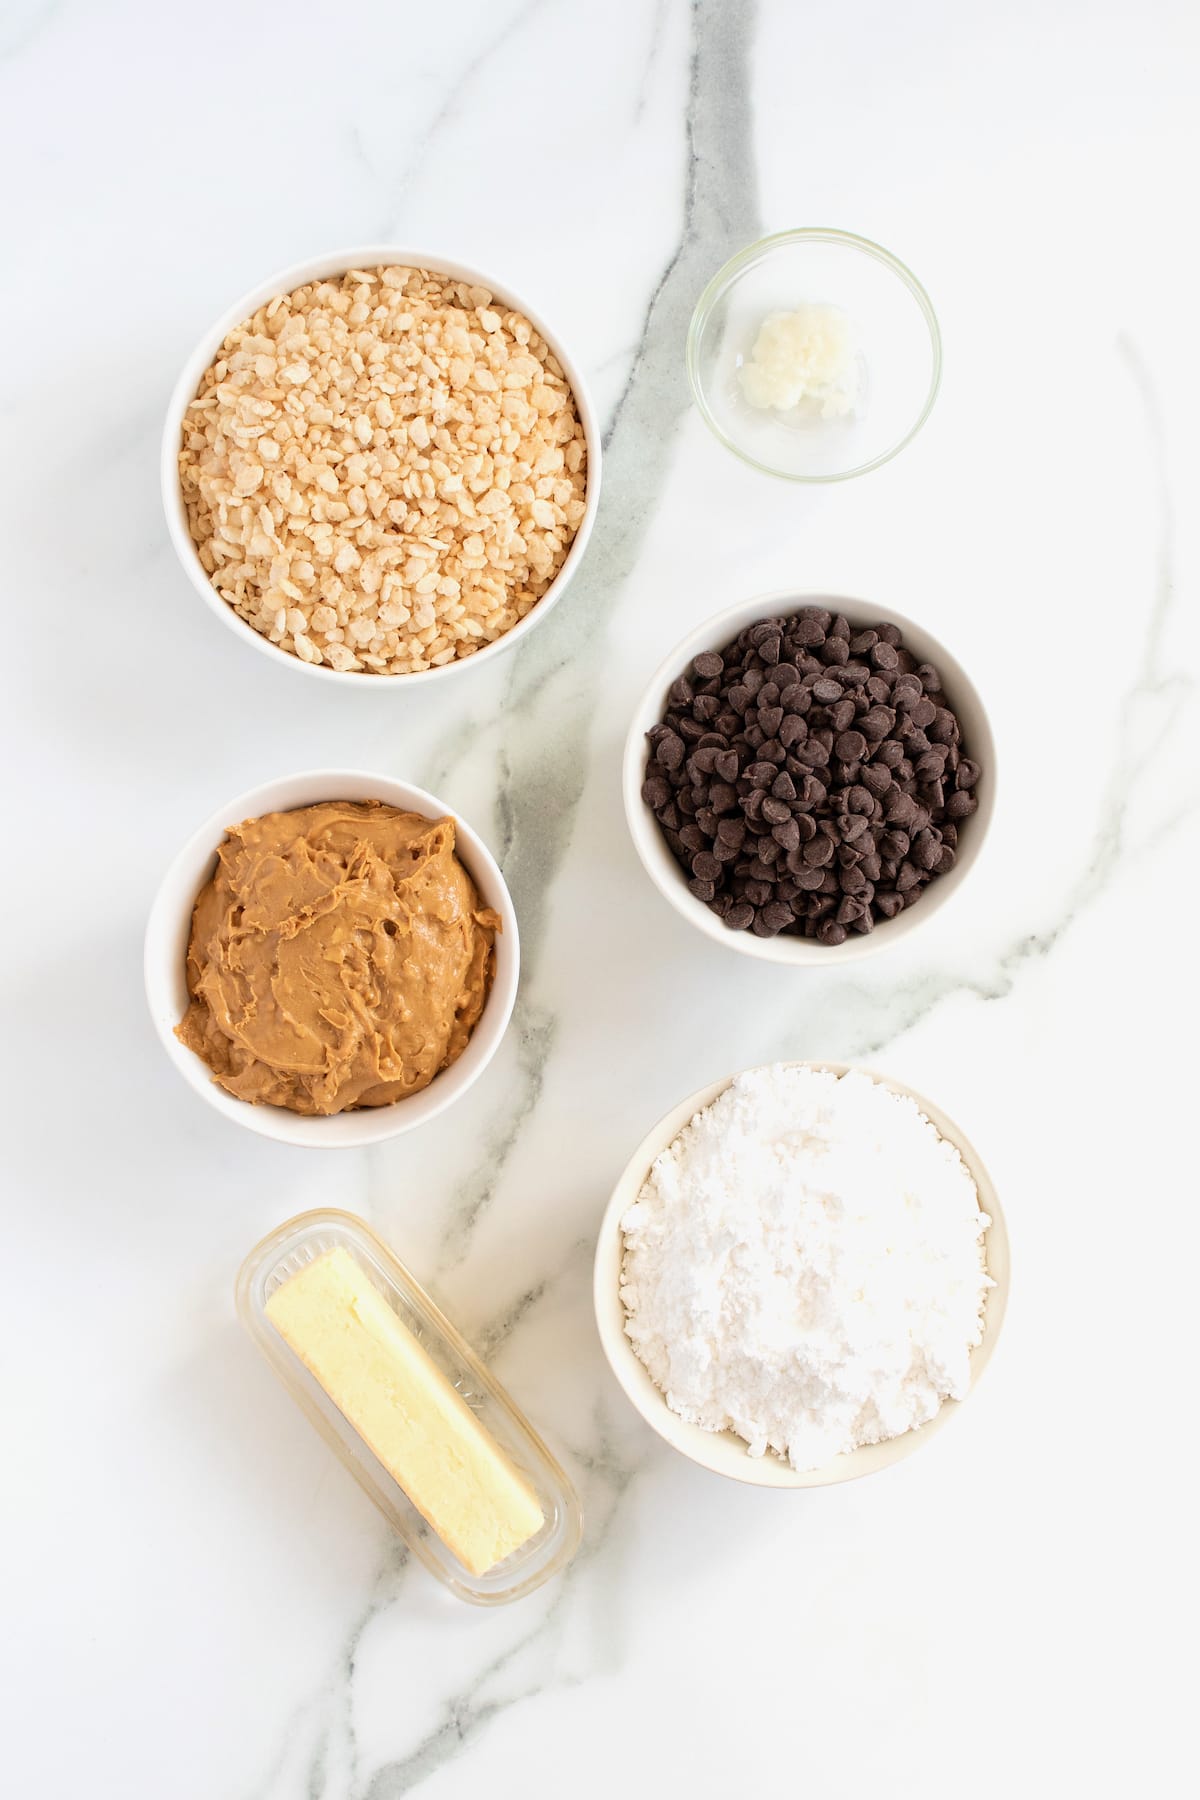
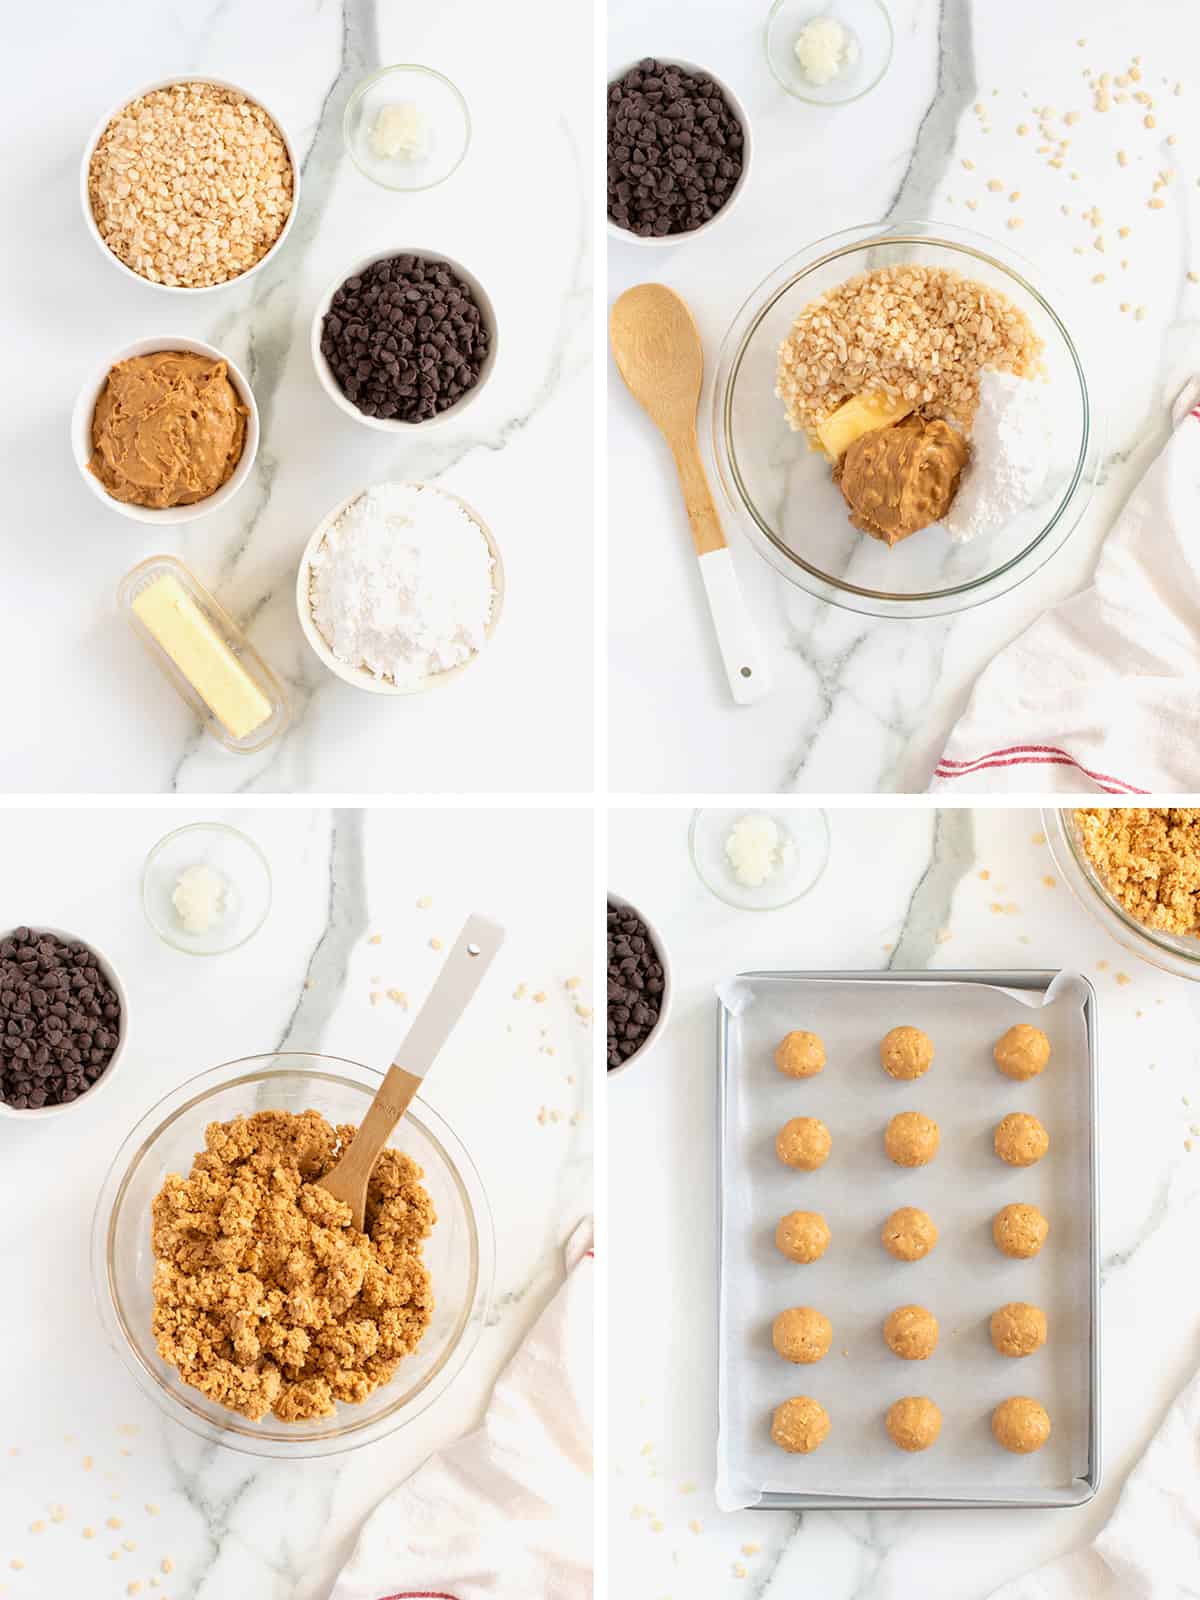
What Do I Need to Make Chocolate Peanut Butter Balls?
- Crunchy peanut butter (no-stir peanut butter is best)
- Butter
- Powdered sugar
- Rice Krispies cereal
- Semi‐sweet chocolate chips
- Canola or coconut oil
- Baking sheet
- Parchment paper
More Chocolate Peanut Butter Recipes You’ll Love
For all my chocolate peanut butter fans out there, you’re sure to find a treat to satisfy your craving.
- Peanut Butter Cup Stuffed Brookies: A chocolate peanut butter cup baked in the middle of a peanut butter chocolate chip cookie and a rich chocolate brownie! These Peanut Butter Cup Stuffed Brookies define deliciousness!
- No-Bake Chocolate Peanut Butter Bars: Dense, chewy peanut buttery bars topped with a smooth chocolate peanut butter layer make these No-Bake Chocolate Peanut Butter Bars an easy and delicious treat.
- Peanut Butter Kiss Cookies: Chewy peanut butter cookies dusted with sugar and topped with a chocolate kiss. These Peanut Butter Kiss Cookies are a must-make cookie you’ll crave all year round.
- No-Bake Chocolate Peanut Butter Pie: No special occasion needed to enjoy this No-Bake Chocolate Peanut Butter Pie. Crunchy peanut butter, creamy whipped topping and cream cheese piled into an Oreo crust make this ice box pie perfect for celebrating every day life!
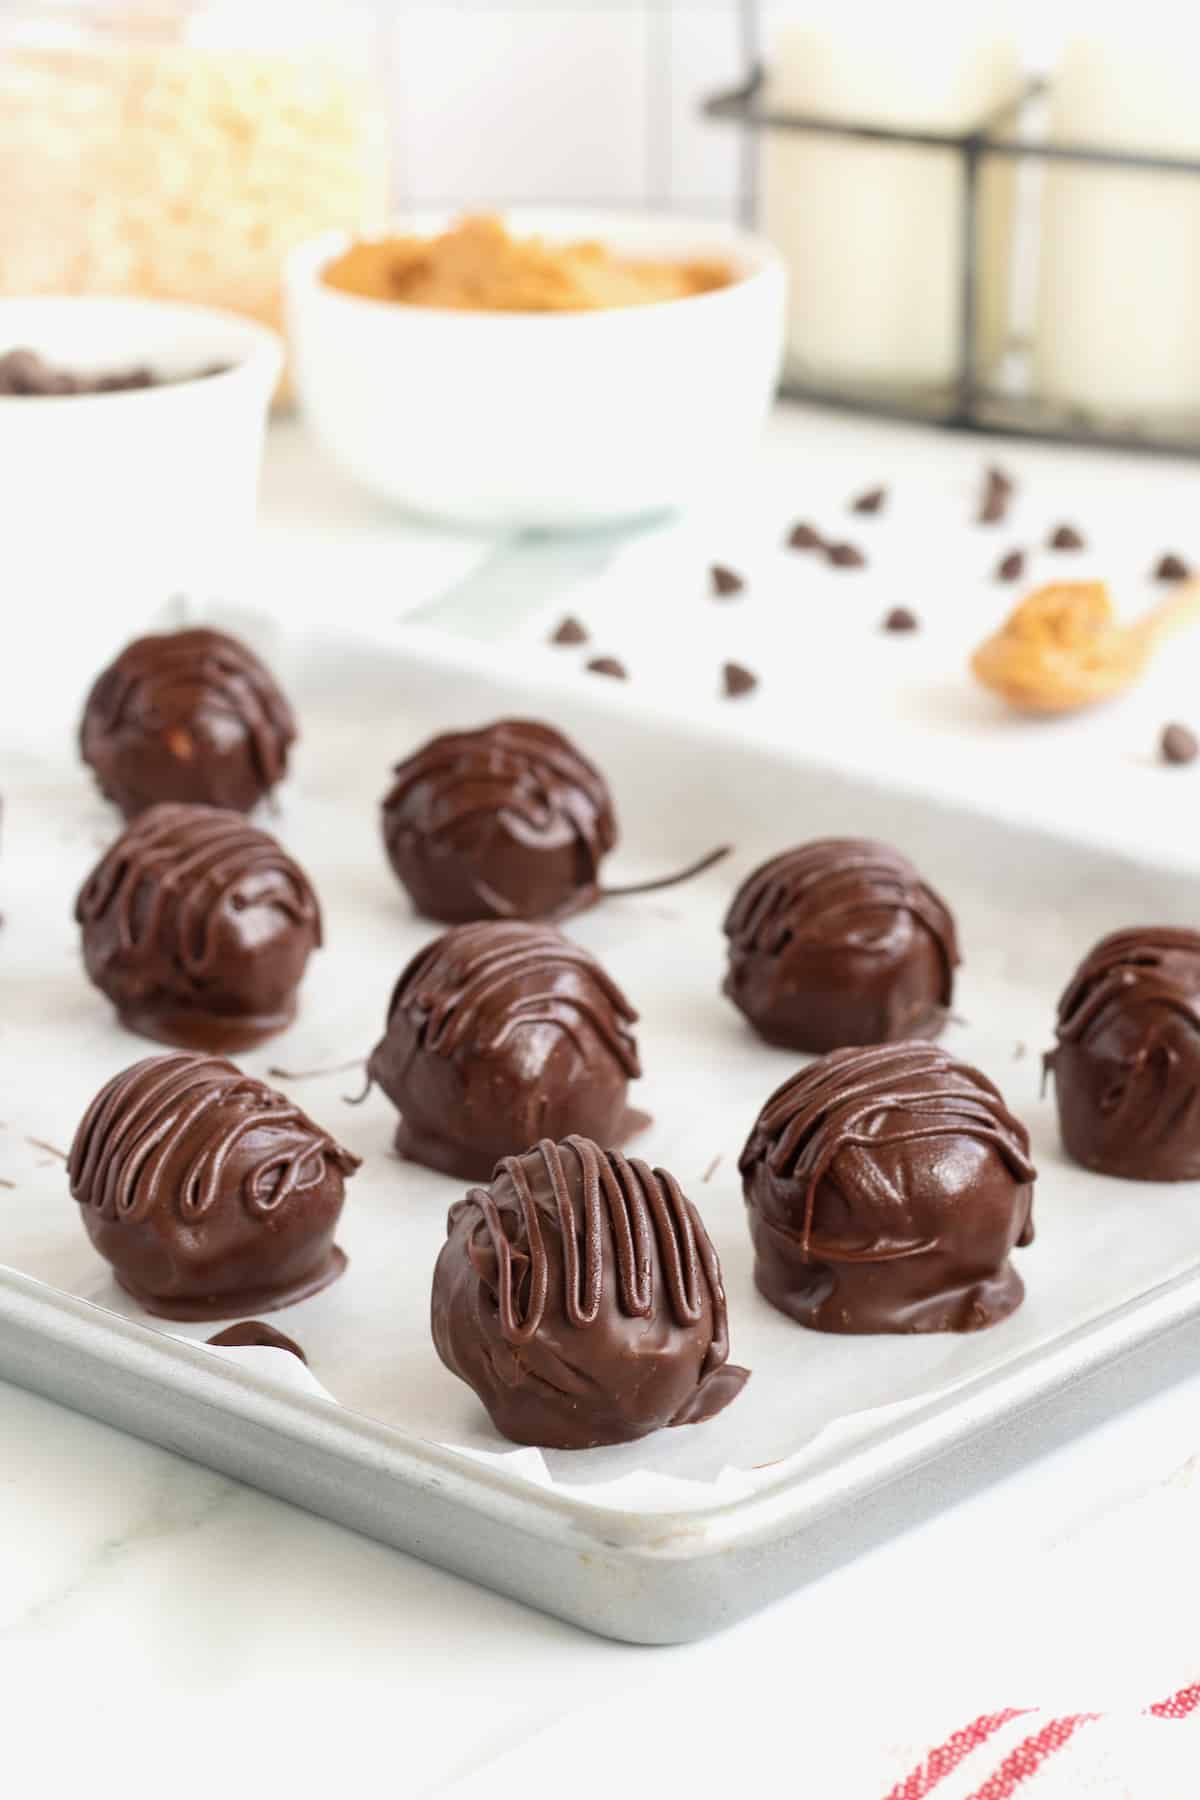
How to Make Chocolate Peanut Butter Balls
- First, in a large bowl, stir together the peanut butter, butter, powdered sugar and cereal until well combined. Form mixture into 1-inch balls with your hands.
- It will be sticky at first, but just keep rolling the mixture between the palm of your hands until it holds together in a ball shape. Coat your hands with non-stick cooking spray, if necessary.
- Place on a parchment-lined baking sheet.
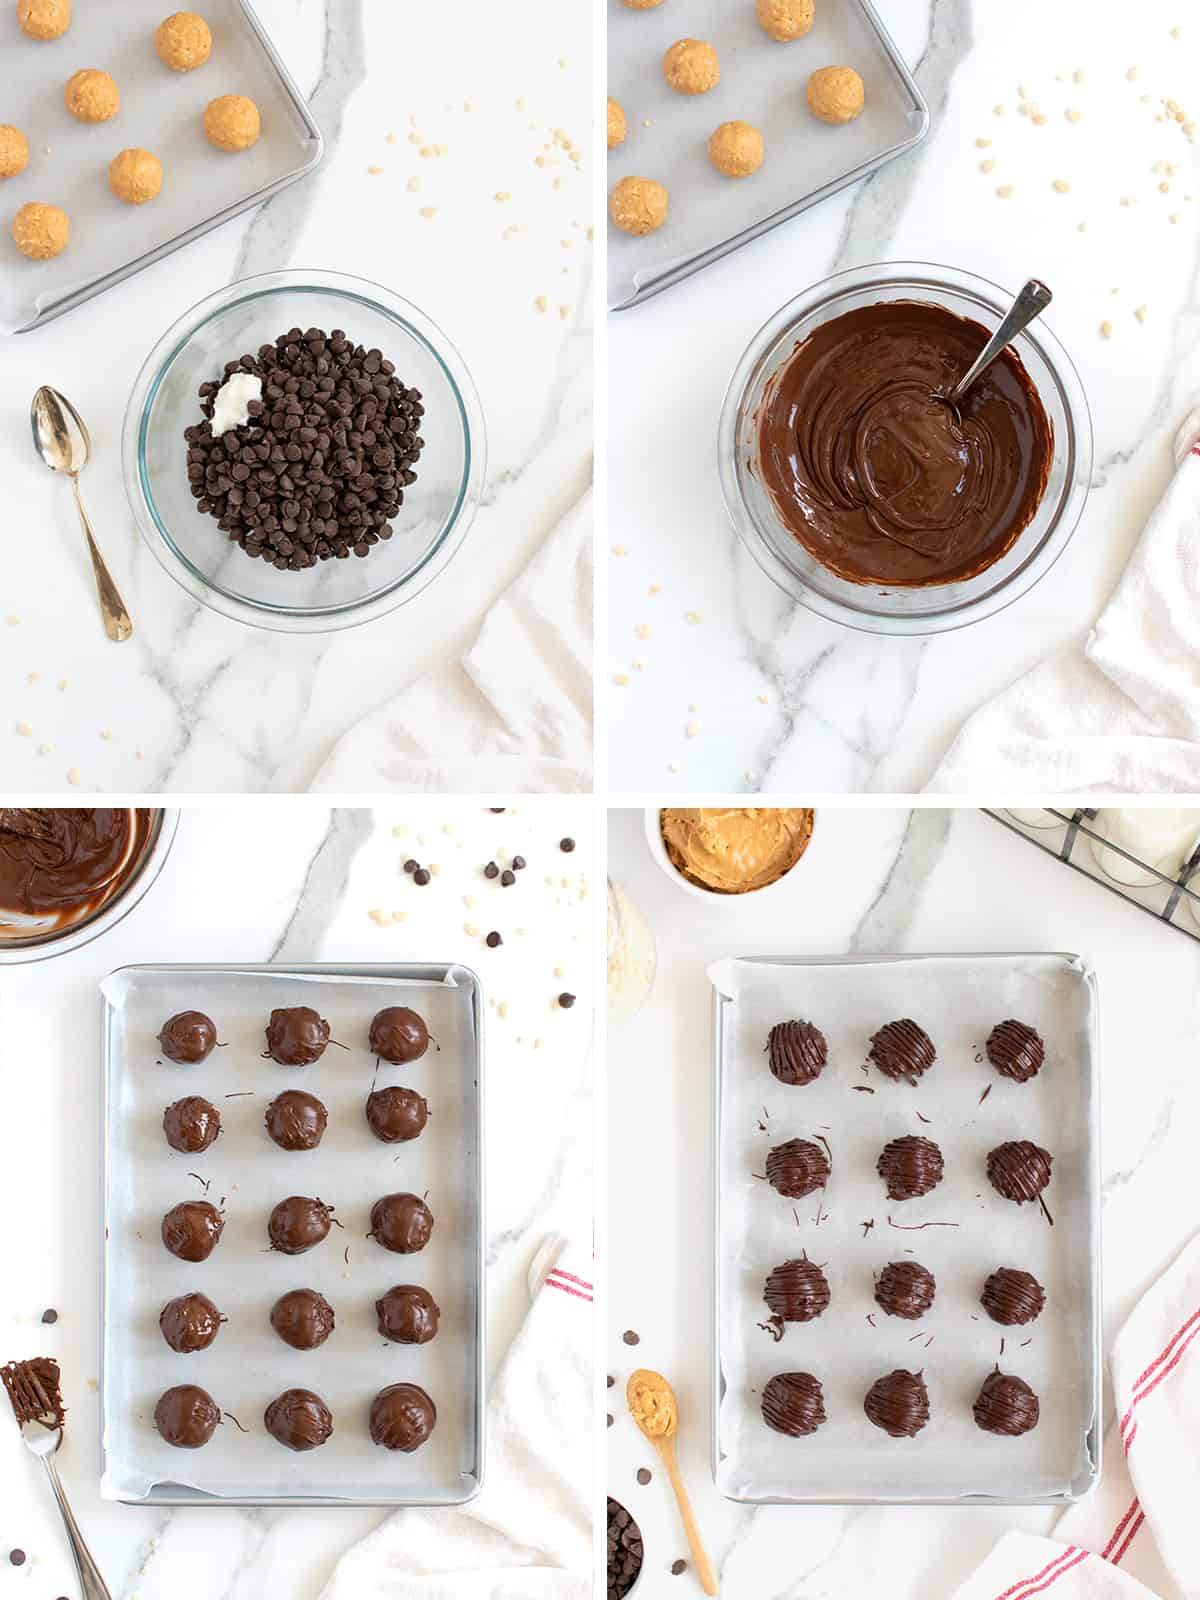
- Next, in a medium microwave-safe bowl, melt the chocolate chips with 2 teaspoons oil for 60 seconds in the microwave and then stir continuously until completely melted and smooth. Microwave an additional 30 seconds, if necessary.
- Drop peanut butter balls, one at a time, into the melted chocolate. Using a fork, roll the peanut butter ball to coat completely in the chocolate and gently lift to let excess chocolate drip back into the bowl. Transfer back to the parchment-lined baking sheet.
- Repeat with remaining peanut butter balls until they are all coated. Then drizzle each coated peanut butter ball with some of the remaining melted chocolate for a decorative touch.
- Let coated peanut butter balls set until coating is completely dry. Store in an airtight container at room temperature or in the refrigerator or freezer.
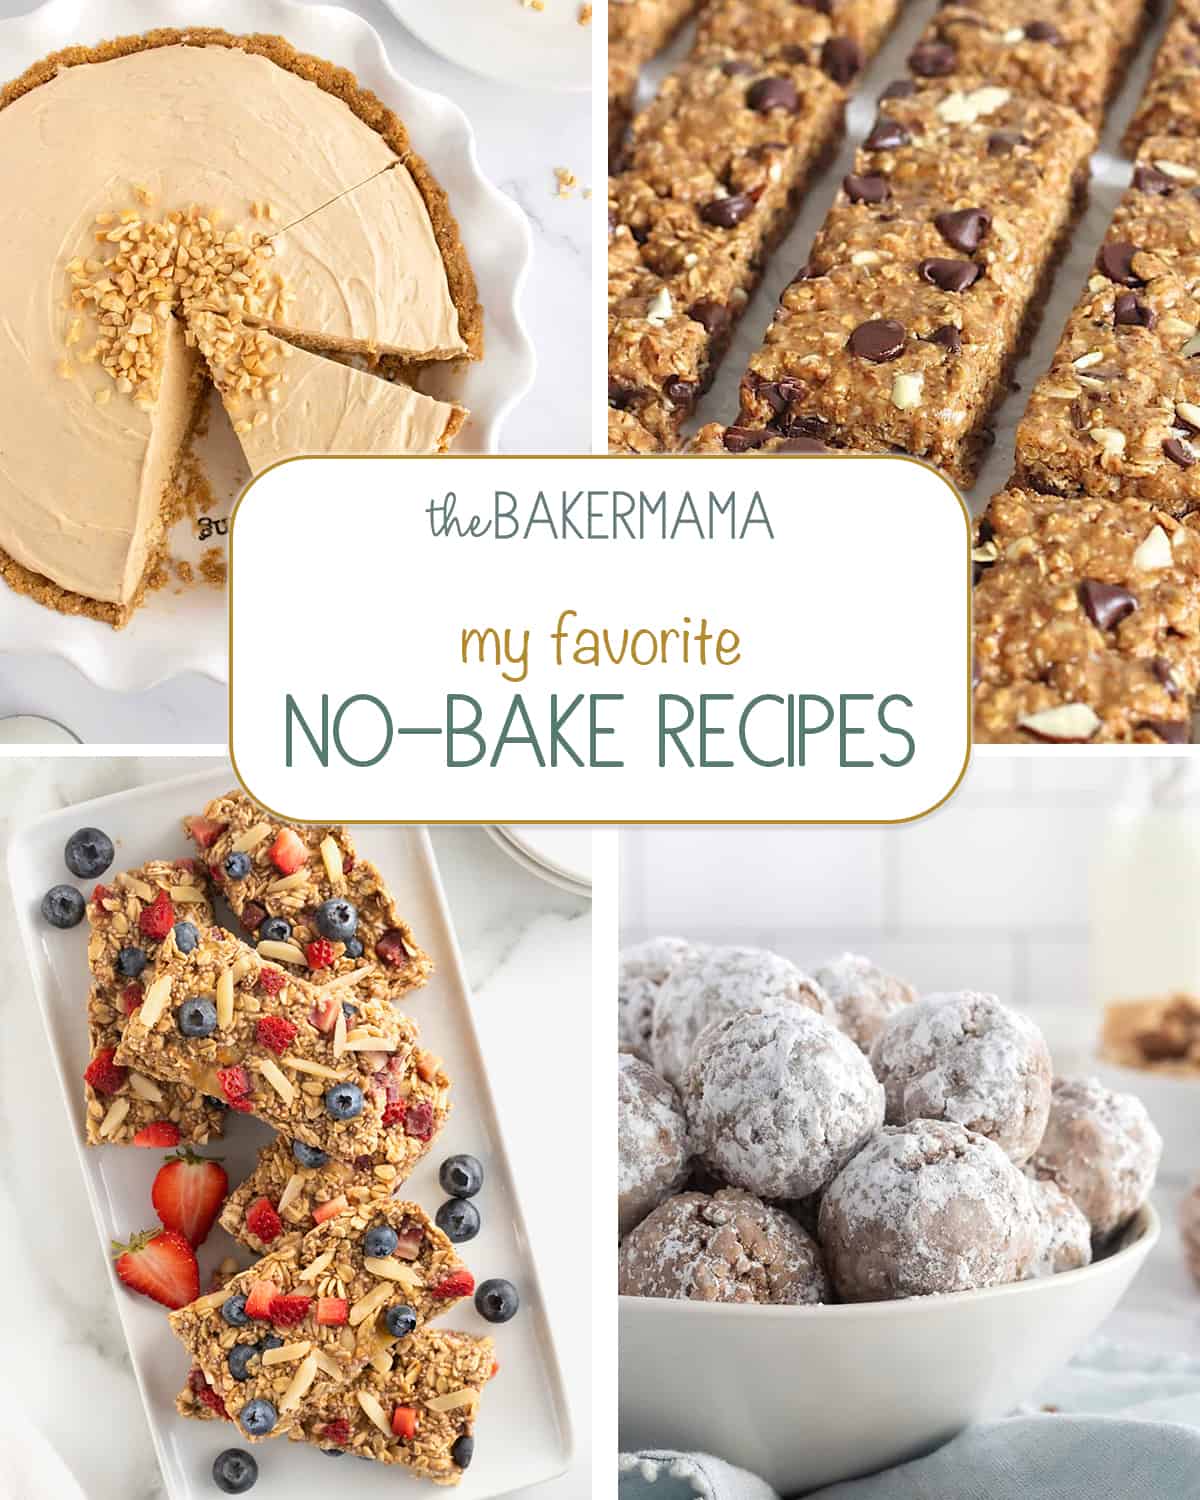
More of My Favorite No-Bake Recipes
From nutritious energy bites and hearty granola to dreamy and decadent icebox pies, my Favorite No-Bake Recipes leave nothing out but the oven. Skip the heat and enjoy these delicious no-bake eats!
More No-Bake Balls and Bites
- Oreo Cake Balls: Vanilla cake mixed with crushed Oreo cookies and covered in white chocolate and topped with cookies and cream sprinkles. They will sweeten any celebration!
- No-Bake Pumpkin Pie Balls: Turn leftover store-bought pumpkin pie into bite-sized heaven. They’re a whole new way to enjoy pumpkin pie!
- No-Bake Monster Cookie Balls: A sweet bite-sized treat that’s easy to make and tastes just like everyone’s favorite monster cookie!
- Muddy Buddy Bites: All the crunchy, peanut-buttery goodness without all the mess. You’ll have a ball with these delicious treats!
If you make these Chocolate Peanut Butter Balls, be sure to snap a picture and share it with me or tag me on Instagram @thebakermama so I can see.  I love seeing how inspired and creative y’all get with the recipes I share. Enjoy!
xoxo,


Chocolate Peanut Butter Balls
- Prep Time: 20
- Cook Time: 2
- Total Time: 22 minutes
- Yield: 40
Description
Crunchy peanut butter and crispy cereal inside a chocolate shell make these Chocolate Peanut Butter Balls one scrumptious holiday favorite we crave year ’round!
Ingredients
- 2 cups crunchy peanut butter (no-stir)
- 1/2 cup butter, softened
- 2 cups powdered sugar
- 3 cups Rice Krispies cereal
- 2 cups semi‐sweet chocolate chips
- 2 teaspoons canola or coconut oil
Instructions
- In a large bowl, stir together the peanut butter, butter, powdered sugar and cereal until well combined.
- Form mixture into 1-inch balls with your hands. It will be sticky at first, but just keep rolling the mixture between the palm of your hands until it holds together in a ball shape. Coat your hands with non-stick cooking spray, if necessary. Place on a parchment-lined baking sheet.
- In a medium microwave-safe bowl, melt the chocolate chips with 2 teaspoons oil for 60 seconds in the microwave and then stir continuously until completely melted and smooth. Microwave an additional 30 seconds, if necessary.
- Drop peanut butter balls, one at a time, into the melted chocolate. Using a fork, roll the peanut butter ball to coat completely in the chocolate and gently lift to let excess chocolate drip back into the bowl. Transfer back to the parchment-lined baking sheet. Repeat with remaining peanut butter balls until they are all coated.
- Drizzle each coated peanut butter ball with some of the remaining melted chocolate for a decorative touch.
- Let coated peanut butter balls set until coating is completely dry.
- Store in an airtight container at room temperature or in the refrigerator or freezer.
The dough was so sticky it was almost impossible to roll. I ended up washing half of it down the drain because it stuck to my hands. I think it would be better to chill it before rolling. Also, you should specify what type of peanut butter you are using – natural or one where the oil doesn’t separate.
Hi, Amy! I’m sorry you had such trouble! I would suggest, that if your hands are getting too much of the mixture on them, to spray your hands with non-stick cooking spray prior to rolling the balls. That should definitely help. I don’t specify peanut butter type, because I haven’t found a peanut butter that doesn’t work. BUT if you’re using a natural peanut butter that is not well combined, it could cause problems. I use natural peanut butter but opt for the no-stir kind so I don’t have to spend time mixing the separated oils beforehand.