
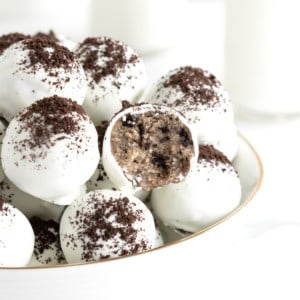
Sweeten any celebration with these irresistible Oreo Cake Balls! Vanilla cake is mixed with crushed Oreo cookies then covered in vanilla candy coating and topped with more crushed cookies. Amaze-balls!

The Best Oreo Cake Balls Recipe
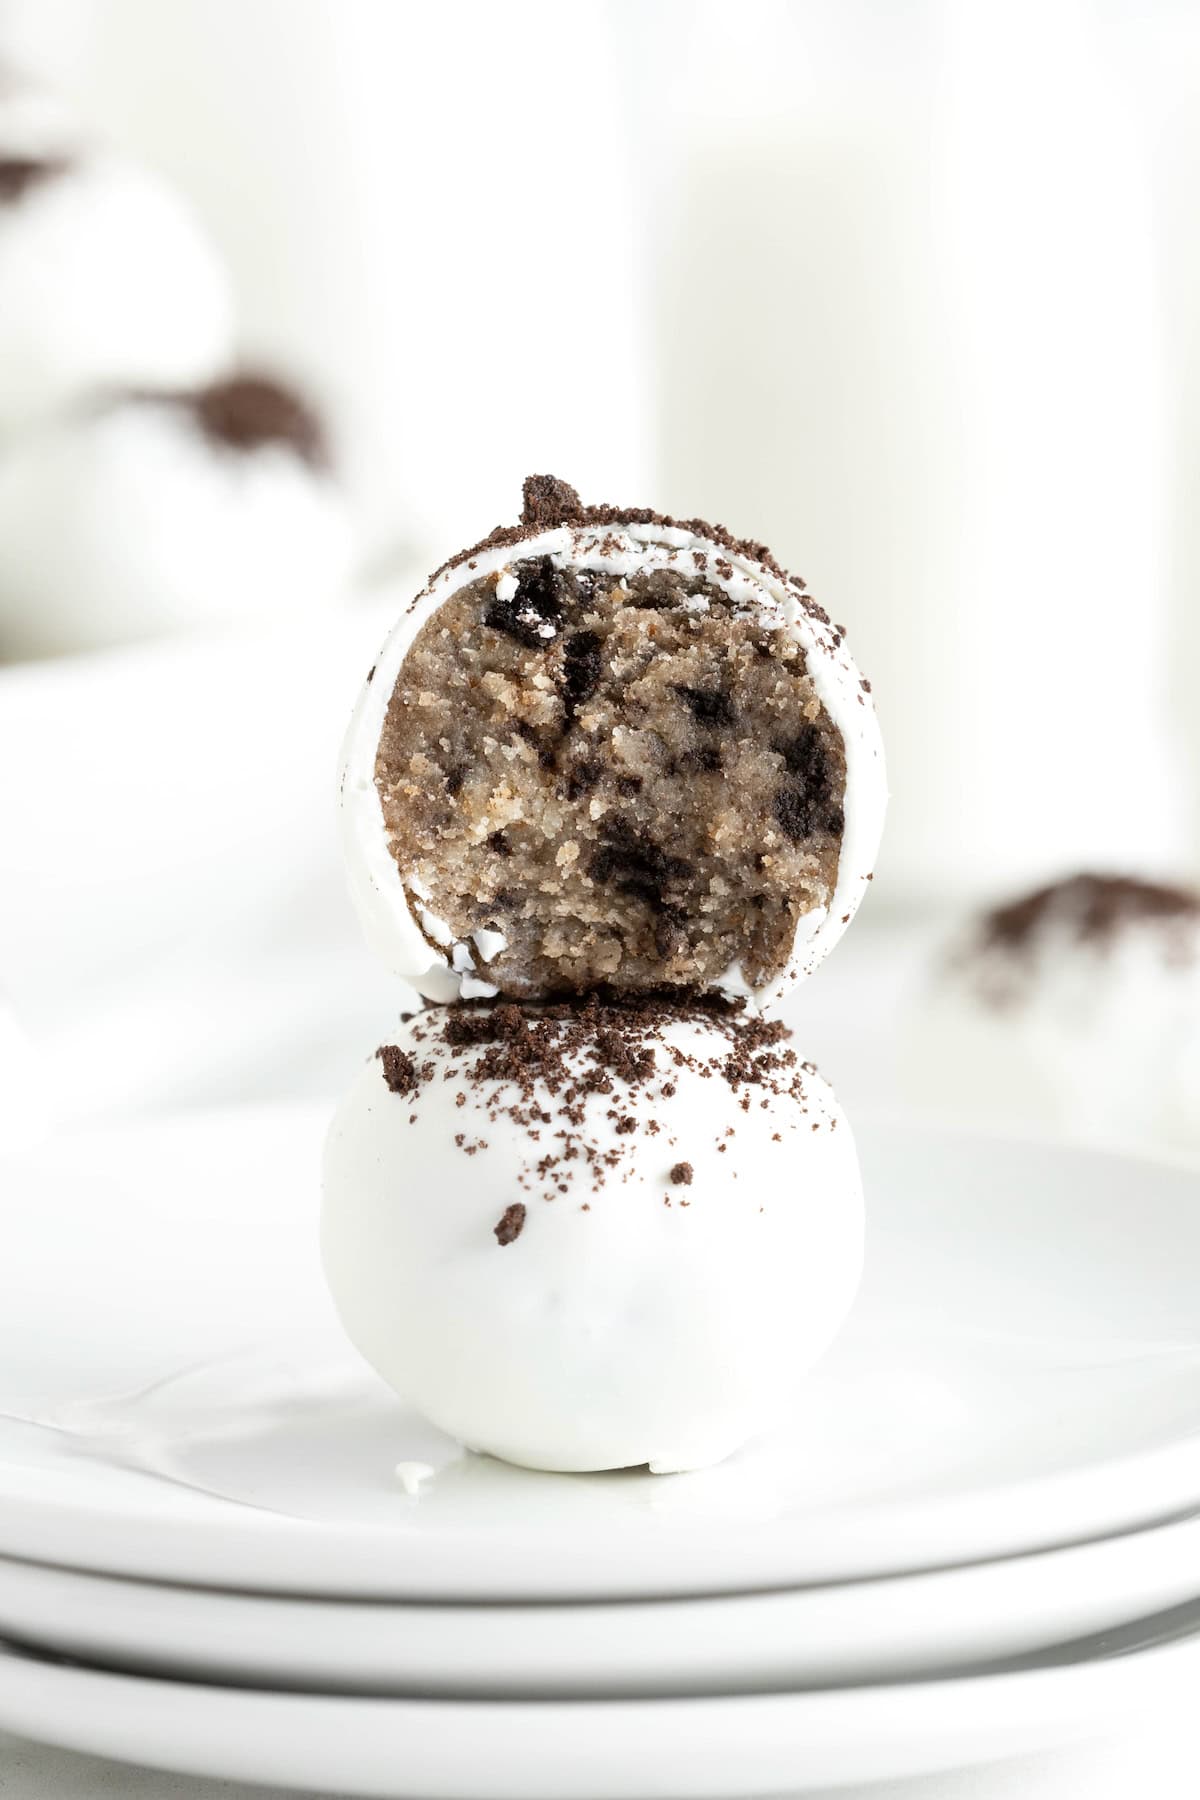
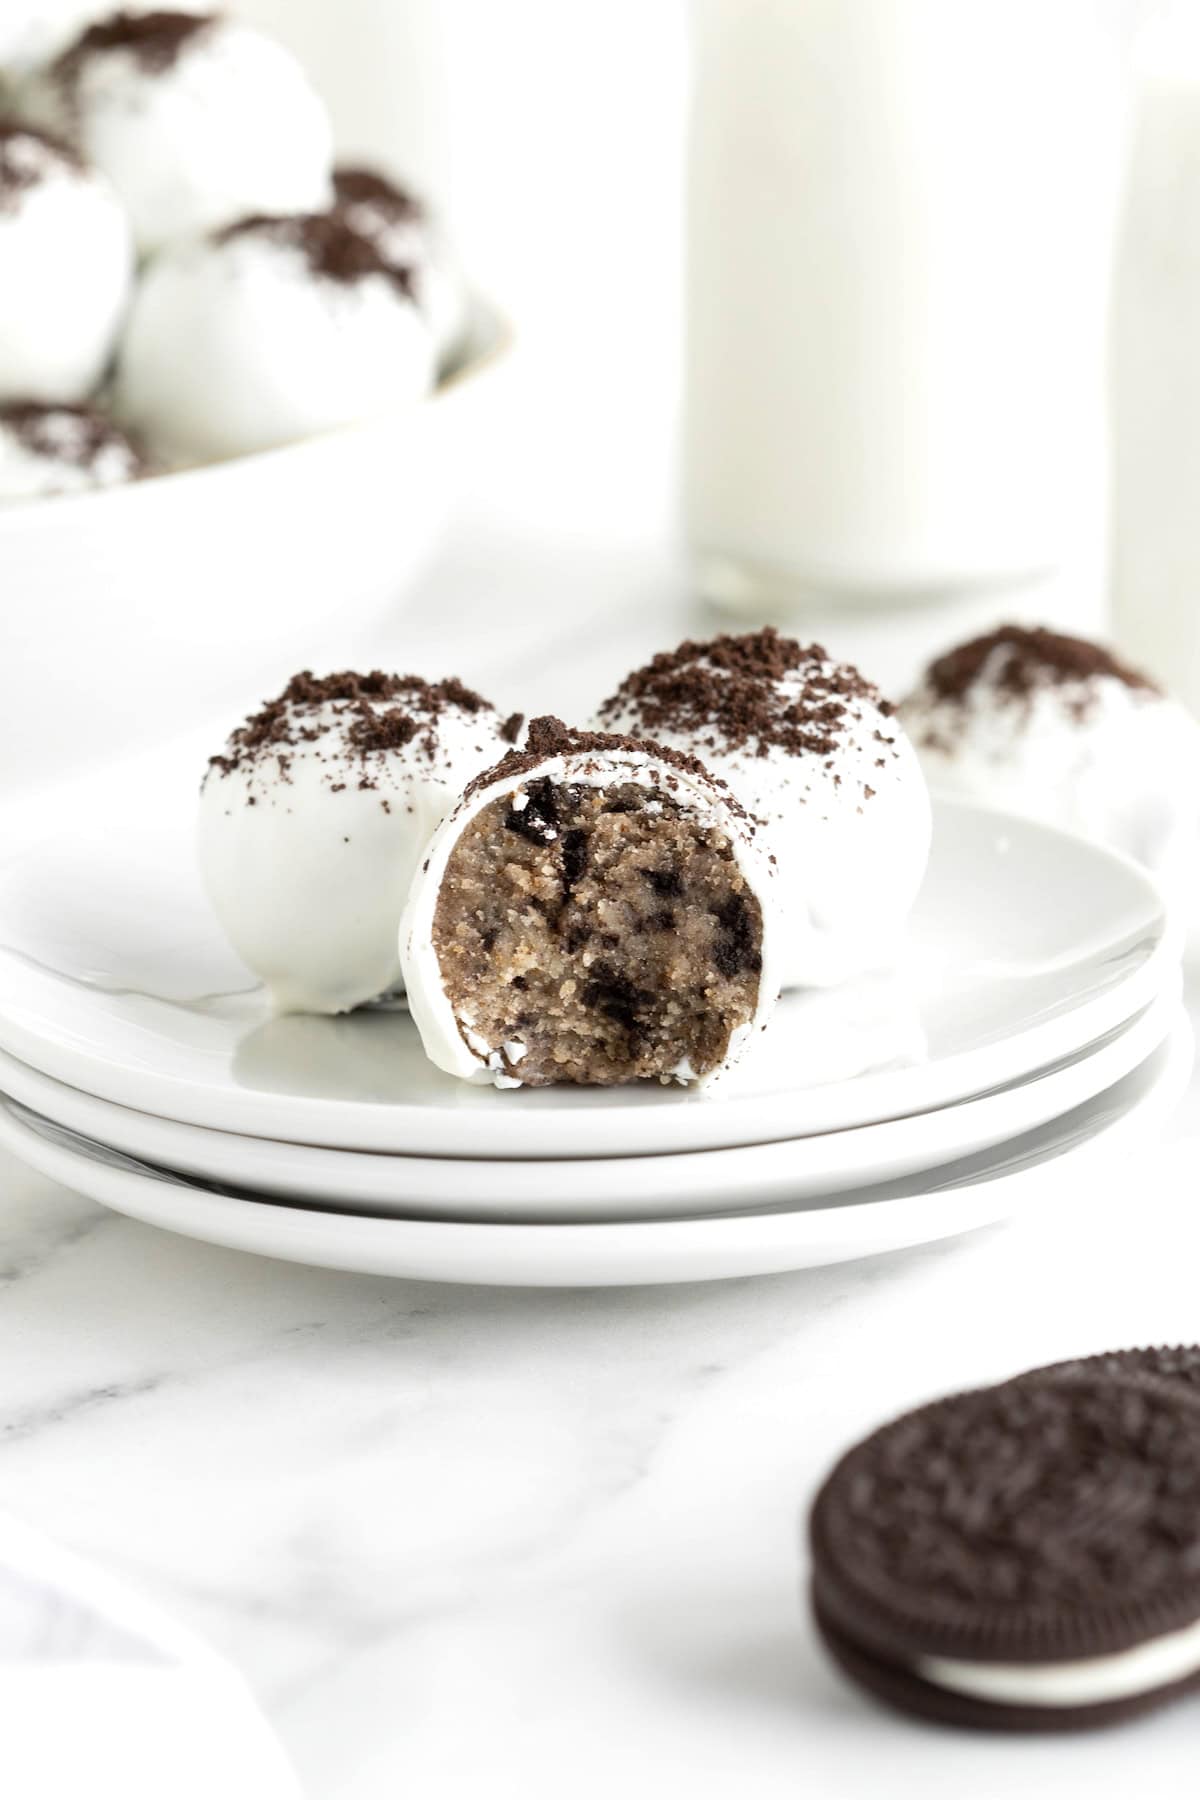
The tender cake. The Oreo cookie crunch. The sweet white chocolate vanilla coating. So much yum going on in these little bite-sized Oreo Cookie Cake Balls! I’ve been making them for years and they’re always the star of the dessert options at barbecues, baby showers and birthday parties.
Every time I make these, they’re a HUGE hit! Rave reviews. People grabbing them by the handfuls, sneaking them into their pockets as they walk out the door, and literally texting me on the their way home to get the recipe. They’re just that good!
I know a lot of people are so intimidated to make cake balls, but shouldn’t be. They’re actually pretty easy to make and the more you make them the more you realize just how easy these Oreo truffles are. So worth the little effort needed, especially when some bakeries charge like $3.50 each for Oreo cake pops. Craziness!
What are Oreo Cake Balls Made of?
Oreo cookies are crushed (either in a food processor or crush them with a rolling pin) and mixed with a baked vanilla cake and some vanilla frosting before being rolled into bite-sized balls and placed in the refrigerator or freezer to harden before being dipped in candy coating and topped with cookies and cream sprinkles.
Oreo Cake Balls Ingredients and Supplies
(see recipe card at the bottom of this post for measurements and details)
Ingredients:
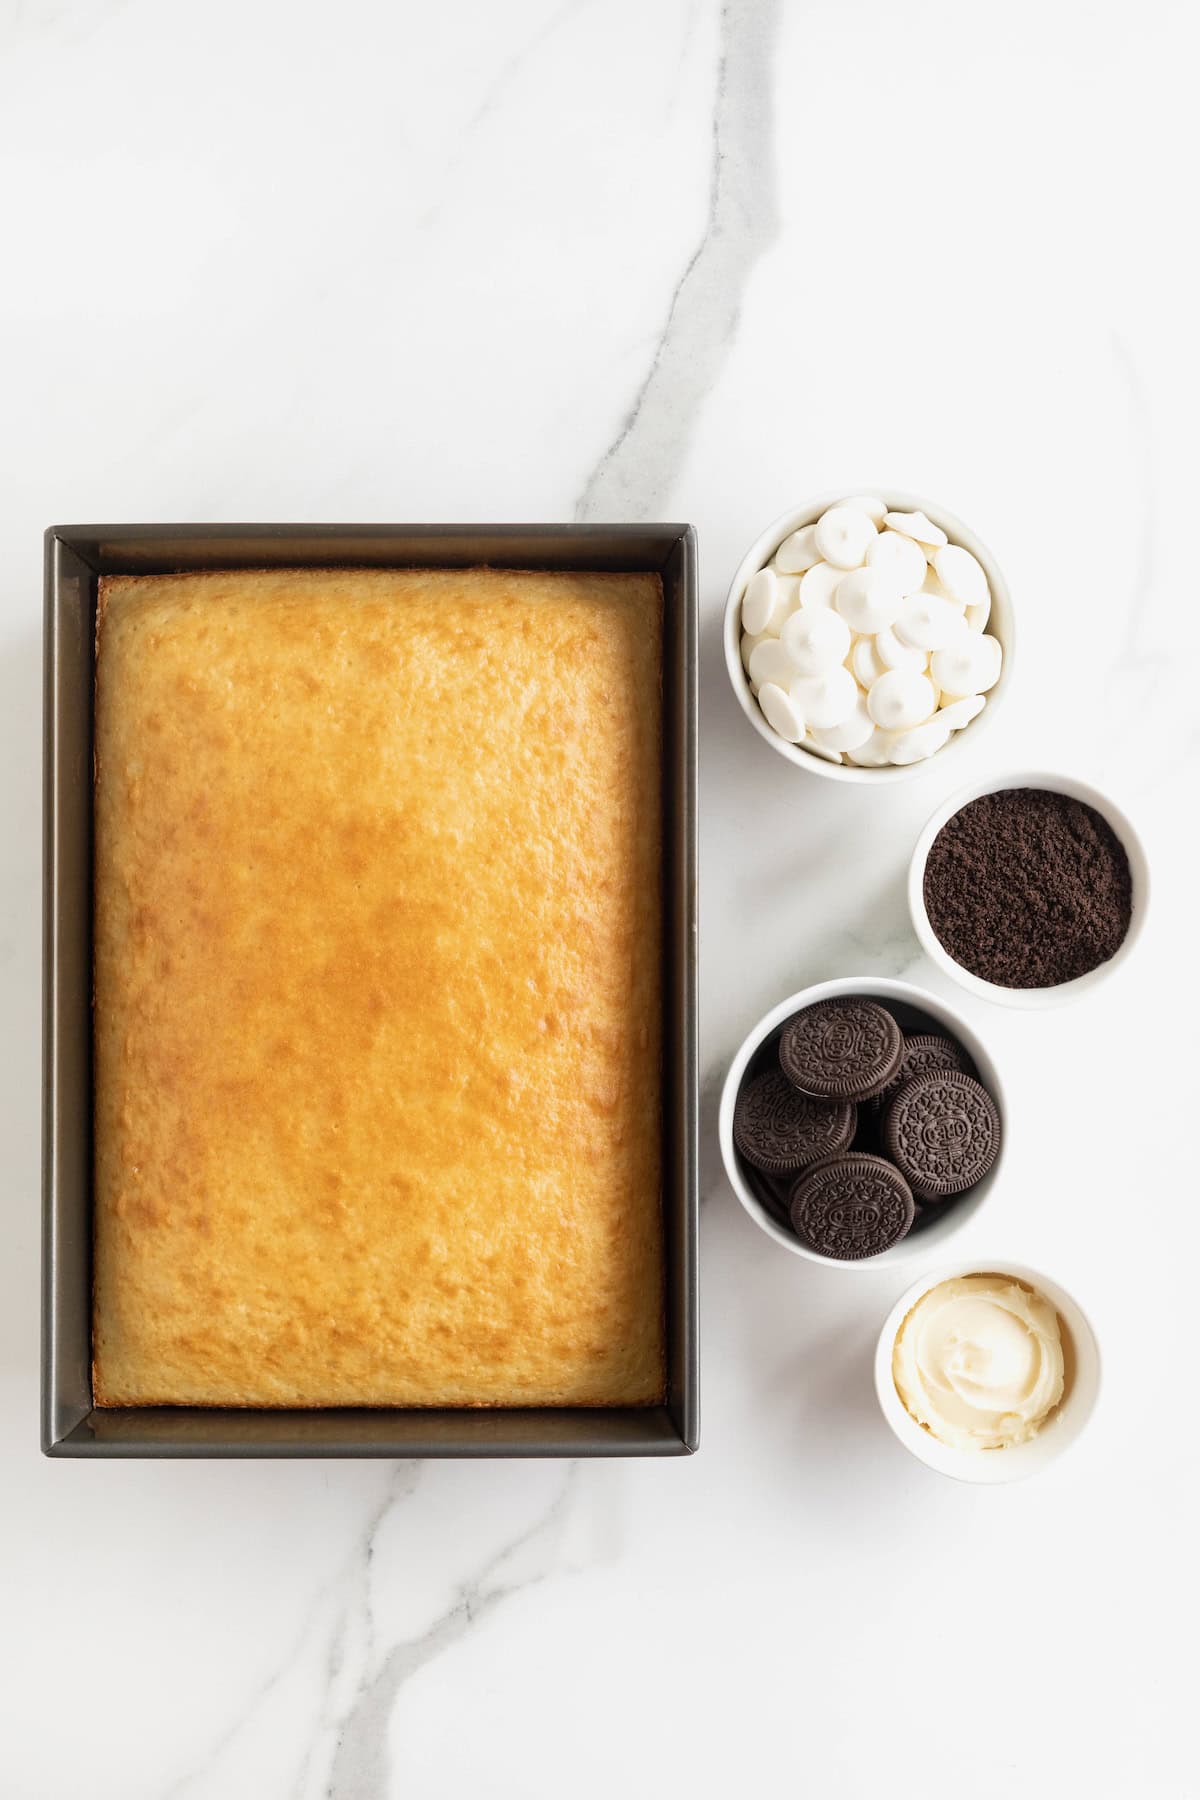
- Vanilla cake mix (baked as directed on box for a 13 x 9-inch cake) – a vanilla cake mix complements the Oreos so well, but you could use any flavor cake mix, if you’d like to switch it up. For example, a chocolate cake would add extra chocolate or a white cake would omit that extra vanilla flavor and still complement the Oreos nicely.
- Vanilla frosting – you could use regular vanilla cake frosting or a whipped vanilla frosting. You could also switch up the flavor of the frosting if you’d like. A chocolate frosting for more chocolate flavor or a white frosting for less vanilla, would work great!
- Oreo cookies – you could use regular Oreos or Double Stuf Oreos if you like that extra fondant flavor! The recipe features regular Oreo cookies, but you could switch up the cookies and replace the Oreos with Nutter Butter cookies or Chips Ahoy! cookies for a different twist.
- Vanilla candy coating or white candy melts – I use a vanilla candy coating most often, but I have used a chocolate candy coating to coat these Oreo Cake Balls and everyone loves them just as much! If you can’t find candy coating or candy melts, you could melt 2 cups white chocolate chips with 2 teaspoons of canola or coconut oil to create your own coating. The white chocolate chip coating won’t harden as well as the candy coating, but it still works nicely as a coating for the cake balls.
Supplies:
- 9 x 13-inch cake pan
- Electric mixer with paddle attachment – if you don’t have an electric mixer, you could use a hand mixer.
- Baking sheets
- Parchment paper or wax paper
- Shallow bowl
How to Make Oreo Cake Balls
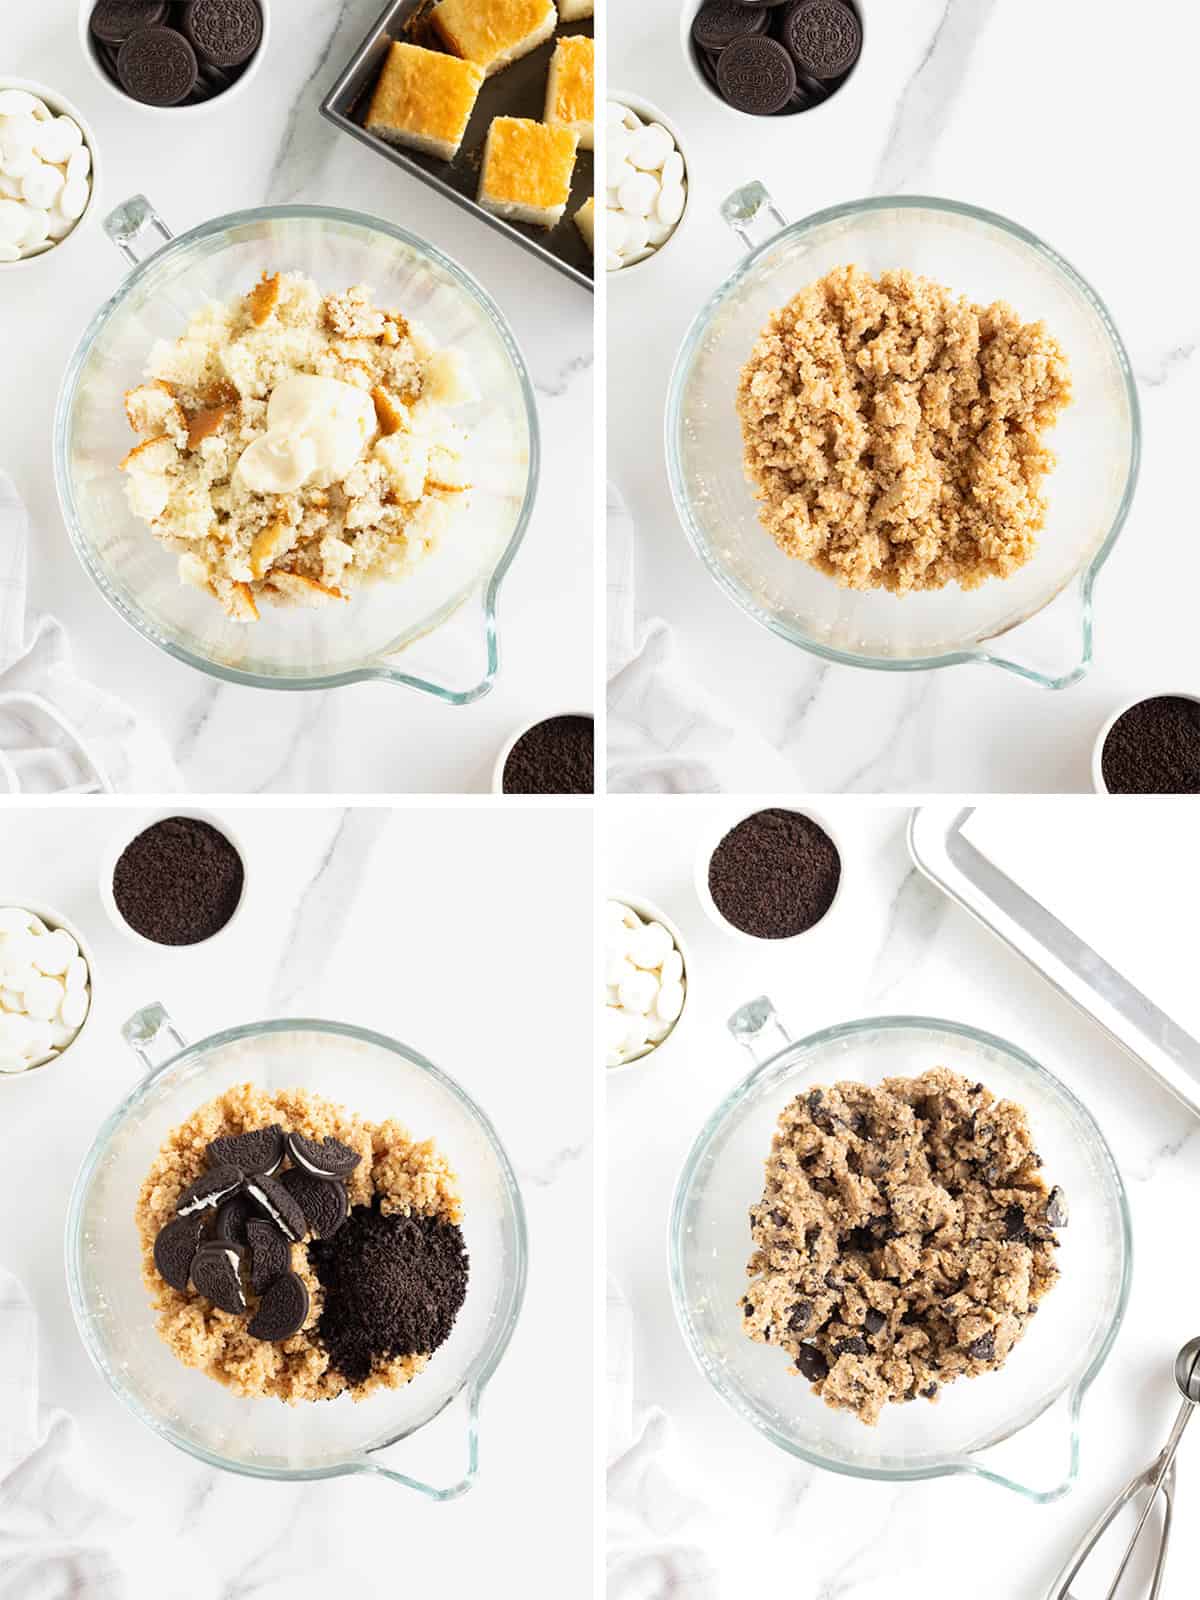
- Bake cake mix according to package directions for a 9 x 13-inch cake (using additional ingredients called for on the box such as oil, water and eggs). Let cake cool completely.
- In the bowl of an electric mixer fitted with the paddle attachment, crumble in the cooled cake along with 1/4 cup frosting. Beat on medium speed until cake starts to come together.
- Add 5 Oreos (broken in half) and 5 Oreos (finely crushed). Beat on low speed until Oreos are mixed thoroughly throughout the cake mixture.
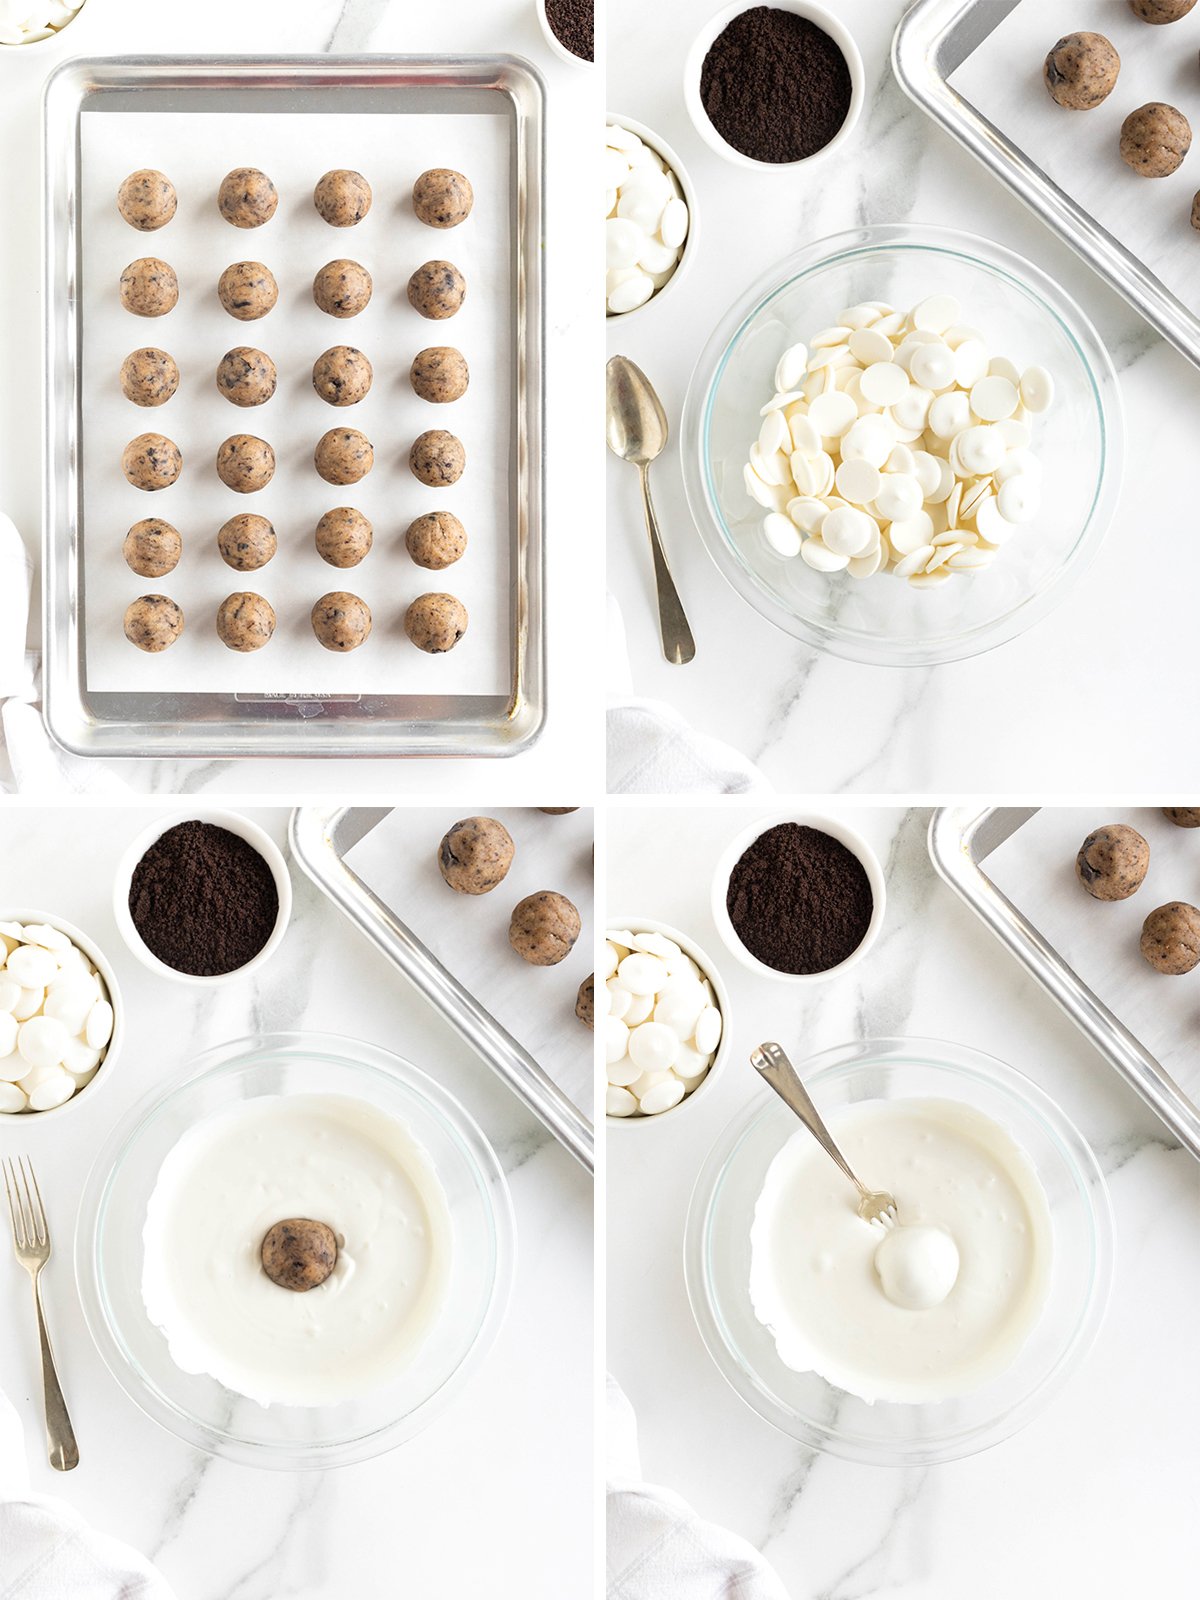
- Roll mixture into 2-tablespoon sized balls and place on a parchment-lined baking sheet. You should get about 35-40 cake balls.
- Roll mixture into 2-tablespoon sized balls and place on a parchment-lined baking sheet. You should get about 35-40 cake balls.
- Place baking sheet (filled with cake balls) in the refrigerator for at least 1 hour or in the freezer for about 15 minutes to harden.
- Melt one package of candy melts at a time according to package directions in a shallow bowl. Cover another cookie sheet with parchment paper. Finely crush the remaining 5 Oreo cookies.
- Remove cake balls from the refrigerator (or freezer) and begin to coat them one-by-one in the melted candy coating.
- Using a fork, gently roll each cake ball in the melted candy coating trying not to touch the fork to the cake. You want there to be candy coating between the cake ball and the fork at all times to maintain a smooth coating and keep the cake ball’s round shape.
- Remove and let as much excess candy coating drip off the fork before placing on the prepared parchment-lined baking sheet.
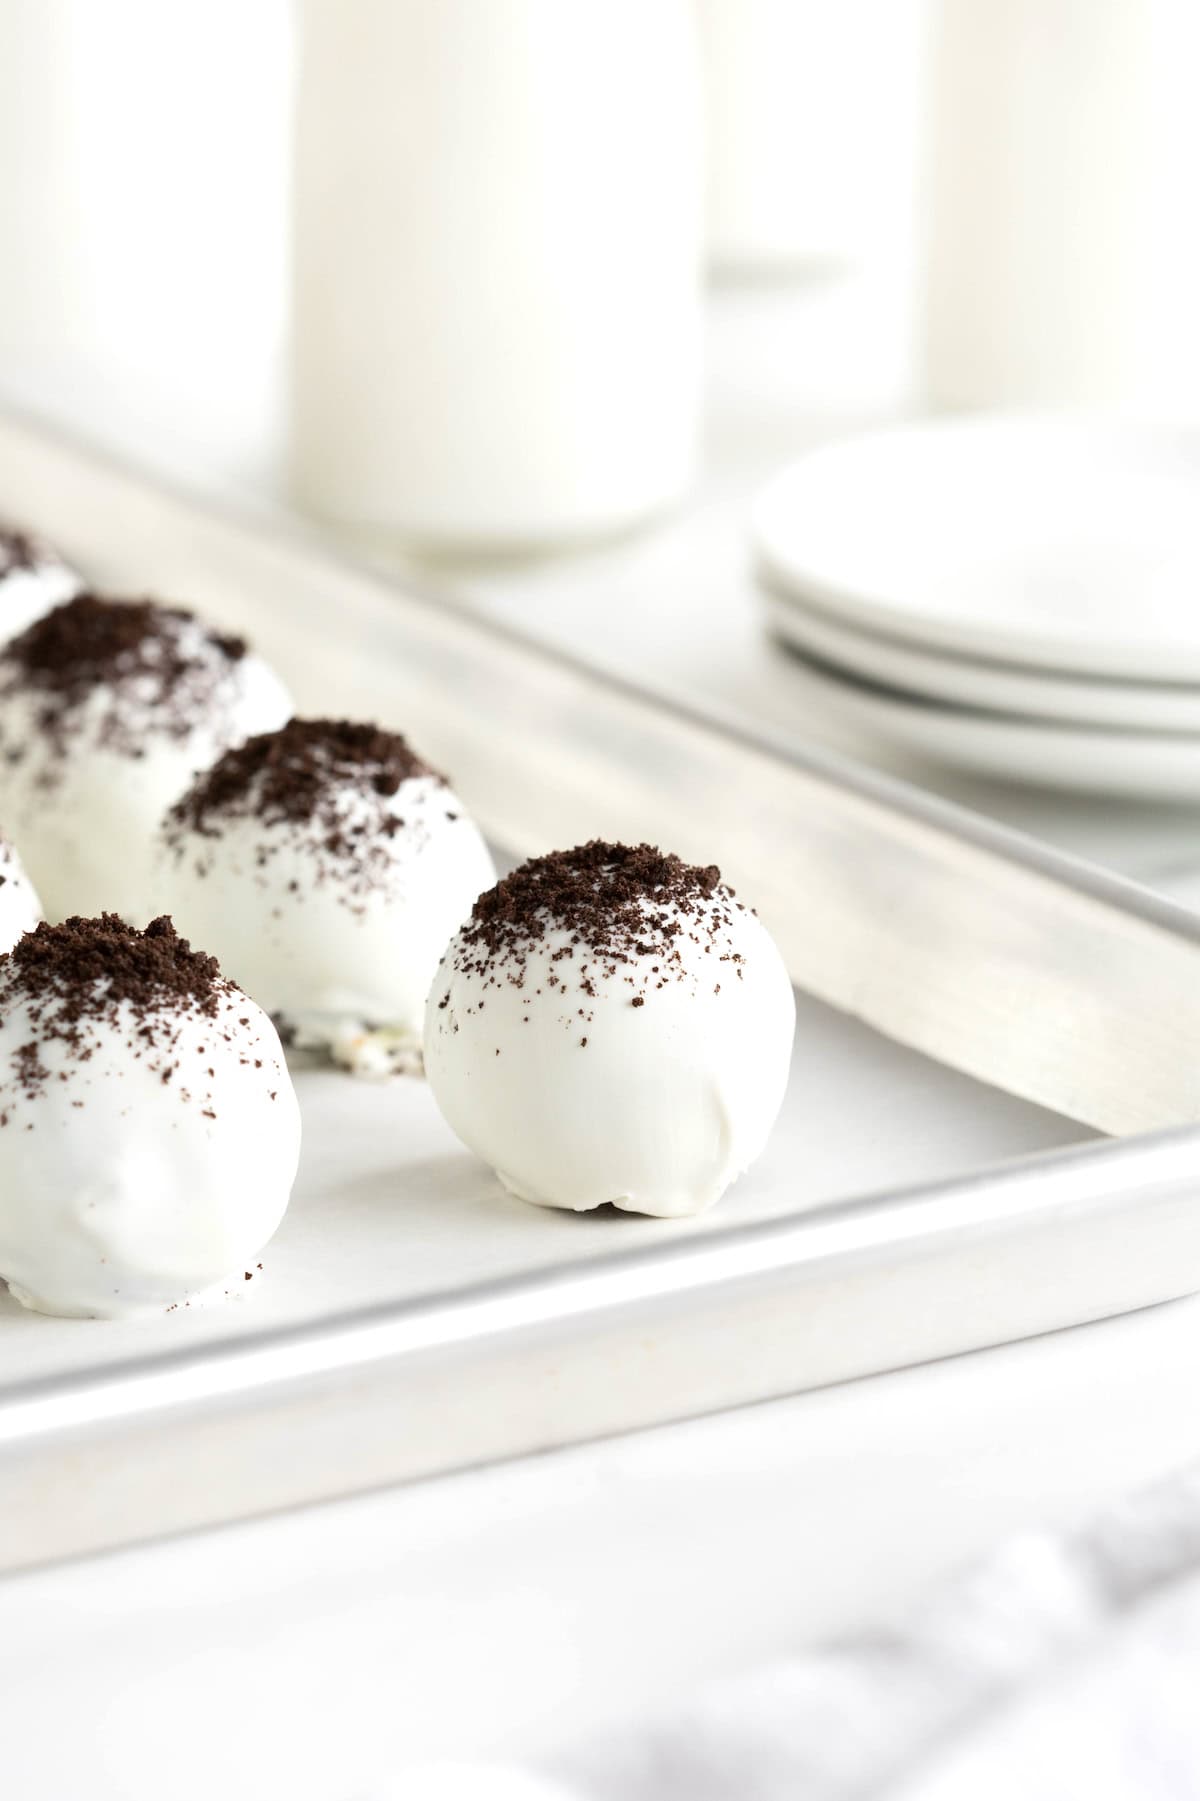
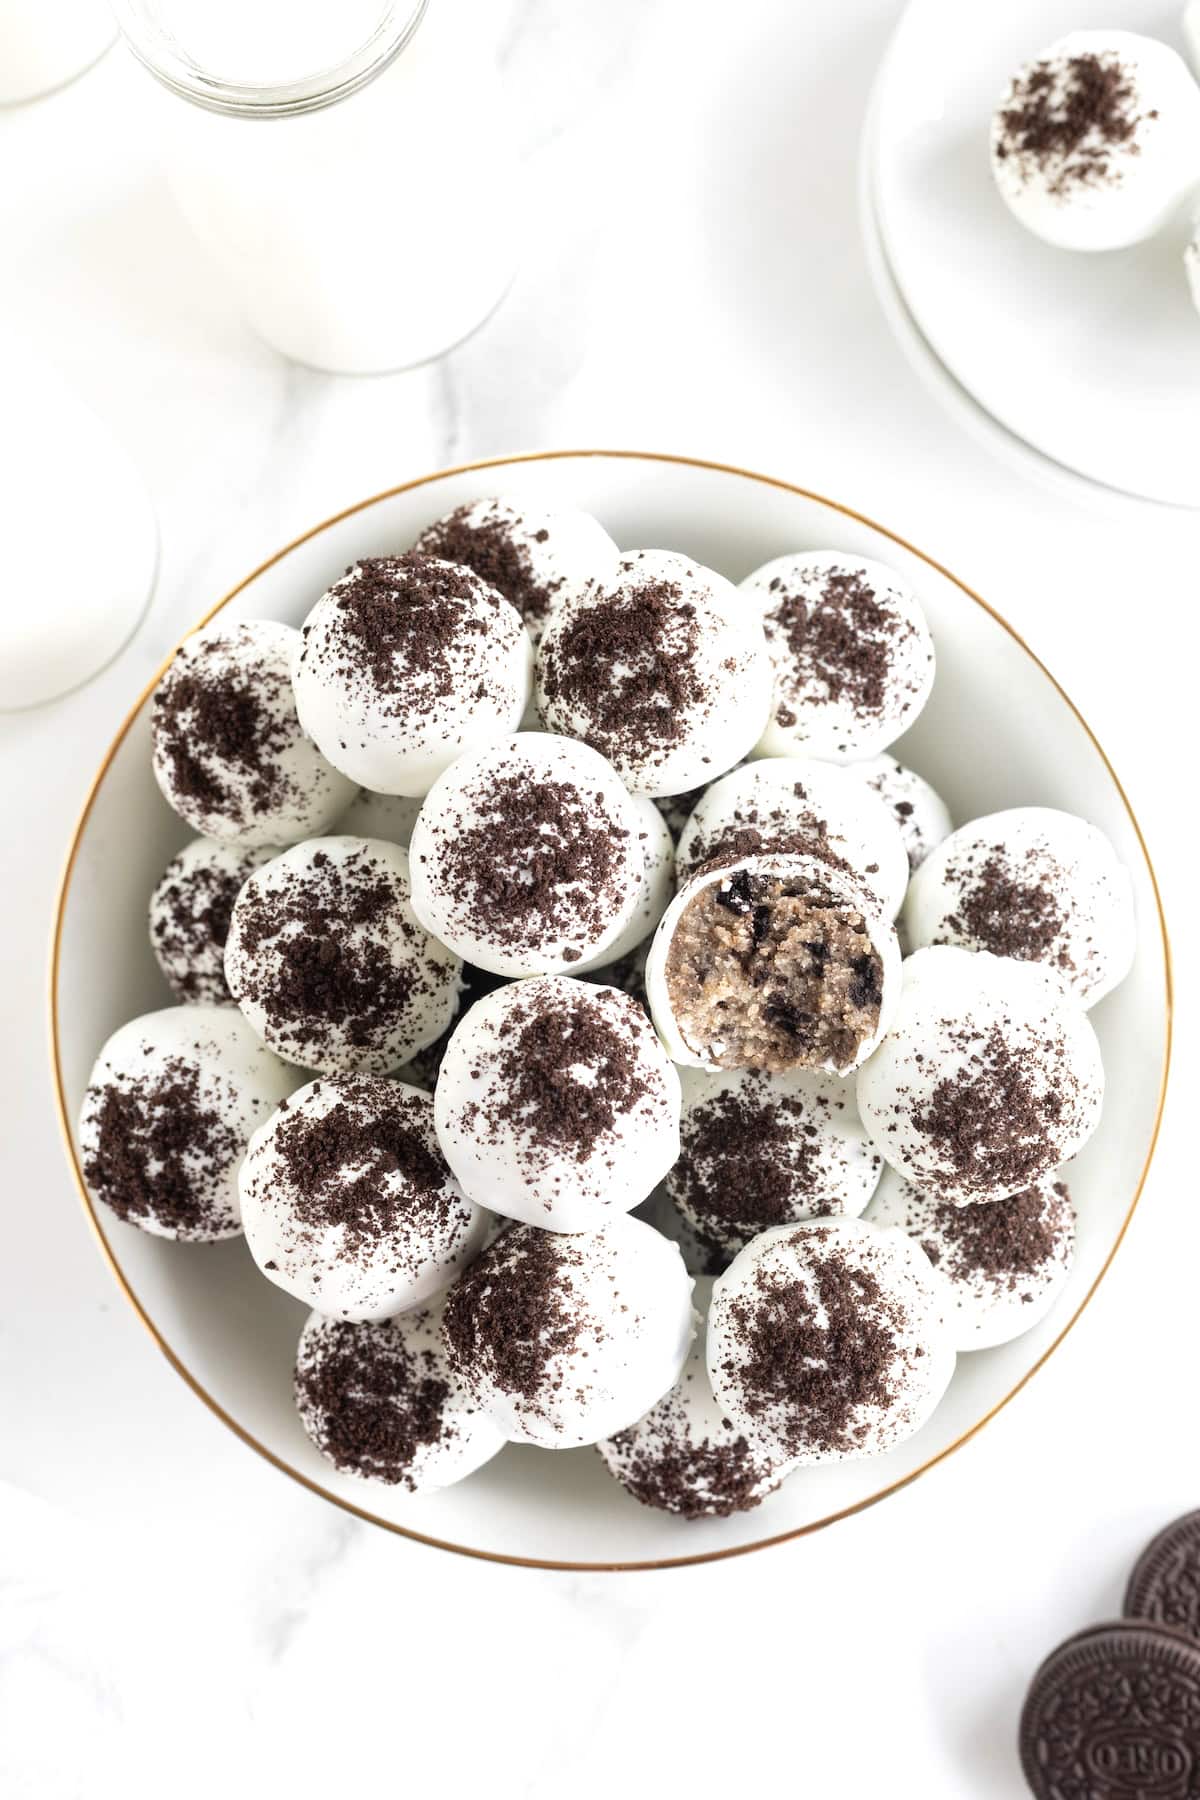
- Immediately sprinkle each coated cake ball with some of the crushed Oreos.
- Allow cake balls to harden completely and then break off any excess candy coating that may have gathered around the bottom of the ball.

Helpful Tips for Making Oreo Cake Balls
The keys to coating the cake balls smoothly: make sure the candy coating is melted perfectly smooth (according to package directions) and that the cake balls are very cold so they don’t break apart as they’re being dipped and rolled around in the warm coating.
I always use a fork to dip and coat my cake balls so the excess candy coating drips back into the bowl and less is left to gather around the bottom of the ball on parchment paper to set.
It’s okay to have a little of the coating harden around the bottom of the cake ball because once it sets you can easily break it off.
Another thing that sets my cake ball recipe apart from other recipes I’ve tried is that I use just 1/4 cup frosting to bind the cake together instead of a whole container of frosting. I’ve found that using just a small amount of frosting still brings it all together to easily form into balls while maintaining a tender cakey texture.
Why are My Oreo Cake Balls Falling Apart?
The key to keeping things together is making sure your cake balls stay COLD until dipping.
More No-Bake Balls and Bites
- Oreo Cake Balls: Vanilla cake mixed with crushed Oreo cookies and covered in white chocolate and topped with cookies and cream sprinkles. They sweeten any celebration!
- No-Bake Pumpkin Pie Balls: Turn leftover store-bought pumpkin pie into bite-sized heaven. They’re a whole new way to enjoy pumpkin pie!
- No-Bake Monster Cookie Balls: A sweet bite-sized treat that’s easy to make and tastes just like everyone’s favorite monster cookie!
- Muddy Buddy Bites: All the crunchy, peanut-buttery goodness without all the mess. You’ll have a ball with these delicious treats!
- Chocolate Peanut Butter Balls: Crunchy peanut butter and crispy cereal inside a melted chocolate shell make these Chocolate Peanut Butter Balls one scrumptious holiday favorite we crave year ’round!
- No-Bake Energy Bites: Fuel your busy day with quick and delicious No-Bake Energy Bites. With peanut butter and dark chocolate chips, there’s no sacrificing taste when it comes to these healthy treats!
If you make these Oreo Cake Balls, be sure to snap a picture and share it with me or tag me on Instagram @thebakermama so I can see.  I love seeing how inspired and creative y’all get with the recipes I share. Enjoy!
xoxo,

Oreo Cake Balls Recipe
- Prep Time: 40 mins
- Chilling Time: 1 hour
- Cook Time: 30 mins
- Total Time: 1 hour 10 mins
- Yield: 35-40
- Category: Dessert
Description
Sweeten any celebration with these irresistible Oreo Cake Balls! Vanilla cake is mixed with crushed Oreo cookies then covered in vanilla candy coating and topped with more crushed cookies. Amaze-balls!
Ingredients
- 1 (15.25-ounce) box vanilla cake mix (baked as directed on box for a 13 x 9-inch cake)
- 1/4 cup vanilla frosting
- 15 Oreo cookies, divided
- 1 (16 ounce) package vanilla candy coating or 2 (10-ounce) bags white candy melts
Instructions
- Bake cake mix according to package directions for a 13 x 9-inch cake (using additional ingredients called for on the box such as oil, water and eggs). Let cake cool completely.
- In the bowl of an electric mixer fitted with the paddle attachment, crumble in the cooled cake along with 1/4 cup frosting. Beat on medium speed until cake starts to come together.
- Add 5 Oreos (broken in half) and 5 Oreos (finely crushed). Beat on low speed until Oreos are mixed thoroughly throughout the cake mixture.
- Roll mixture into 2-tablespoon sized balls and place on a parchment-lined baking sheet. You should get about 35-40 cake balls. Place baking sheet (filled with cake balls) in the refrigerator for at least 1 hour or in the freezer for about 15 minutes to harden.
- When you’re ready to coat the cake balls, melt one package of candy melts at a time according to package directions in a shallow bowl. Cover another cookie sheet with parchment paper. Finely crush the remaining 5 Oreos.
- Remove cake balls from the refrigerator (or freezer) and begin to coat them one-by-one in the melted candy coating.
- Using a fork, gently roll each cake ball in the melted candy coating trying not to touch the fork to the cake. You want there to be candy coating between the cake ball and the fork at all times to maintain a smooth coating and keep the cake ball’s round shape. Remove and let as much excess candy coating drip off the fork before placing on the prepared parchment-lined baking sheet.
- Immediately sprinkle each coated cake ball with some of the crushed Oreos.
- Allow cake balls to harden completely and then break off any excess candy coating that may have gathered around the bottom of the ball.
- Store cake balls in a sealed container in a cool, dry place.

i used to make these all the time and then I had health problems and so I had to look them up to see how to make them again so thank you for sharing the receipt
Hi Lynda! So glad you found them again ❤️ Thank you so much for sharing that with me, and I hope they bring back lots of sweet memories.
I am glad I found your website! How far can I make this ahead and keep in the fridge? Thanks!
Hi Maureen! I recommend storing them at room temperature for up to a week or in the refrigerators for up to 3 weeks. Enjoy!
Hi! Do you use just regular frosting to mix in with the batter?
Thanks!
Hi Stacy! Yes, you could use regular or whipped frosting. Enjoy!
HI! These are exactly what I’m looking for. I would like to put them on a stick. Do you know how they would hold up? Thanks!
Hi Andrea! They should hold up great since there’s only 1/4 cup frosting in the recipe, they aren’t too moist to dip on a stick. Enjoy!
How long should the balls warm up before dipping to prevent cracking?
Hi Kim! If they’re coming from the refrigerator or have been in the freezer for just 15 minutes, they should be great to coat right away. If they’re completely frozen, you’ll want them to defrost completely before coating. Hope this helps. Enjoy!
I am looking for the recipe that has peanut butter
Hi Nina! You can search peanut butter balls in my search engine and they should come right up. Here’s the link: https://thebakermama.com/recipes/healthy-5-ingredient-dark-chocolate-peanut-butter-balls/
Can you keep these made up and in the freezer? And then just pull out as needed?
Hi Debra! You certainly can and I do it often, but you do risk the chance of the coating cracking in the process. If you do, be sure to freeze them in an airtight container in single layers separated by parchment paper. When defrosting, set them out in a single layer on paper towels so the towel collects any condensation. Hope this helps. Enjoy!
Thank you very much!
[…] 9. Oreo Cake Balls […]
[…] Bekijk het recept hier. […]