
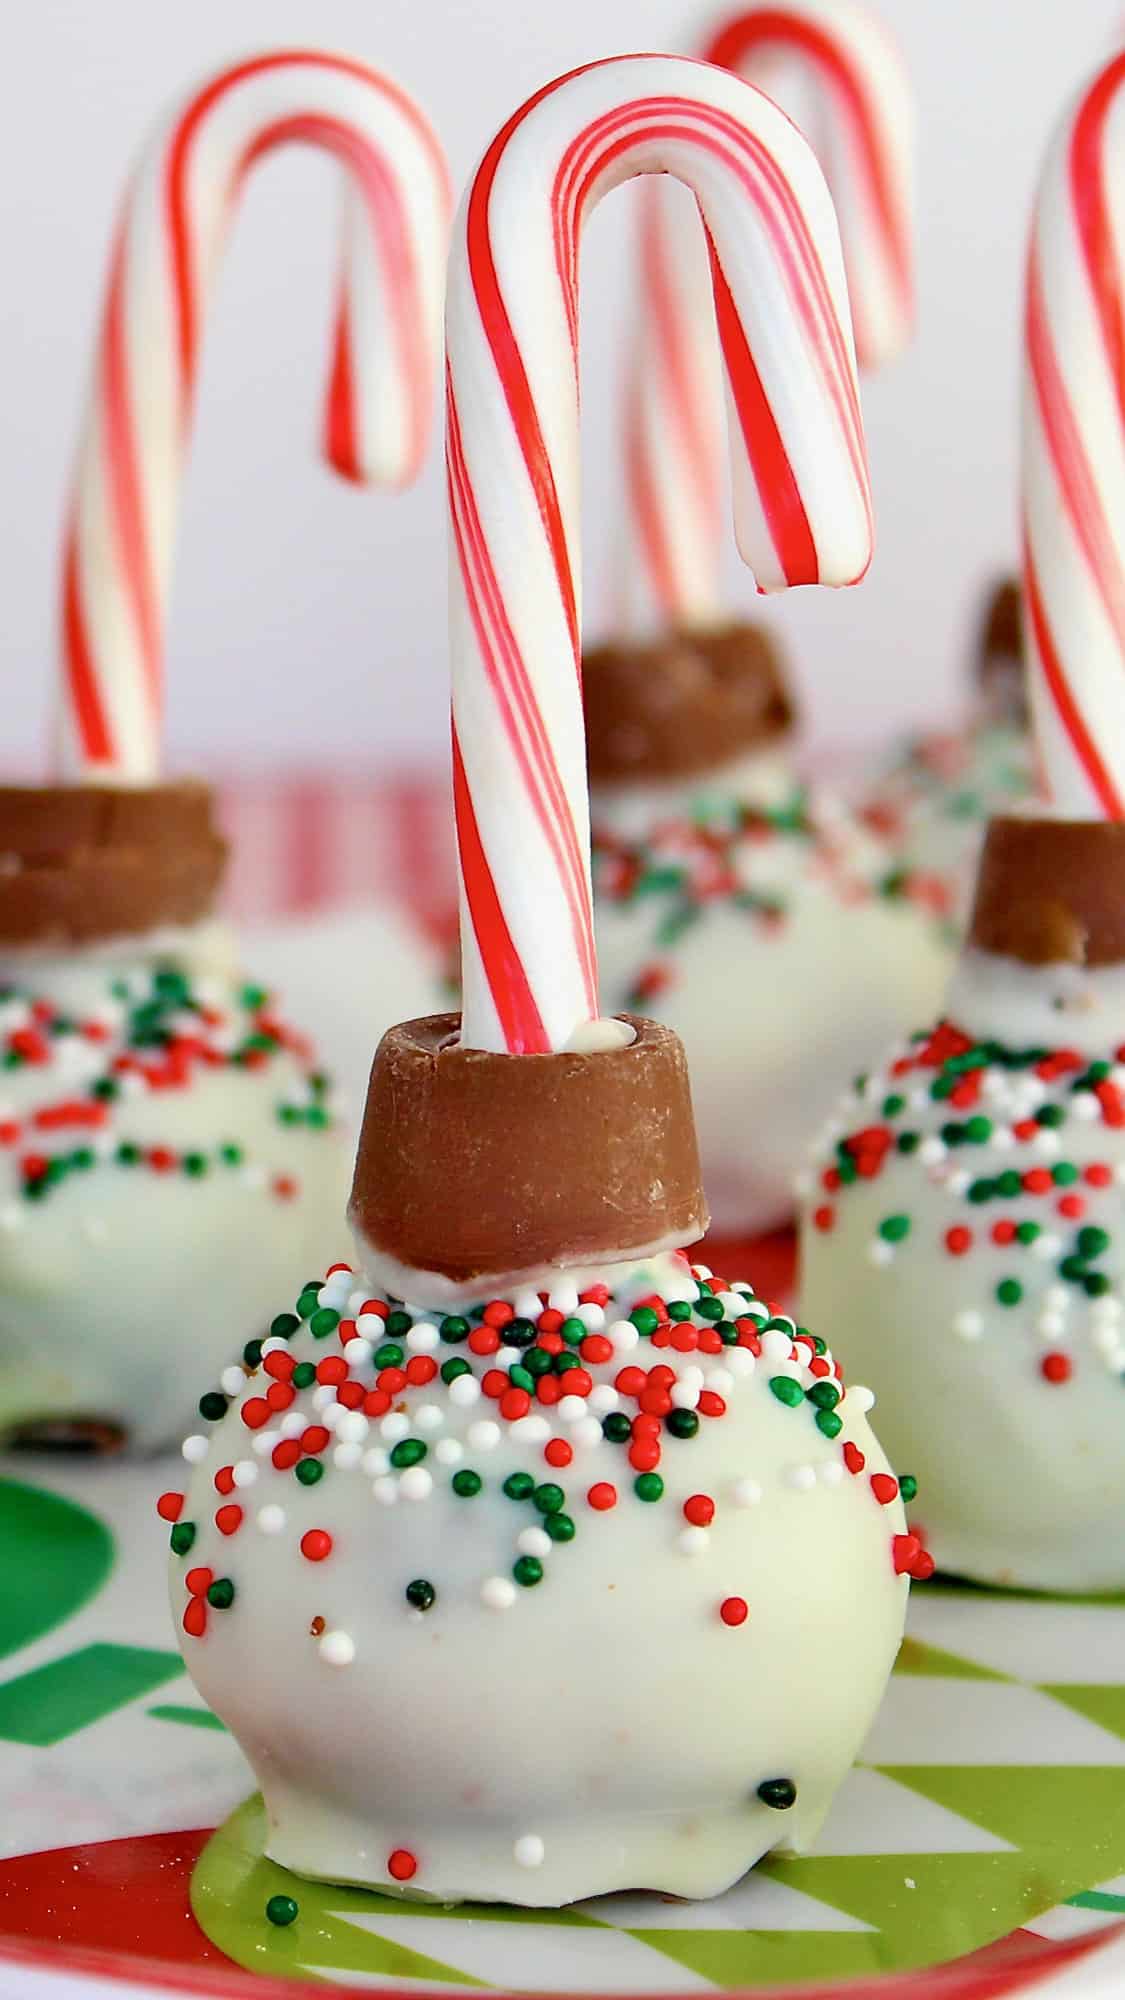
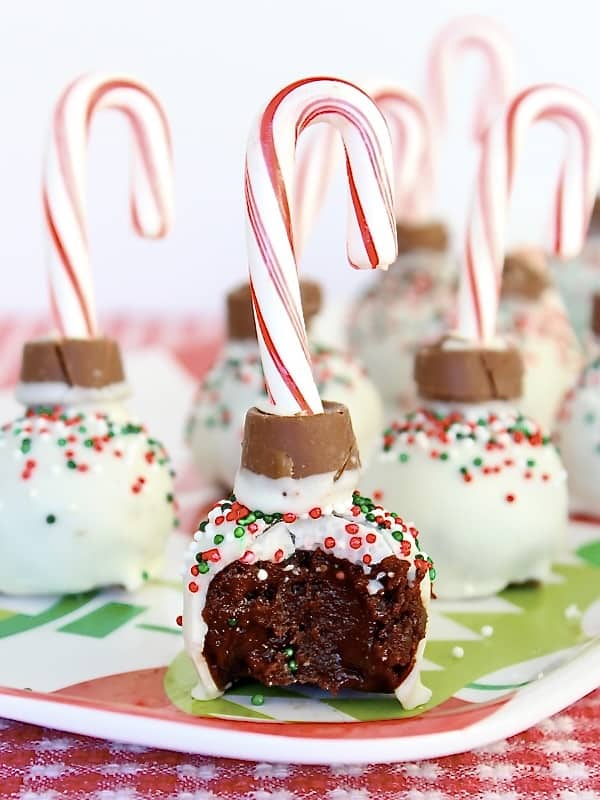
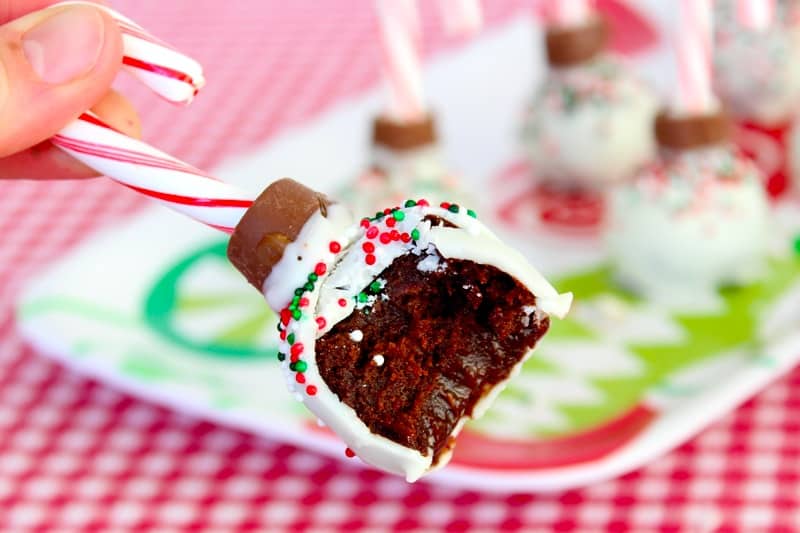
These adorable Ornament Brownie Balls are such a fun and festive holiday treat!
Adorable Christmas Fun
These yummy Ornament Brownie Balls are so fun and easy to make and even more fun to eat! What’s not to adore about a cute edible ornament with a fudgy brownie surprise inside?! Together with gingerbread men cookies, Christmas Crunch Mix and our Chocolate Peanut Butter Balls, they’re an absolute MUST during the holiday season.
Watch Me Make Ornament Brownie Balls
Join me in the kitchen to make these super cute and fun Ornament Brownie Balls!
Ingredients and Supplies
(see recipe card at the bottom of this post for measurements and details)
Ingredients:
- Unsalted butter
- Semi-sweet chocolate chips
- Sugar
- Eggs and vanilla
- All-purpose flour
- Vanilla candy coating
- Festive sprinkles
- Chocolate coated caramel candies (such as Rolos)
- Mini candy canes
Supplies:
- 8-inch baking dish
- Nonstick cooking spray
- Baking sheet
- Parchment paper
More Christmas Cookies
Bring your A game to this year’s Christmas cookie exchange! I’ve got the Best Christmas Cookies to share at holiday cookie exchange or to gift to your neighbors this holiday season. They’re sure to spread tons of cheer! Plus, get tips on hosting your own Christmas cookie exchange party.

How to Make Ornament Brownie Bites
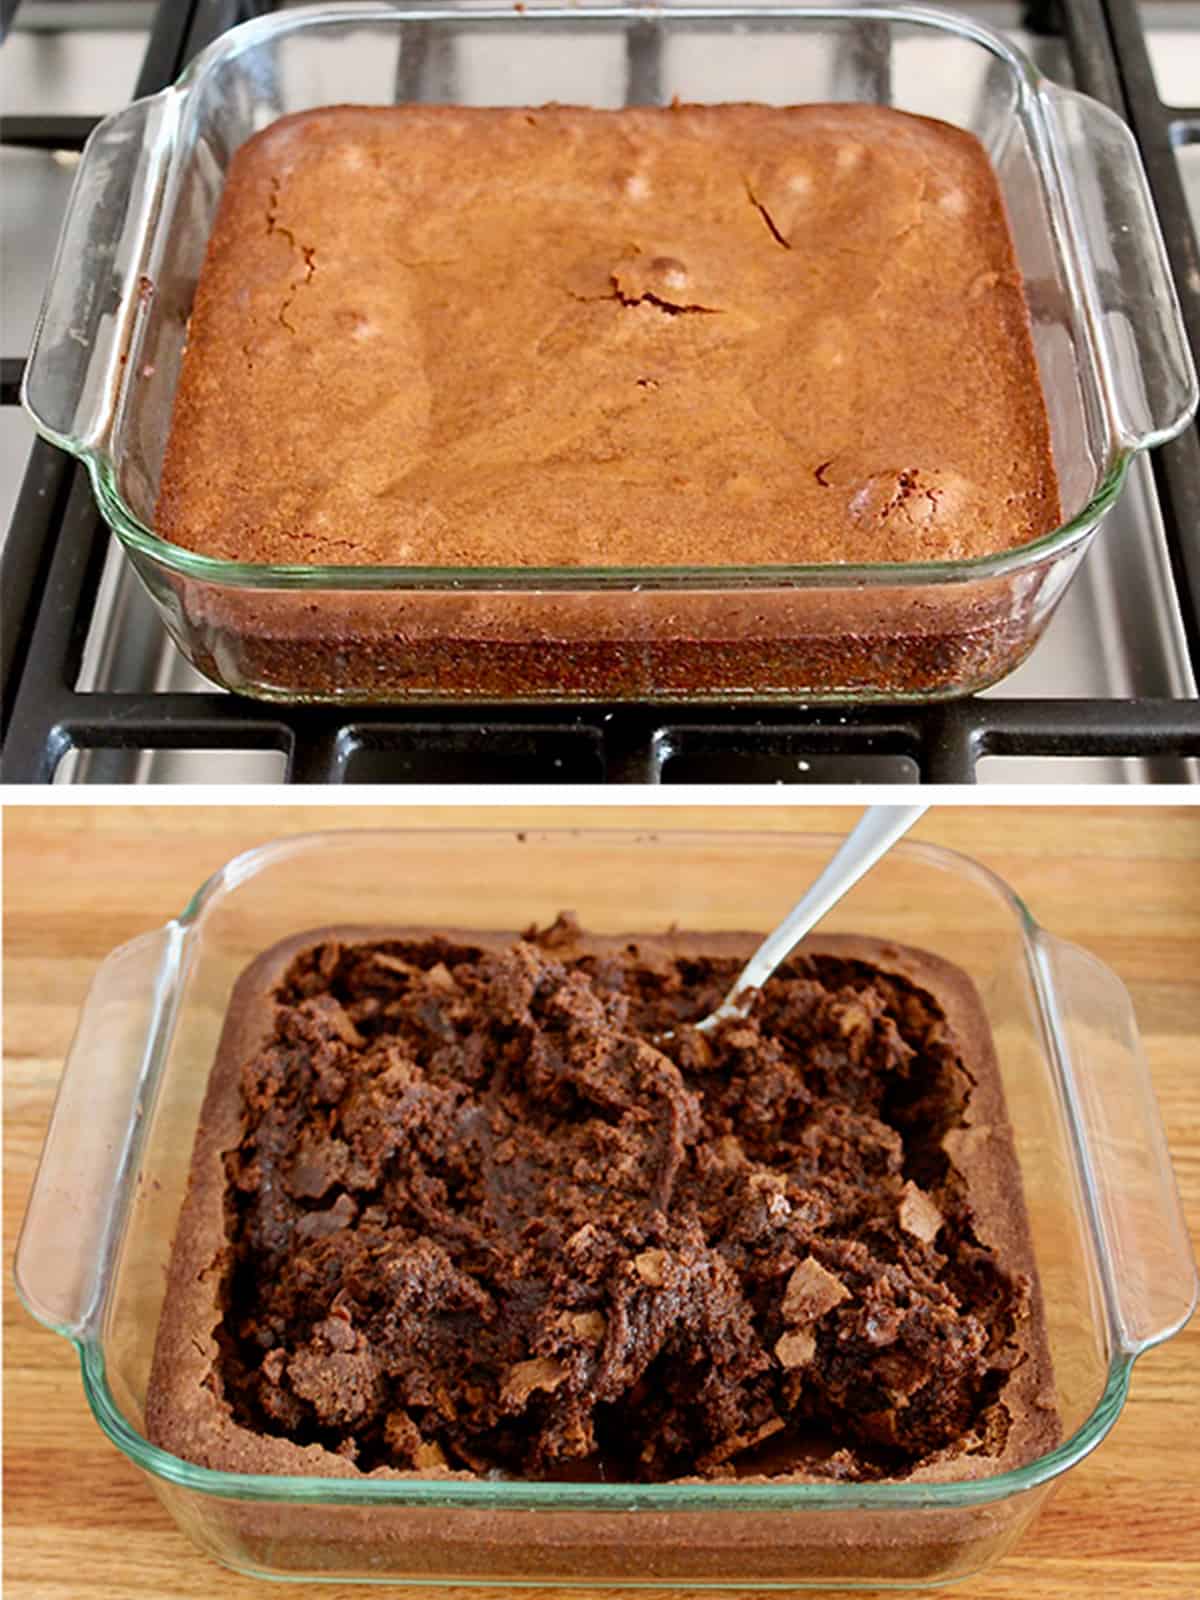
- Preheat oven to 350°F. Lightly grease an 8-inch baking dish with non-stick cooking spray and set aside.
- In a large microwaveable bowl, melt the butter and chocolate chips until completely melted, about 2 minutes, stirring every 30 seconds.
- Stir in the sugar. Add the eggs, one at a time, stirring until well combined. Stir in the vanilla and then the flour until well mixed. Pour evenly into prepared baking dish.
- Bake for 30 minutes or until a toothpick inserted in the center comes out clean, but the brownies are still fudgy. Do not over bake. Let brownies cool completely on a wire rack.
- Once brownies are cooled, use a spoon to dig up the middle of the brownies, leaving the edges to snack on later!
- Roll two-tablespoon portions of fudgy brownie into balls and place on a parchment-lined baking sheet.
- Place baking sheet in the freezer for 10-15 minutes so brownie balls will harden.
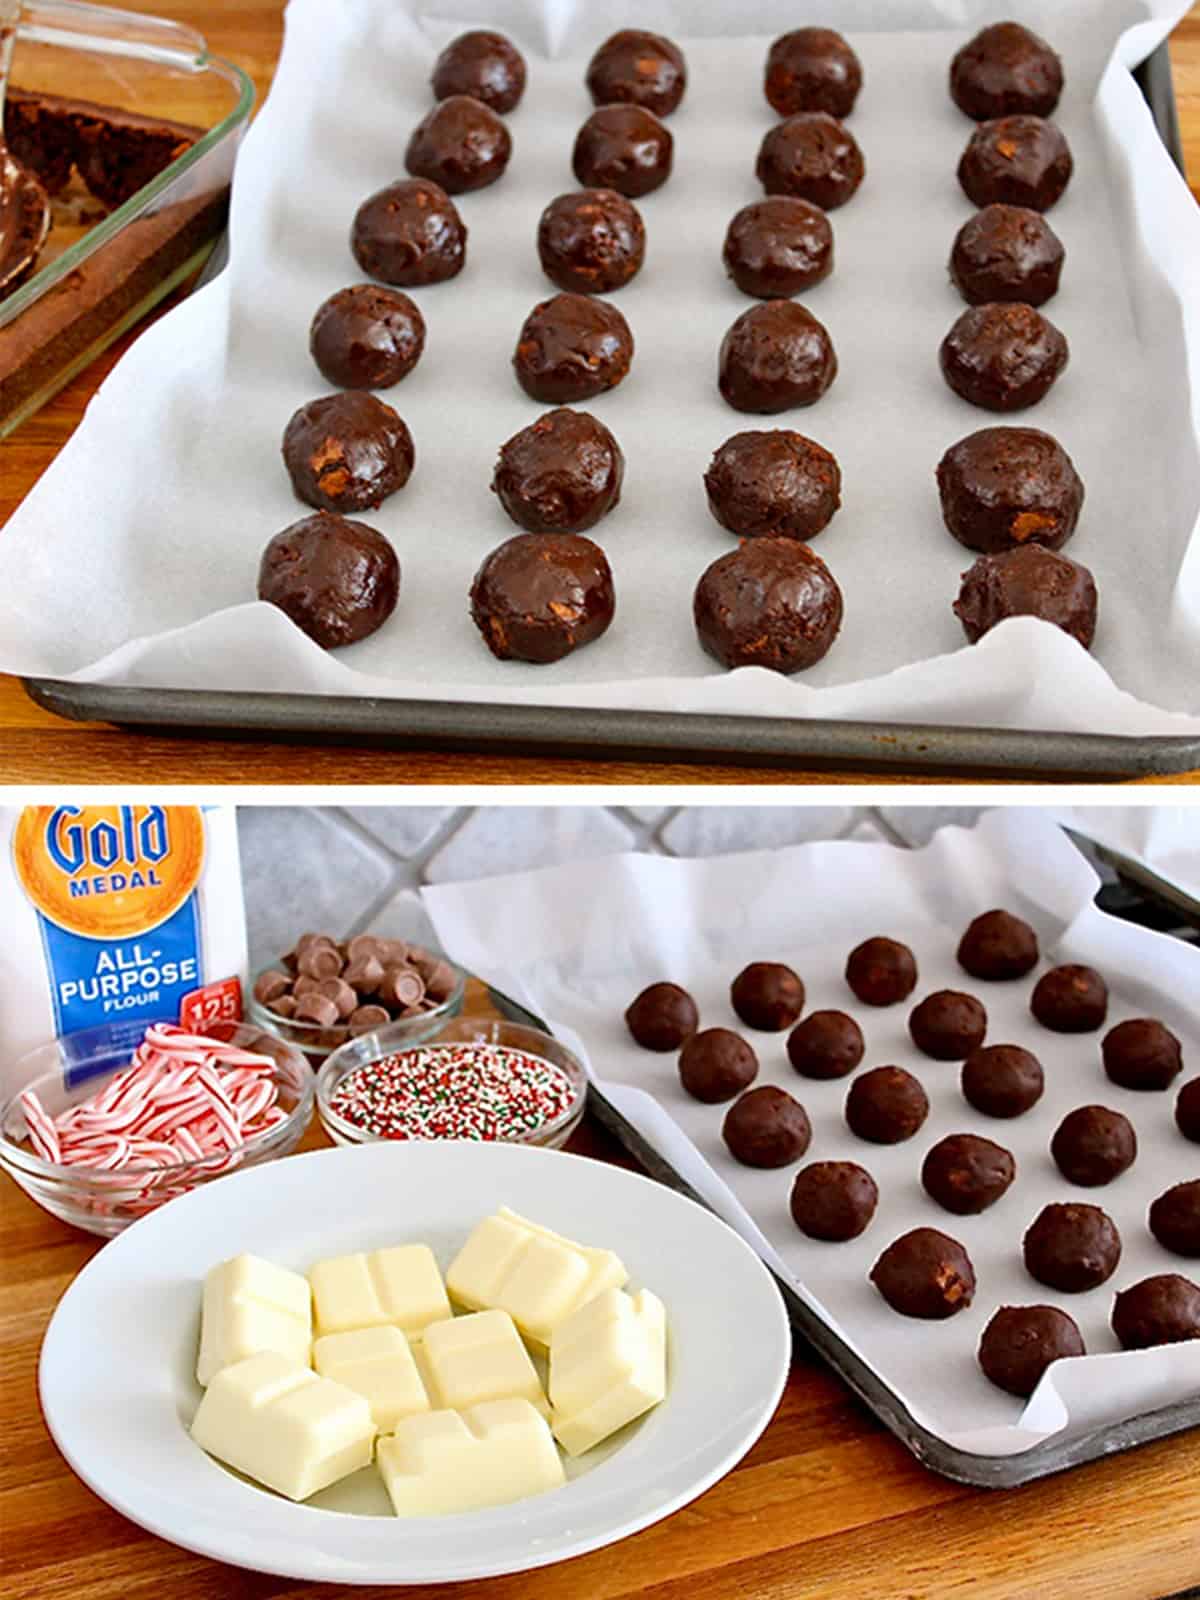
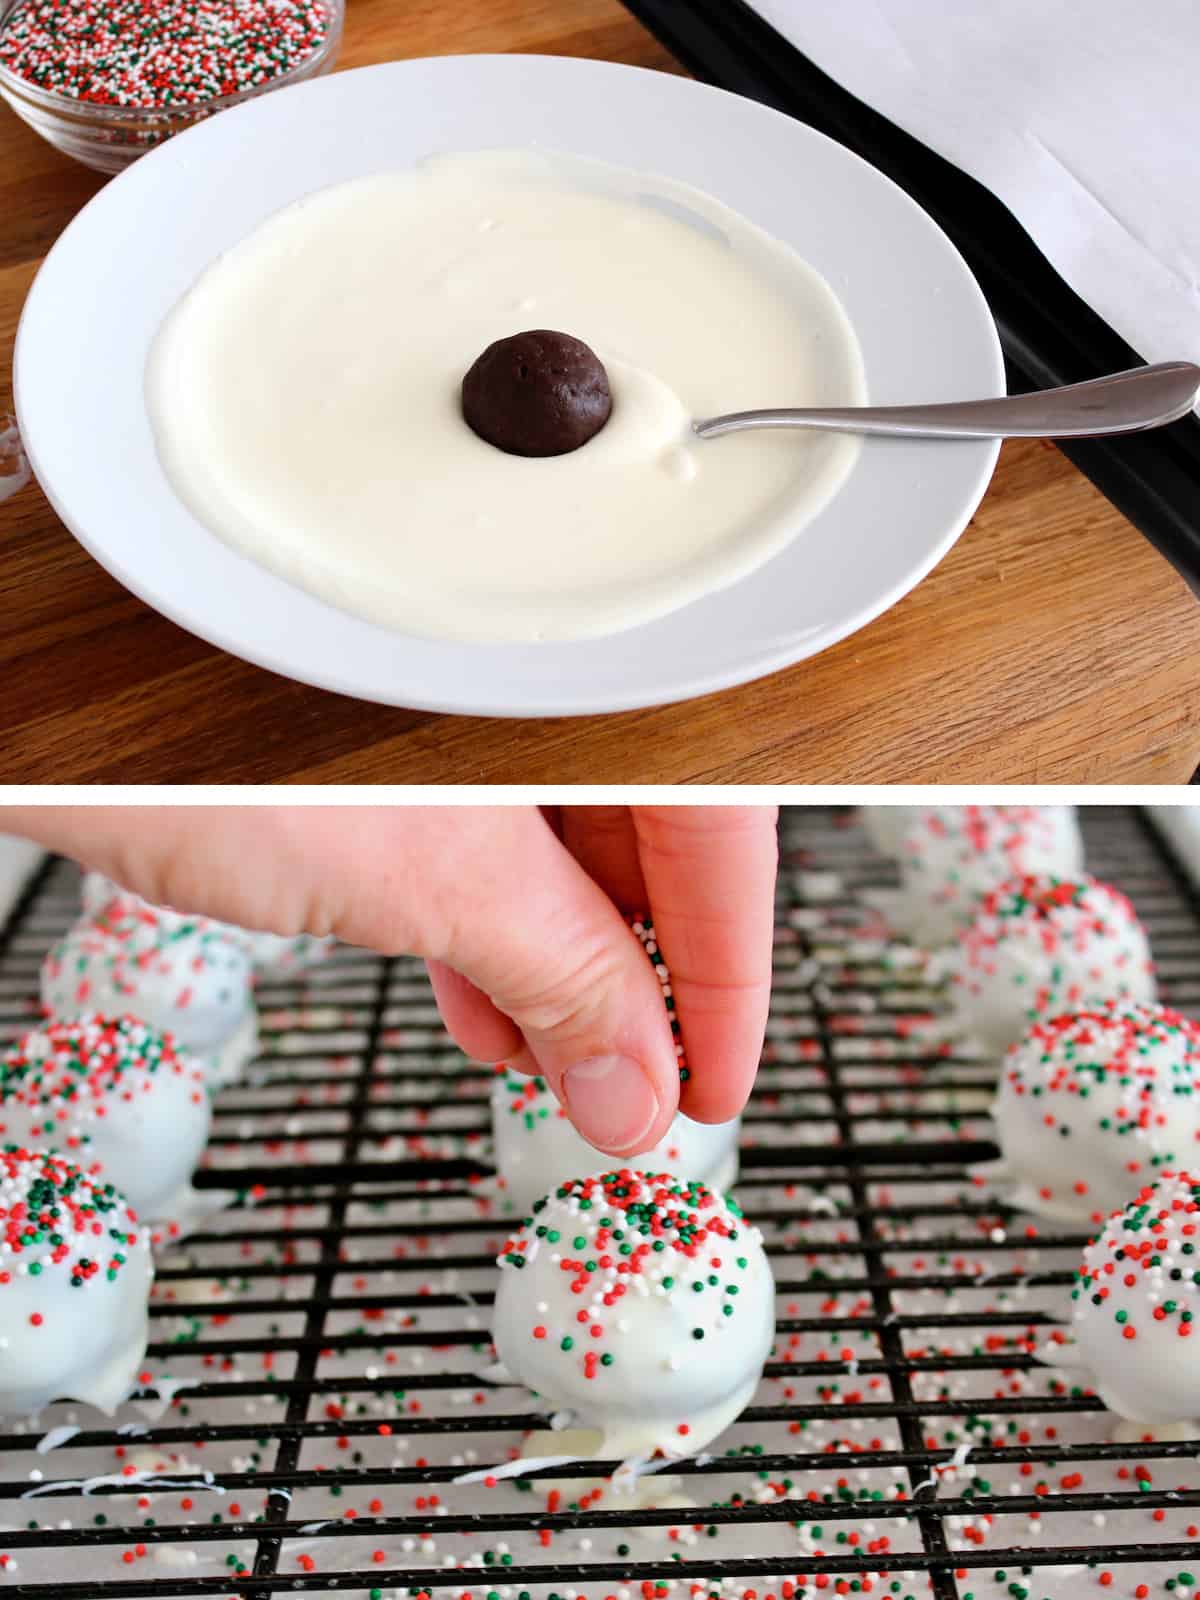
- Melt the candy coating according to package directions. Using a fork, dip each brownie ball into the candy coating until it is completely coated. Place on a greased cooling rack or parchment paper. Immediately sprinkle with festive sprinkles. Let set completely.
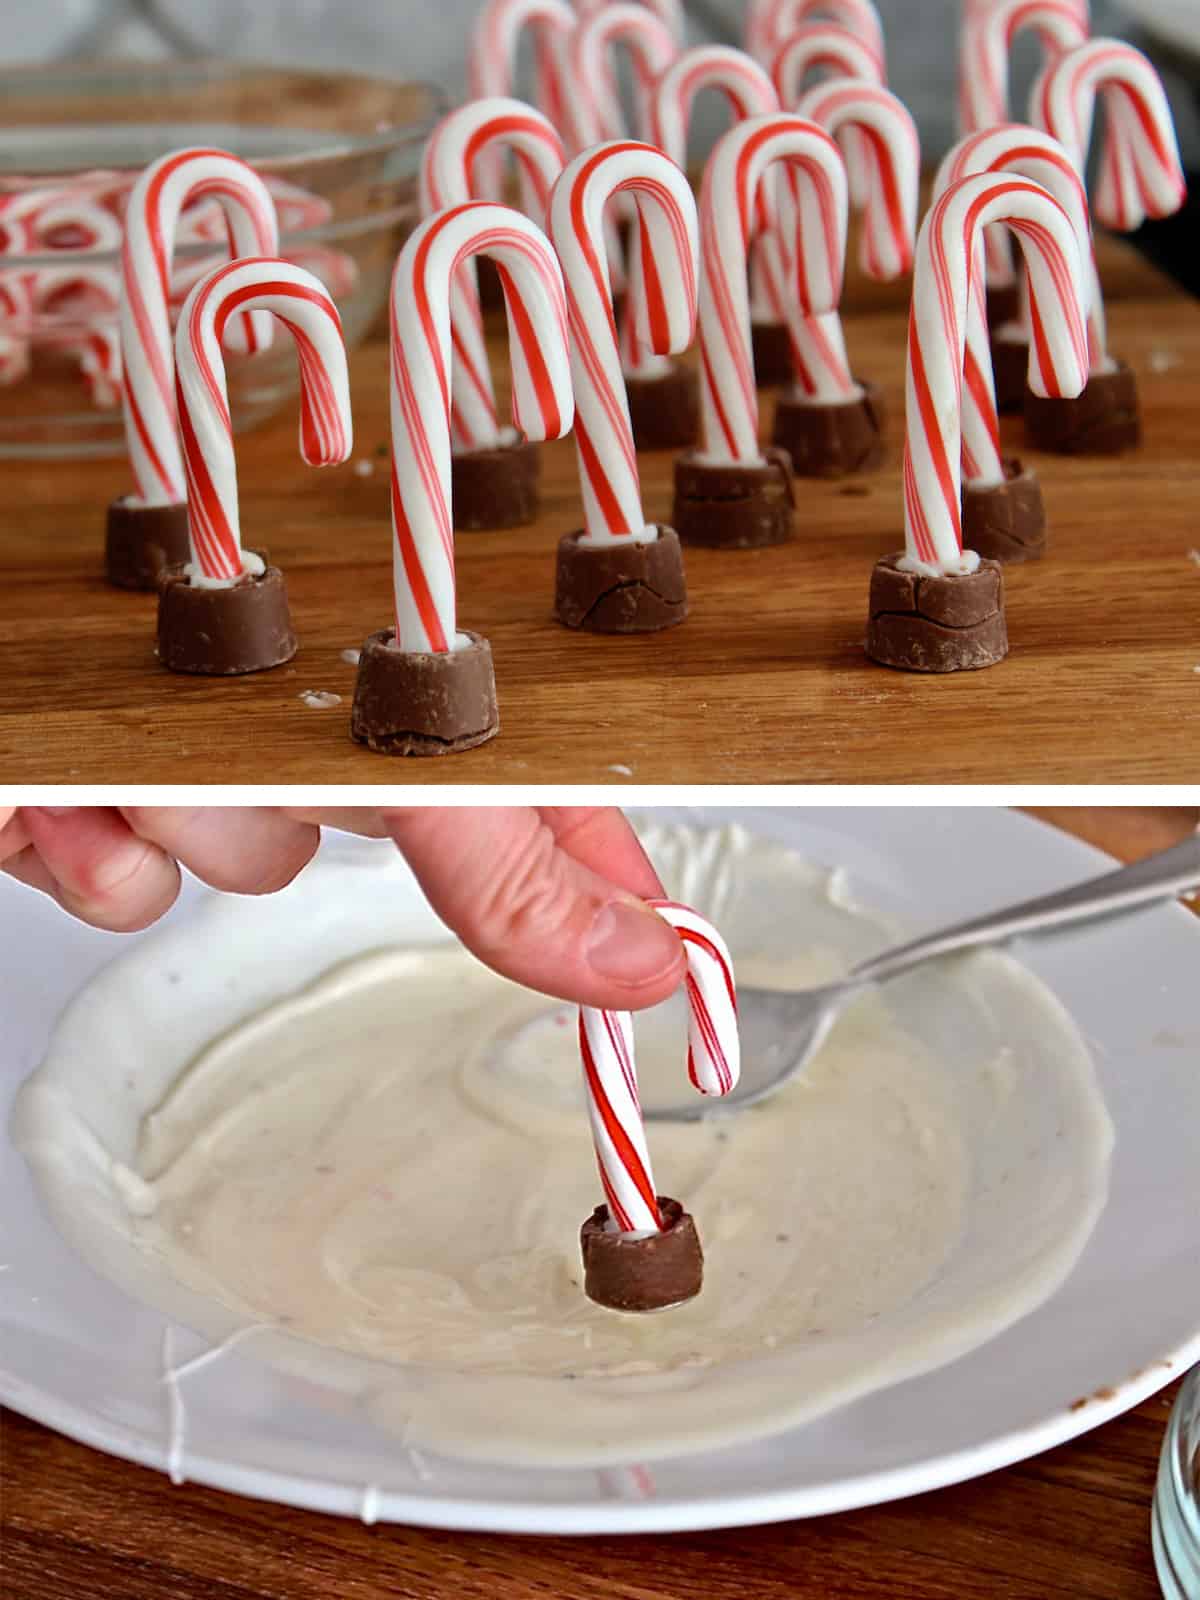
- Using the bottom of a candy cane, make a small well in the top of each chocolate-coated caramel. Then, dip the end of the candy cane in a little candy coating before standing it up in the well. Let set completely.
- Dip the bottoms of the chocolate-coated caramels into the candy coating.
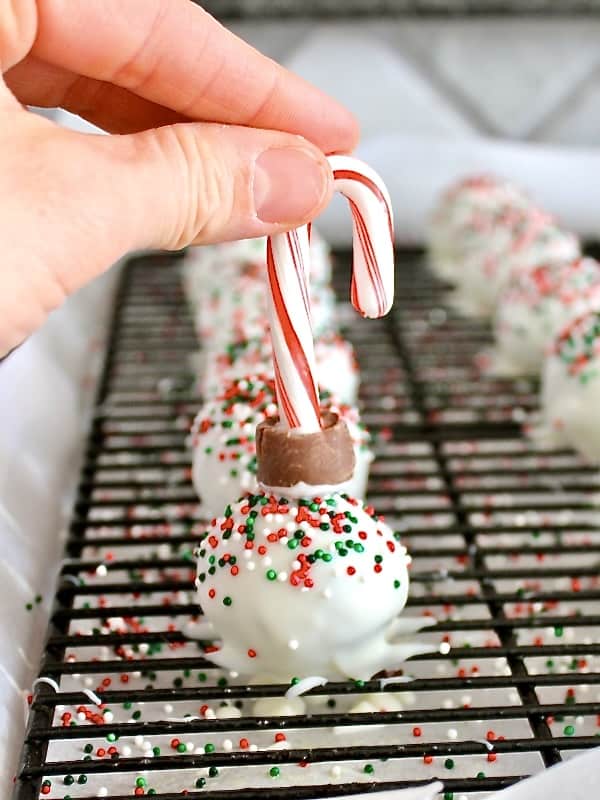
- Attach candy cane topper to the top of each brownie ball. Let set completely before serving. Note: If candy coating starts to harden while decorating the brownie balls, return to the microwave for 15-30 seconds to melt again.
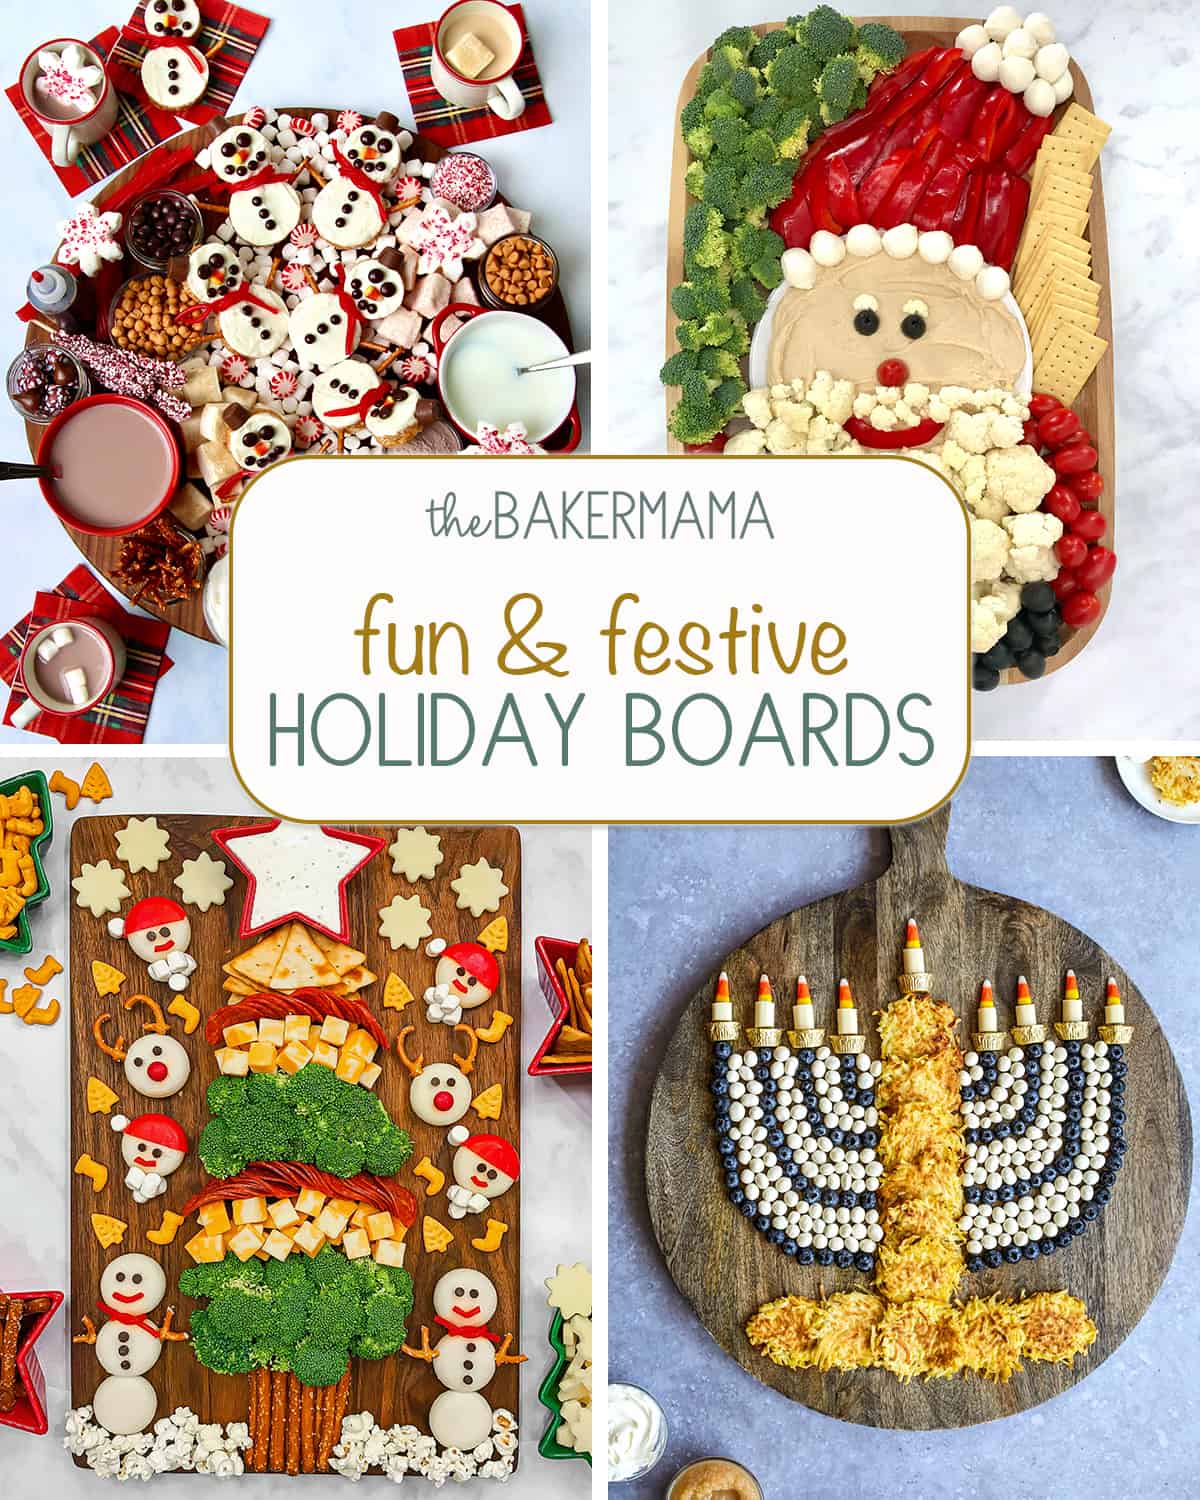
Fun & Festive Holiday Boards
Celebrate the magic of the season with Fun and Festive Holiday Boards that you and your loved ones are sure to enjoy! From sweet treats to healthy snacks, there’s a little something for everyone!
Adorable and delicious ornament brownie bites! If you make these, be sure to snap a picture and share it with me or tag me on Instagram @thebakermama so I can see. 😍 I love seeing how inspired and creative y’all get with the recipes I share. Enjoy!
xoxo,

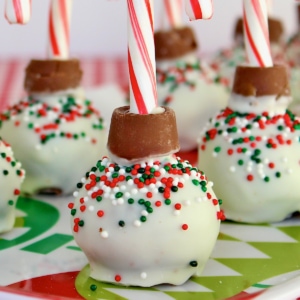
Ornament Brownie Balls
- Prep Time: 45 mins
- Cook Time: 30 mins
- Total Time: 1 hour 15 mins
- Yield: 24
- Category: Dessert
Description
These adorable Ornament Brownie Balls are such a fun and festive holiday treat!
Ingredients
Brownies:
- 1/2 cup (1 stick) unsalted butter
- 3/4 cup semi-sweet chocolate chips
- 2 cups sugar
- 3 eggs
- 1/2 teaspoon vanilla
- 1 cup all-purpose flour
Other ingredients:
- 1 (16 ounce) package vanilla candy coating
- festive sprinkles
- 24 chocolate coated caramel candies (such as Rolos)
- 24 mini candy canes
Instructions
- Preheat oven to 350°F. Lightly grease an 8-inch baking dish with non-stick cooking spray and set aside.
- In a large microwaveable bowl, melt the butter and chocolate chips until completely melted, about 2 minutes, stirring every 30 seconds.
- Stir in the sugar. Add the eggs, one at a time, stirring until well combined. Stir in the vanilla and then the flour until well mixed. Pour evenly into prepared baking dish.
- Bake for 30 minutes or until a toothpick inserted in the center comes out clean, but the brownies are still fudgy. Do not over bake. Let brownies cool completely on a wire rack.
- Once brownies are cooled, use a spoon to dig up the middle of the brownies, leaving the edges to snack on later! Roll two-tablespoon portions of fudgy brownie into balls and place on a parchment-lined baking sheet. Place baking sheet in the freezer for 10-15 minutes so brownie balls will harden.
- Melt the candy coating according to package directions. Using a fork, dip each brownie ball into the candy coating until it is completely coated. Place on a greased cooling rack or parchment paper. Immediately sprinkle with festive sprinkles. Let set completely.
- Using the bottom of a candy cane, make a small well in the top of each chocolate-coated caramel. Then, dip the end of the candy cane in a little candy coating before standing it up in the well. Let set completely.
- Dip the bottoms of the chocolate-coated caramels into the candy coating and attach one to the top of each brownie ball. Let set completely before serving.
- Notes: If candy coating starts to harden while decorating the brownie balls, return to the microwave for 15-30 seconds to melt again.

Can you freeze them?!
Hi Megan! Yes! You can freeze the ornament brownie balls, but for best results, freeze them before adding the Rolo and candy cane decorations. Flash freeze the undecorated brownie balls on a baking sheet until firm, then transfer them to an airtight container or freezer bag with parchment between layers to prevent sticking. Thaw them in the fridge and add the toppers just before serving to keep everything looking festive and fresh. I hope this helps and that y’all enjoy!
how do I store these for 4 days to keep them fresh?
Hi, Lisa! They should keep great in the fridge for four days if you just gently cover (or place in a tall Tupperware with a lid). Enjoy!
love love your recipes
Thank you for sharing
OUR FAMILY LOVES THEM