• Skip to primary navigation
  • Skip to main content
  • Skip to primary sidebar
  • Skip to footer

The BakerMama logo

Nav Social Menu

  • Facebook
  • Pinterest
  • Instagram
  • Twitter
  • YouTube
  • Nav Social Menu

    • Facebook
    • Pinterest
    • Instagram
    • Twitter
    • YouTube
  • Home
  • About
    • About
    • Contact
    • faq
    • Subscribe
    • Work With Me
  • Recipes
    • Recipes
    • Basics
    • Gathering Guides
    • Tips & Tricks
  • Cookbooks
    • Spectacular Spreads โ€“ NEW!
    • Beautiful Boards Cookbook
  • Boards by The BakerMama
    • Shop Boards
    • Board Inspiration
  • Shop
    • Amazon Favorites
    • Boards
    • Board Accessories
    • Family Favorites
    • Gift Guides
      • Anniversary Gifts
      • Gifts for the Baker
      • Gifts for the Homebody
      • Gifts for a New Mom
      • Gifts to Say Thank You
      • Gifts for the Sports Fan
      • Housewarming Gifts
      • Hostess Gifts
      • Kid’s Birthday Party Gifts
      • Teacher Gifts
      • Wedding Gifts
    • In The Kitchen
    • Around the House
    • Holiday Favorites
    • Shop All

Home ยป Recipes ยป Appetizers ยป 7-Layer Tacos

Published on May 2, 2014 | Updated on May 13, 2020 by The BakerMama

7-Layer Tacos

Jump to Recipe

These festive 7-Layer Tacos are tasty tacos filled with everyone’s favorite 7-layer dip. They are sure to make your fiesta even more fabulous!

7-Layer Tacos

Okay, let’s talk about 7-layer dip for a bit! I love it, it’s addicting and I could totally make a meal out of it! And that’s exactly what I’ve done with these tacos. I took one of my favorite dips and layered it into a handheld taco and it’s quite possibly one of my proudest creations!

7-Layer Tacos

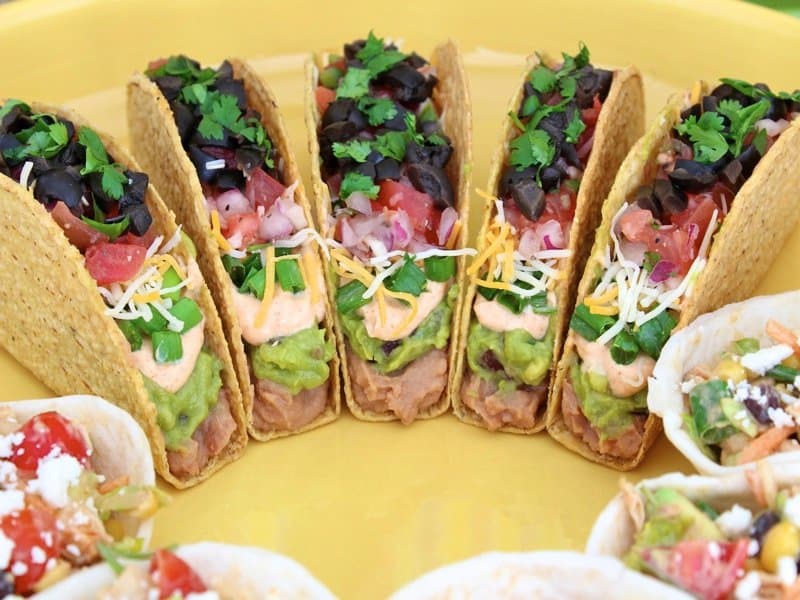
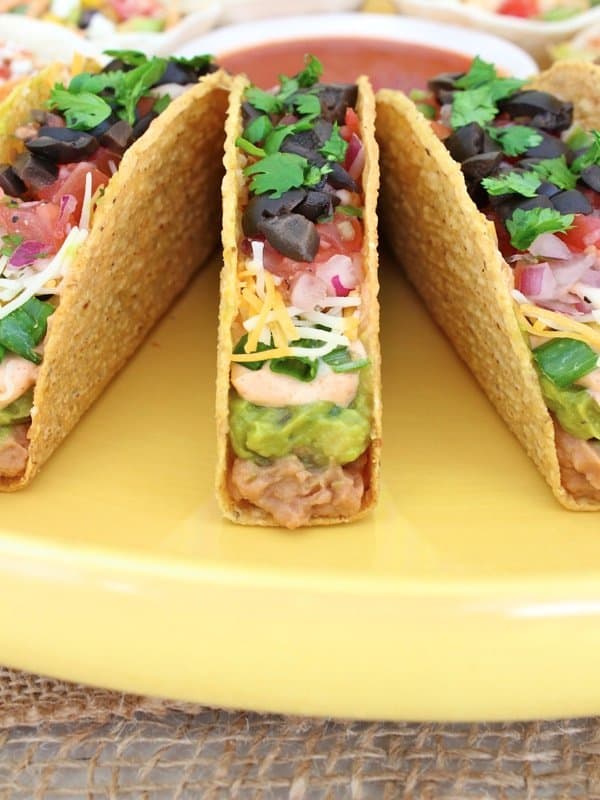
A crunchy taco layered with beans, guacamole, seasoned sour cream, onions, cheese, pico de gallo and olives makes for one of the tastiest tacos I’ve ever put in my mouth. So fresh & festive & fabulous!

7-Layer Tacos

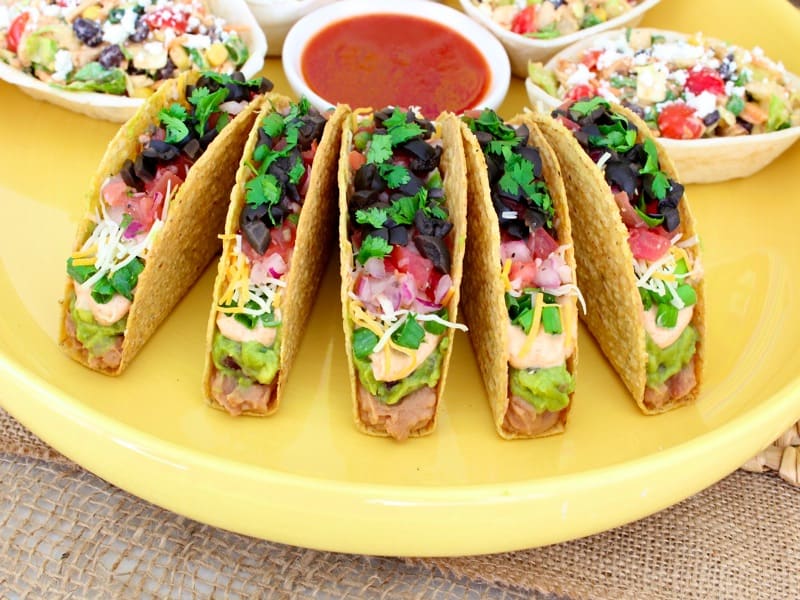
How perfect would these be for a Cinco de Mayo celebration, or a taco dinner on a Tuesday night, or as a gameday great this coming football season! They’re easy to make and easy to eat! Enjoy!

xoxo,


CLICK HERE for a great Mexican-inspired menu to go with these sweet tacos!


Print
clock clock iconcutlery cutlery iconflag flag iconfolder folder iconinstagram instagram iconpinterest pinterest iconfacebook facebook iconprint print iconsquares squares iconheart heart iconheart solid heart solid icon

7-Layer Tacos

  • Author: Maegan - The BakerMama
  • Prep Time: 30 mins
  • Total Time: 30 mins
  • Yield: 10
  • Category: Main
Print Recipe
Pin Recipe

Description

Tasty tacos filled with everyone’s favorite 7-layer dip are sure to make your fiesta even more fabulous!


Ingredients

  • 10 taco shells
  • 1 (16 ounce) can refried beans
  • 1 cup prepared guacamole
  • 1 cup sour cream
  • 1/2 cup mayonnaise
  • 1 (1 ounce) package taco seasoning mix
  • 1 bunch green onions, chopped
  • 1 cup shredded Mexican-style cheese blend
  • 1 cup prepared pico de gallo
  • 1 (2.25 ounce) can sliced black olives, drained and chopped
  • *chopped fresh cilantro, for garnishing

Instructions

  1. Toast taco shells in oven according to package directions.
  2. In a small bowl, whisk together the sour cream, mayonnaise and taco seasoning mix until well combined.
  3. Spread or sprinkle a thin layer of each ingredient into each taco shell in the following order: refried beans, guacamole, sour cream mixture, chopped green onions, shredded cheese, pic de gallo, and chopped olives.
  4. Sprinkle each taco with a pinch of chopped cilantro. Serve immediately or store in the refrigerator until ready to serve.
  5. Note: Tacos are best served within 2 hours of preparing or the shells will start to soften.

Did you make this recipe?

Tag @thebakermama on Instagram and hashtag it #thebakermama

You may also like

  • Build-Your-Own Taco Board and More Festive Mexican-Inspired BoardsBuild-Your-Own Taco Board and More Festive Mexican-Inspired Boards
  • Bean and Cheese Taco BitesBean and Cheese Taco Bites
  • Fabulous FiestaFabulous Fiesta
  • 15+ Great Recipes for a Mexican Fiesta15+ Great Recipes for a Mexican Fiesta
  • Toffee Taco SundaesToffee Taco Sundaes

Sharing is caring!

36 shares

Reader Interactions

Comments · 3

  1. Melisa says

    April 19, 2018 at 1:53 pm

    I absolutely love tacos, and with my type 2 diabetes, tacos are good because they are, for the most part, low carb. Taco shells are lower carb than a slice of bread, and the fillings are all low to no carbohydrates.

    However, let’s be truthful, we both know one bite of your tacos and half the filling would be in your lap or on the plate. I get so frustrated with tacos because they are so messy. You just CAN’T get that filling to stay in the shell no matter how you bite into it. I have tried biting from the sides, from the top down, etc. And no, those taco shells that are flat on the bottom are no better. I usually just give up and put it on a plate and use a fork. Can’t SOMEBODY make a taco shell that is closed on the ends?

    Reply
    • Lisa B. says

      May 6, 2019 at 11:54 am

      I do find that melting cheese on the bottom of the taco shell helps to glue it together when it inevitably breaks. Sometimes I’ll use a single spear of romaine lettuce at the bittom for the same reason. Another option, though not at diabetic friendly, is to wrap the filled taco in a foukr tortilla. My best friend oven bakes corn tortillas into ice cream cone shapes which is fun but makes it hard to get that perfect bite.

      Reply
      • Maegan says

        May 7, 2019 at 12:38 pm

        Great tips, Lisa! Thanks for sharing!

Leave a Reply Cancel reply

Your email address will not be published. Required fields are marked *

Recipe rating ★☆ ★☆ ★☆ ★☆ ★☆

Primary Sidebar

NEVER MISS A RECIPE

Sign up to get new recipes via email

Order Now! Spectacular Spreads Cookbook

Spectacular Spreads cookbook by The BakerMama

Beautiful Boards Cookbook

Beautiful Boards cookbook by The BakerMama

Boards by The Bakermama

Hi, I’m Maegan!

Maegan, the BakerMama

Welcome to The BakerMama! Iโ€™m so happy youโ€™re here! To learn more about me, click here.

Let’s Socialize

  • Facebook
  • Pinterest
  • Instagram
  • Twitter
  • YouTube
  • RSS

Trending Now

American Flag Caprese Salad by The BakerMama

American Flag Caprese Salad

Pancake Flag Board by The BakerMama

Pancake Flag Board

Hot Dog Flag Board by The BakerMama

Hot Dog Flag Board

Patriotic Party Mix

Patriotic Party Mix

Instagram

thebakermama

Maegan Brown ~ The BakerMama
We can't get enough of this One-Ingredient Banana We can't get enough of this One-Ingredient Banana Ice Cream! ๐ŸŒ๐Ÿฆ It may be 100+ degrees here in Dallas, but we're staying cool and content with this naturally sweet treat. Simply slice and freeze any extra-ripe bananas you have on hand, blend in a food processor, and enjoy all summer long! ๐Ÿค— #TheBakerMama

Ingredient:
6 very ripe bananas

Instructions:
1. Line a baking sheet with parchment paper. Slice the bananas into 1/2-inch slices and lay flat on the parchment-lined baking sheet. Place in the freezer for 1 and 1/2 hours.
2. Remove frozen bananas from the freezer and let set out for about 5 minutes while you set up your food processor or blender. You want the bananas to soften just a bit, but still be frozen.
3. Place the bananas in the food processor and pulse/blend until smooth and creamy. Serve and ENJOY!
ย 
Notes:
It has a soft serve consistency when you first make it which is so yummy. If you want a more scoopable consistency, freeze it in a freezer-safe container for at least 2 hours. It freezes well for up to 3 months. Just let it set out of the freezer for about 5 minutes to soften a bit before scooping.
Don't worry, brie happy! ๐Ÿ˜œ If you liked my reci Don't worry, brie happy! ๐Ÿ˜œ If you liked my recipe for grilled brie with strawberries, you'll LOVE this version made with grilled peaches, pesto, and basil. A fresh summer appetizer that everyone enjoys and it's SO easy to make! ๐Ÿง€๐Ÿ‘ #TheBakerMama

Ingredients:

1 (8 ounce) wheel soft-ripened brie cheese
3 fresh peaches
1 crusty baguette
Olive oil
1/4 cup prepared pesto
2 tablespoons chopped fresh basil
Sea salt

Instructions:
1. Preheat the grill to medium heat and brush the grates with oil.
2. Slice the peaches in half and remove the pits.
3. Slice the baguette into ยผ inch thick slices.
4. Place baguette slices, peaches (cut side up) and brie wheel on a baking sheet and brush the tops of everything with olive oil.
5. Put everything on the grill with the olive oiled sides down. Brush the tops of the baguette slices and brie wheel with olive oil while the bottoms are grilling.
6. Grill until you have beautiful grill marks and then flip the brie and baguette slices.
7. Remove everything from the grill once the peaches are soft with good grill marks, the brie is melted (about 2-3 minutes per side) and the baguette slices are toasted on both sides.
8. Transfer the brie to a serving plate.
9. Dice four of the grilled peach halves. Slice the other two peach halves into thin slices.
10. Place the diced peaches on top of the grilled brie.
11. Drizzle with the pesto and garnish with the chopped fresh basil.
12. Sprinkle it with a little sea salt.
13. Serve with grilled baguette and peach slices. Enjoy!
Fabulous 4th with family & friends! โค๏ธ Fabulous 4th with family & friends! โค๏ธ
Happy 4th, friends! I hope yโ€™all have a sweet an Happy 4th, friends! I hope yโ€™all have a sweet and safe day of celebrating! ๐Ÿ‡บ๐Ÿ‡ธโค๏ธ๐Ÿ’ฅ๐ŸŽ‰

These are the dessert recipes from the Patriotic Picnic Spread in my Spectacular Spreads Cookbook:
๐Ÿ’ Cherry Pie Bites
๐Ÿซ Sโ€™mores Brownie Bites
๐ŸŽ‰ Patriotic Party Mix
โญ๏ธ Star-Shaped Rice Krispies Treats

Tasty treats that are great for today or any party! ๐Ÿ˜‹๐ŸŽ‰ #TheBakerMama #SpectacularSpreadsCookbook

https://thebakermama.com/spectacular-spreads/
Load More... Follow on Instagram

Footer

Hi, I’m Maegan!

Maegan, the BakerMama

Welcome to The BakerMama! Iโ€™m so happy youโ€™re here! To learn more about me, click here.

  • Facebook
  • Pinterest
  • Instagram
  • Twitter
  • YouTube
  • RSS

NEVER MISS A RECIPE

Sign up to get new recipes via email

Copyright © 2022 The BakerMama, LLC, All Rights Reserved. | Privacy Policy Website by Bright Coconut

36 shares