
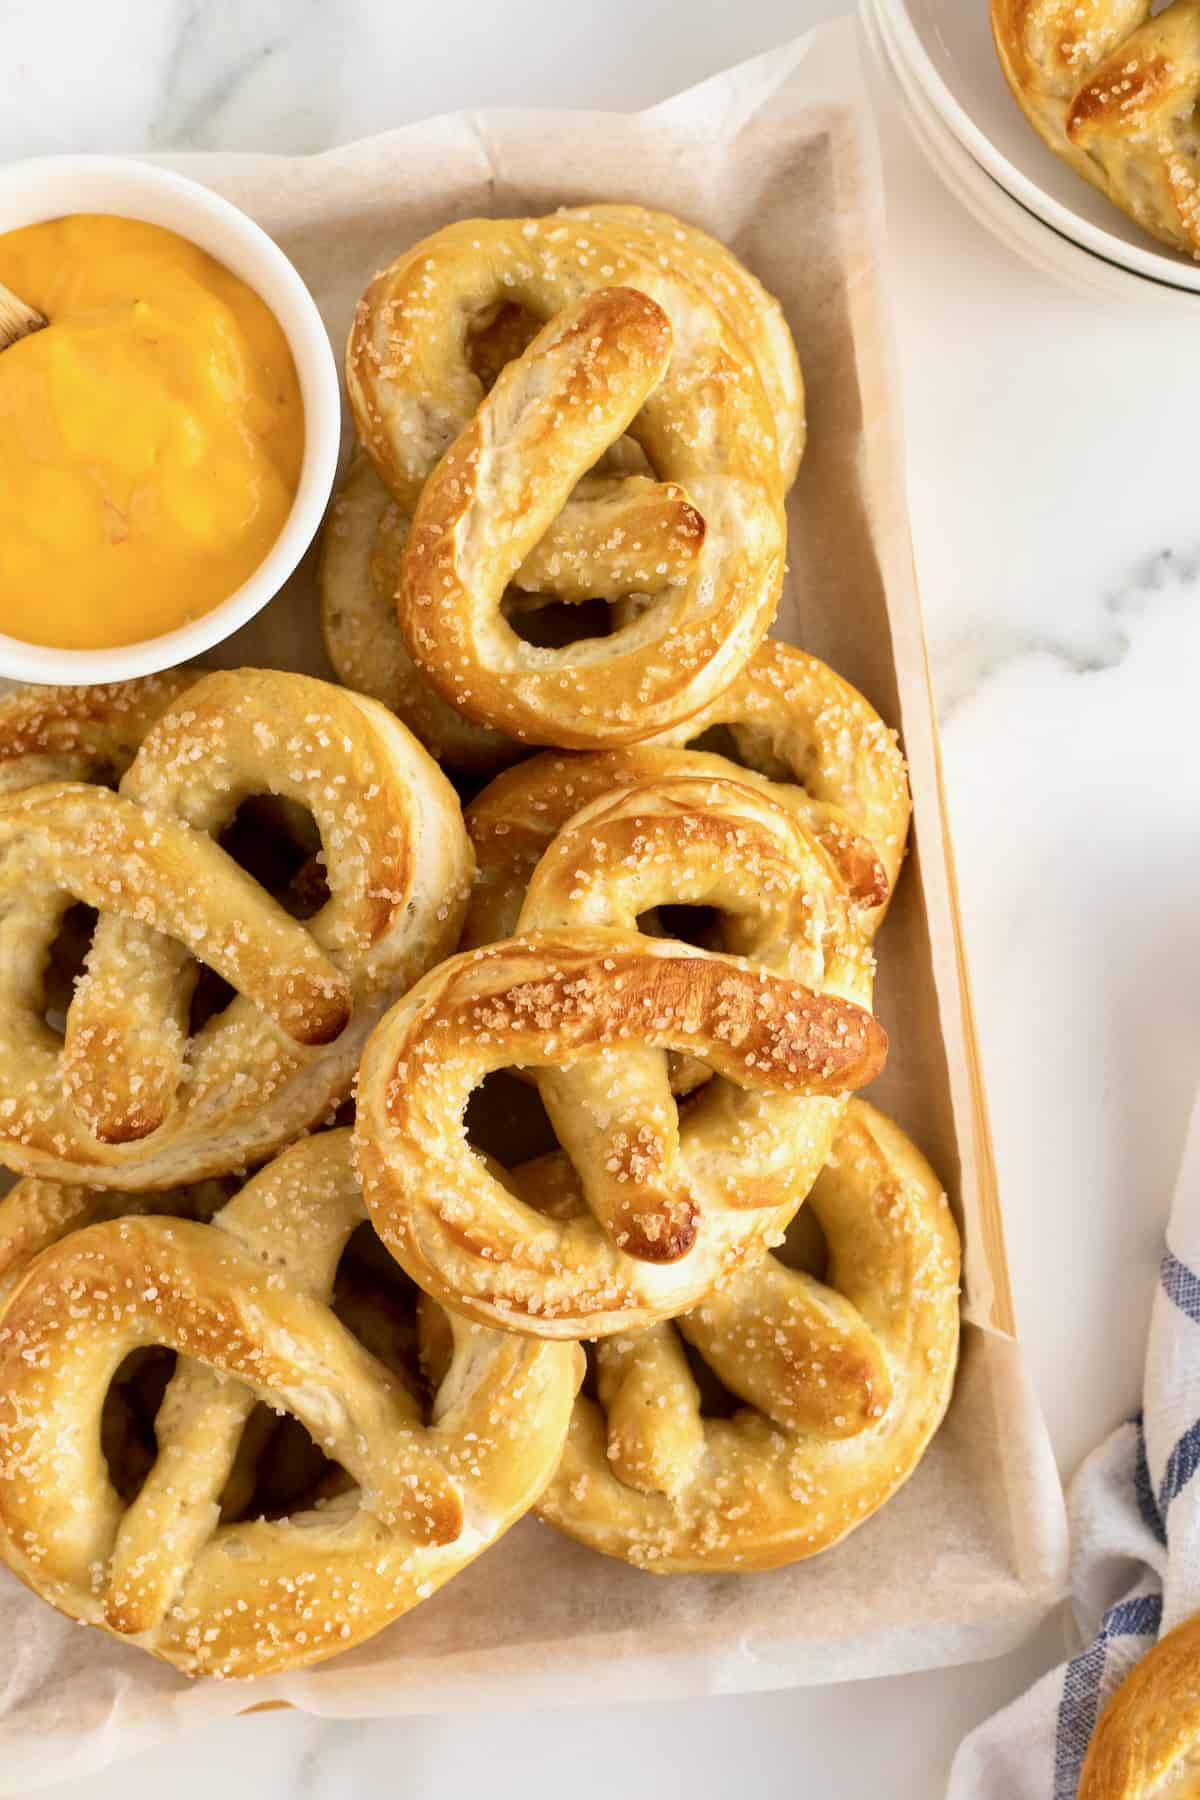
Super Soft Pretzels with a salty crust that are easy to make and better than the ones you’ll buy at the mall or a ballpark.
Constantly Craving a Soft Pretzel
Homemade pretzels have been on my baking bucket list for years. I love a great soft pretzel with a side of mustard or cheese sauce for dipping. It’s one of those snacks that I constantly crave and have always just relied on the mall or ballpark to get one. Why oh why have I waited this long?!
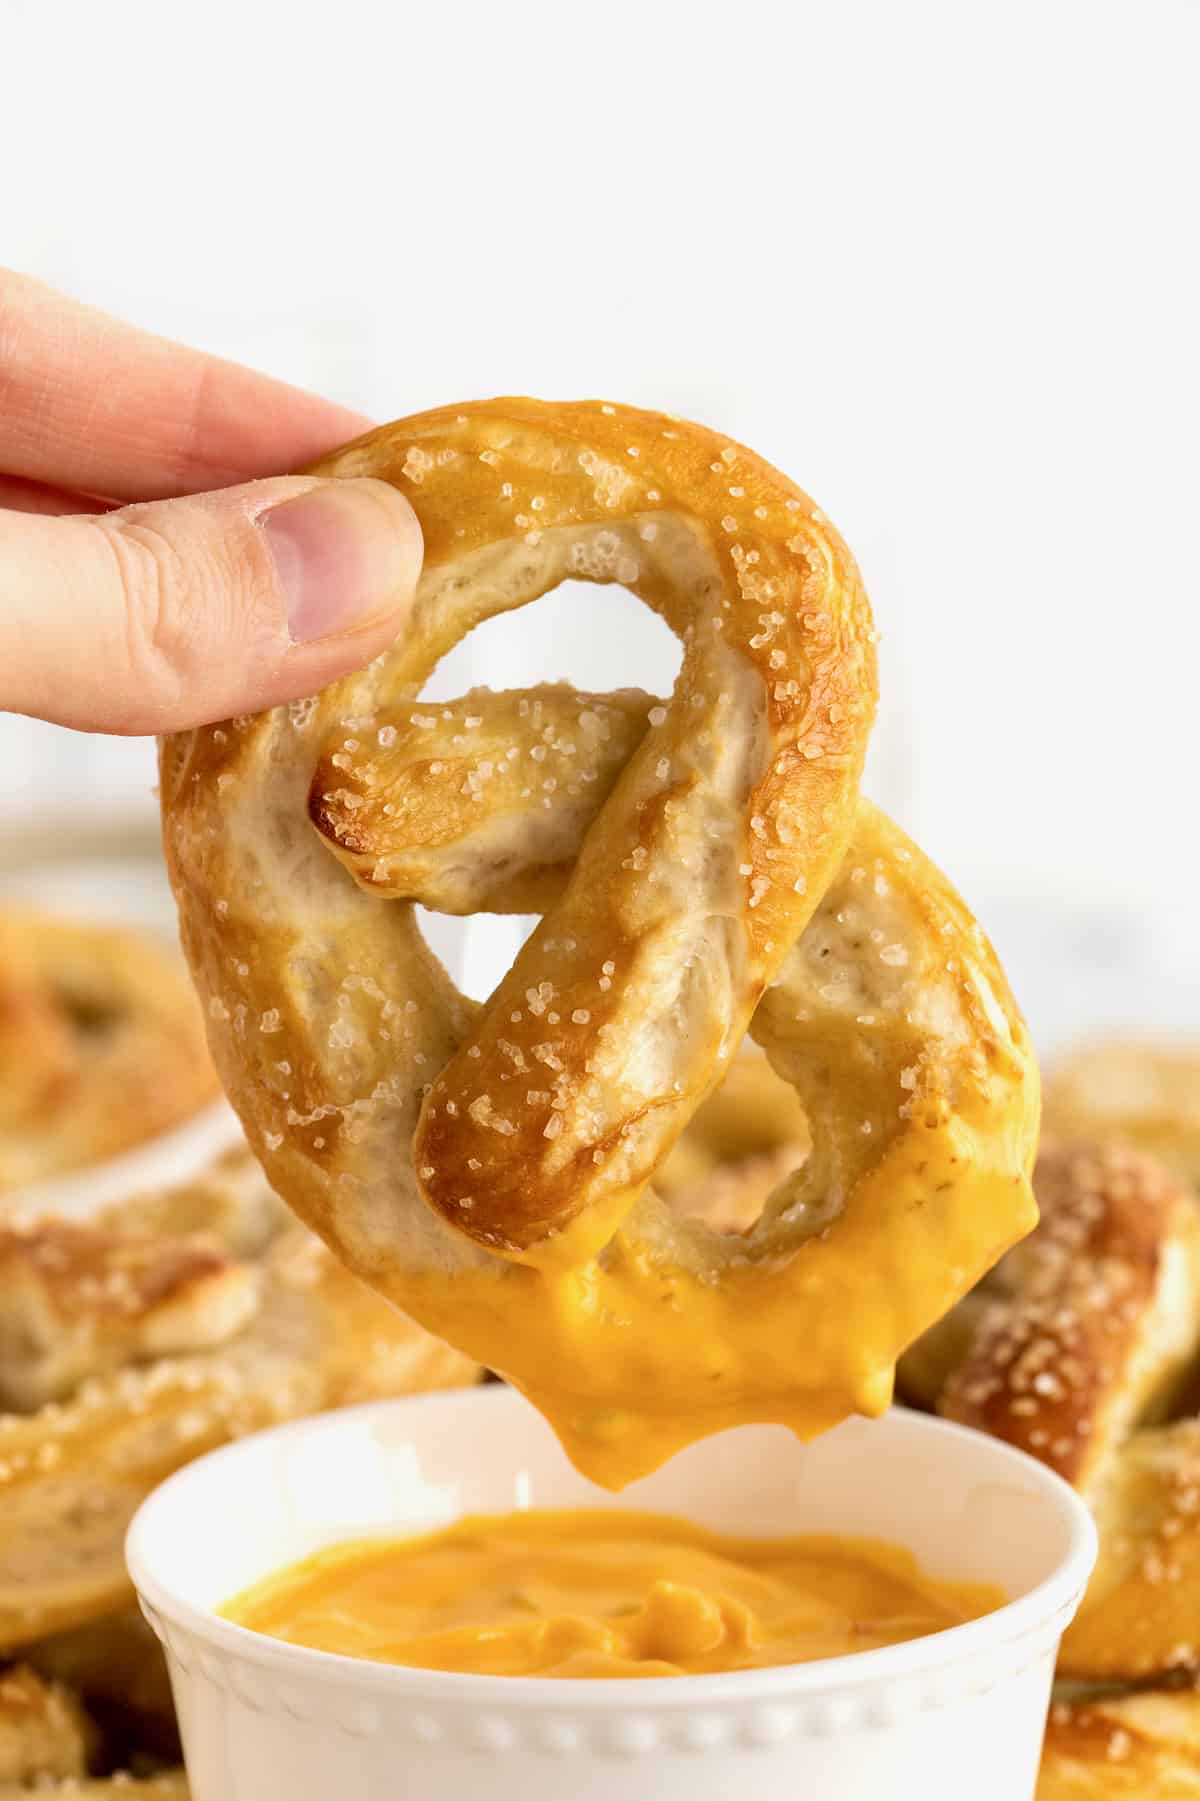
It’s Pretzels with Cheese Dip for Me!
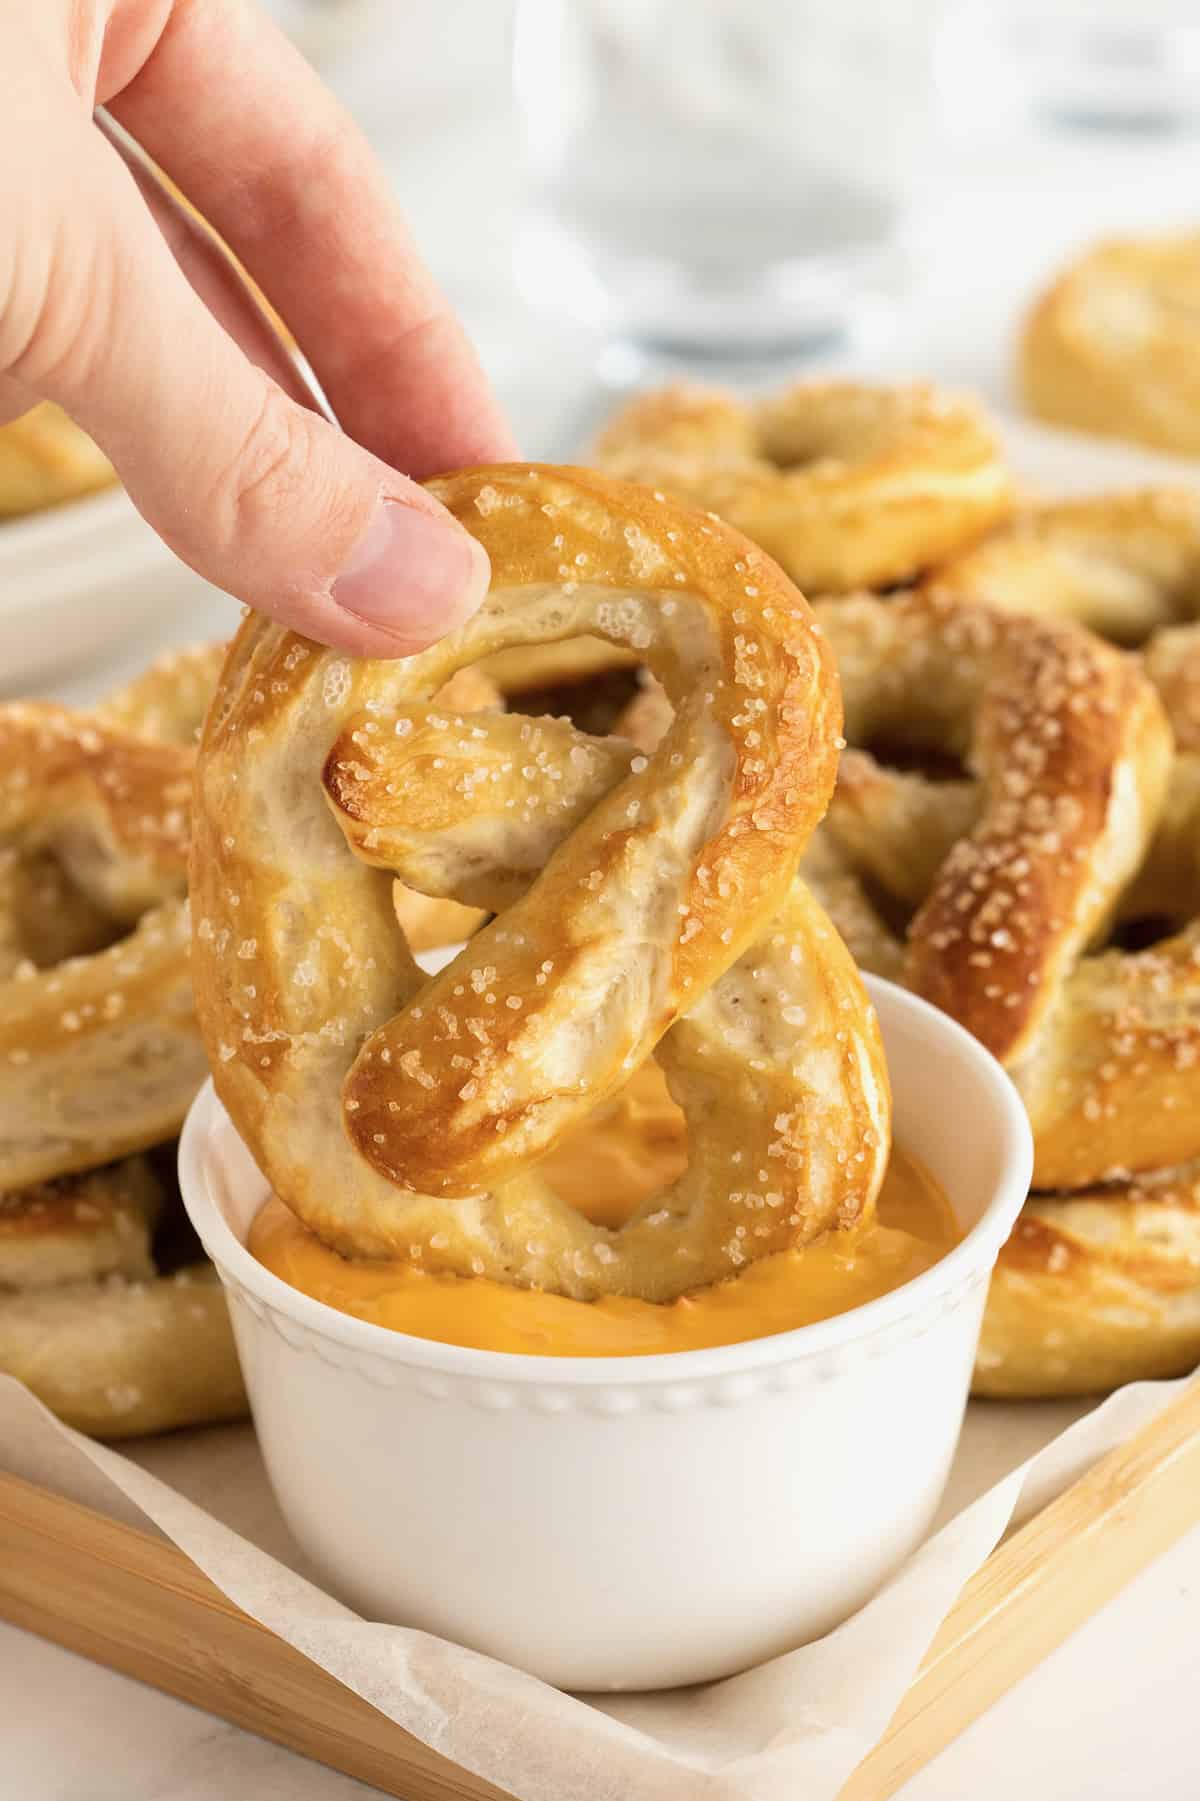
I could eat a big soft pretzel just by itself, but I’m a dipper so I usually get a side of mustard or cheese sauce to dip it in. M’m! M’m!
It’s a lot easier than you’d think to make homemade pretzels. And it’s pretty fun too! Don’t dare fear the yeast. Yeast is a wonderful thing and once you’ve got it down, you’re baking will only get better.
Quick Tip: Give it Time
Although this pretzel recipe is very easy, the dough takes about an hour to rise, so make sure you factor that into your planning.
Love at First Bite
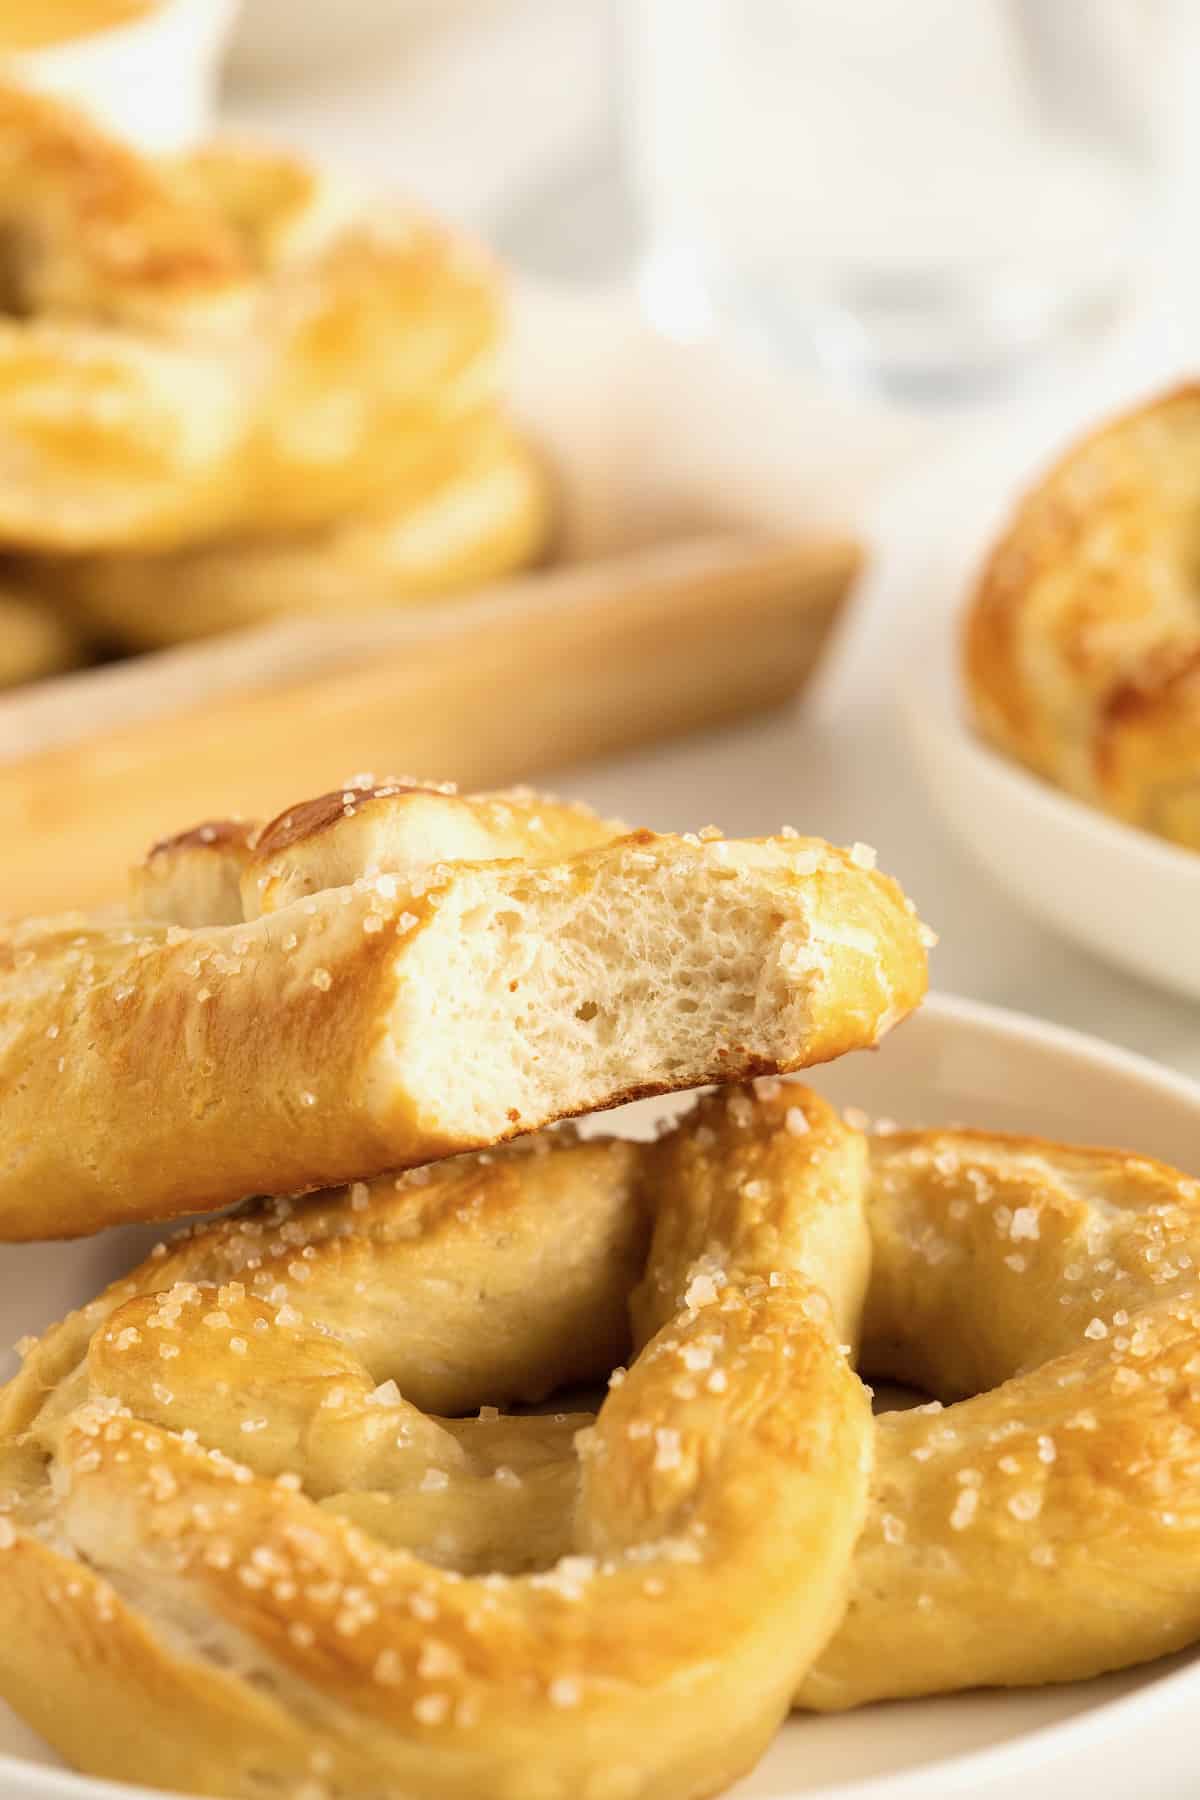
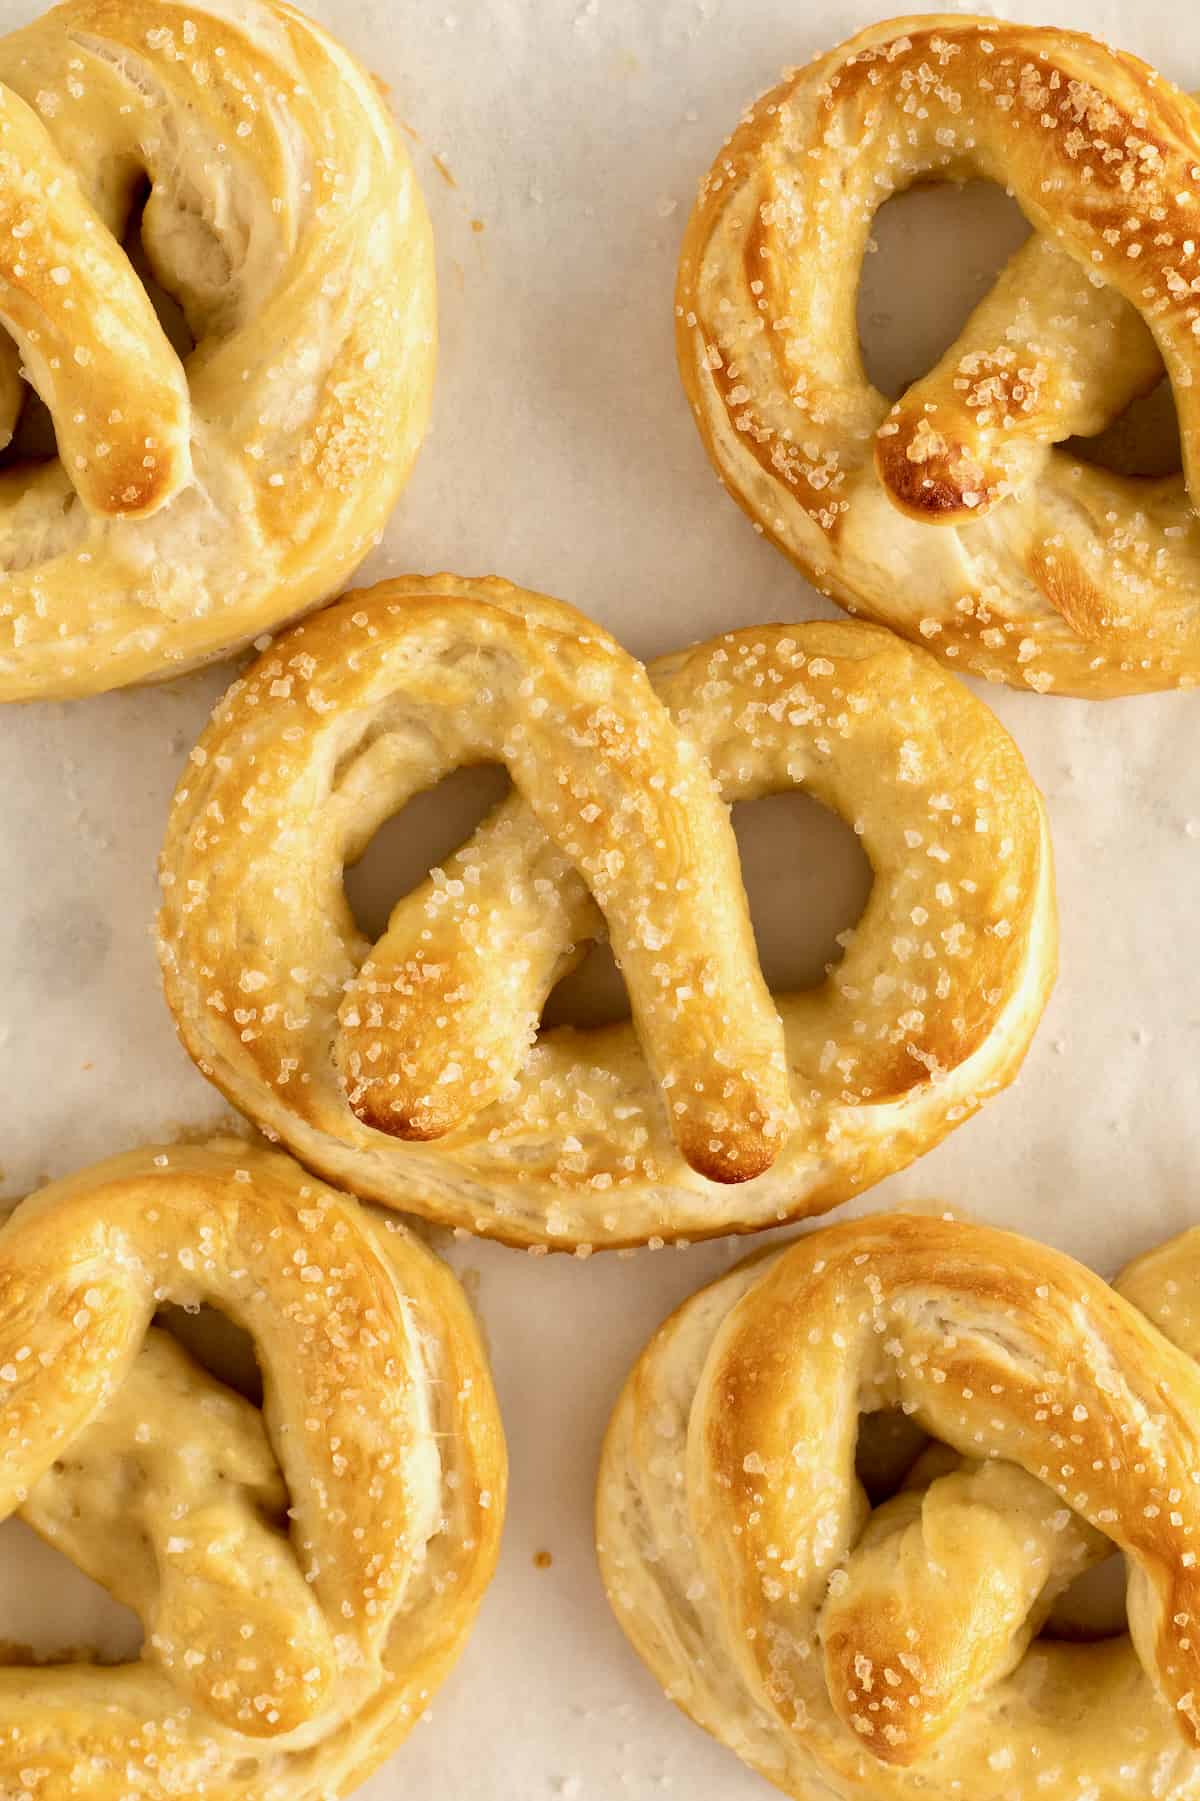
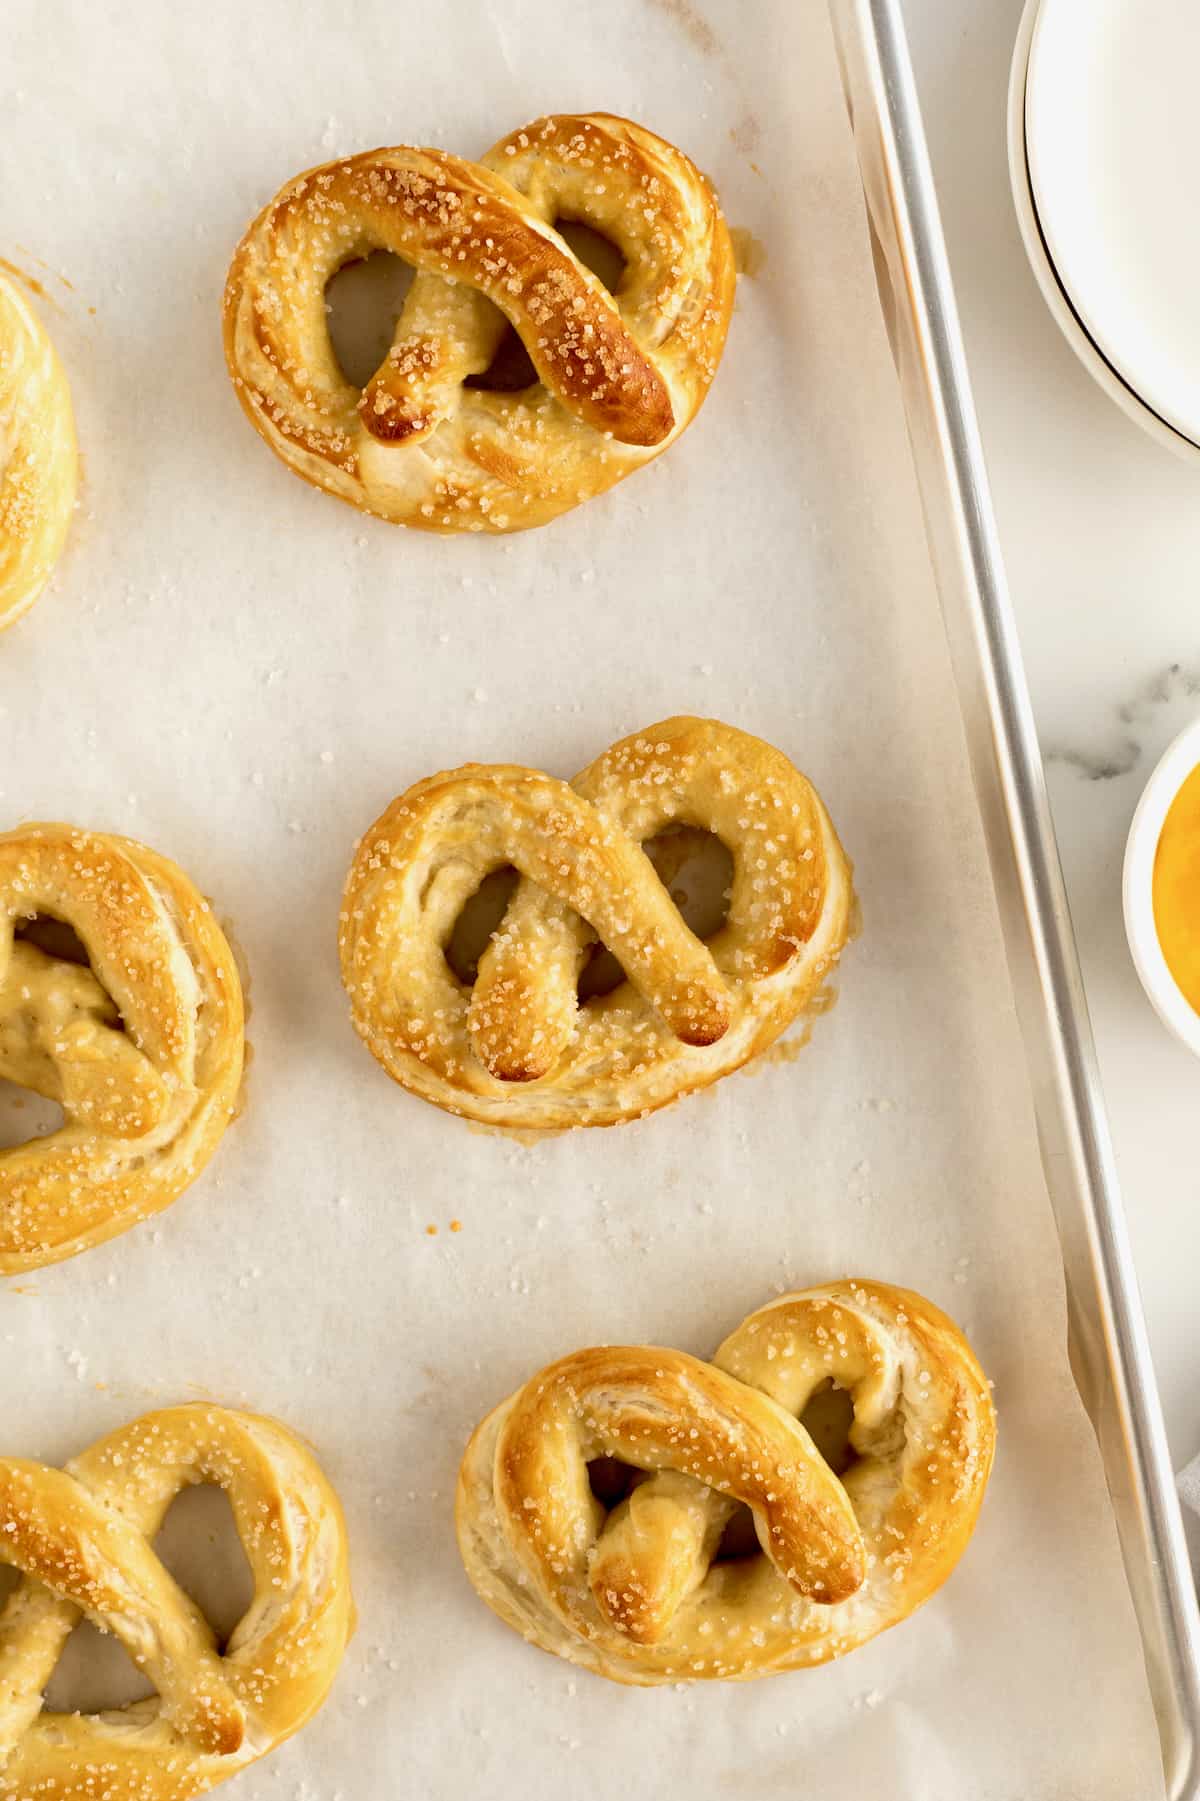
Big, warm, soft, salty homemade pretzels that are love at first sight and most certainly bite! Your house will smell of the most intoxicating pretzel aroma and you’ll pull the most beautiful golden soft pretzels out of your oven. Once you’ve baked them once and tasted how amazing they are, you’ll want to bake them again and again and again.
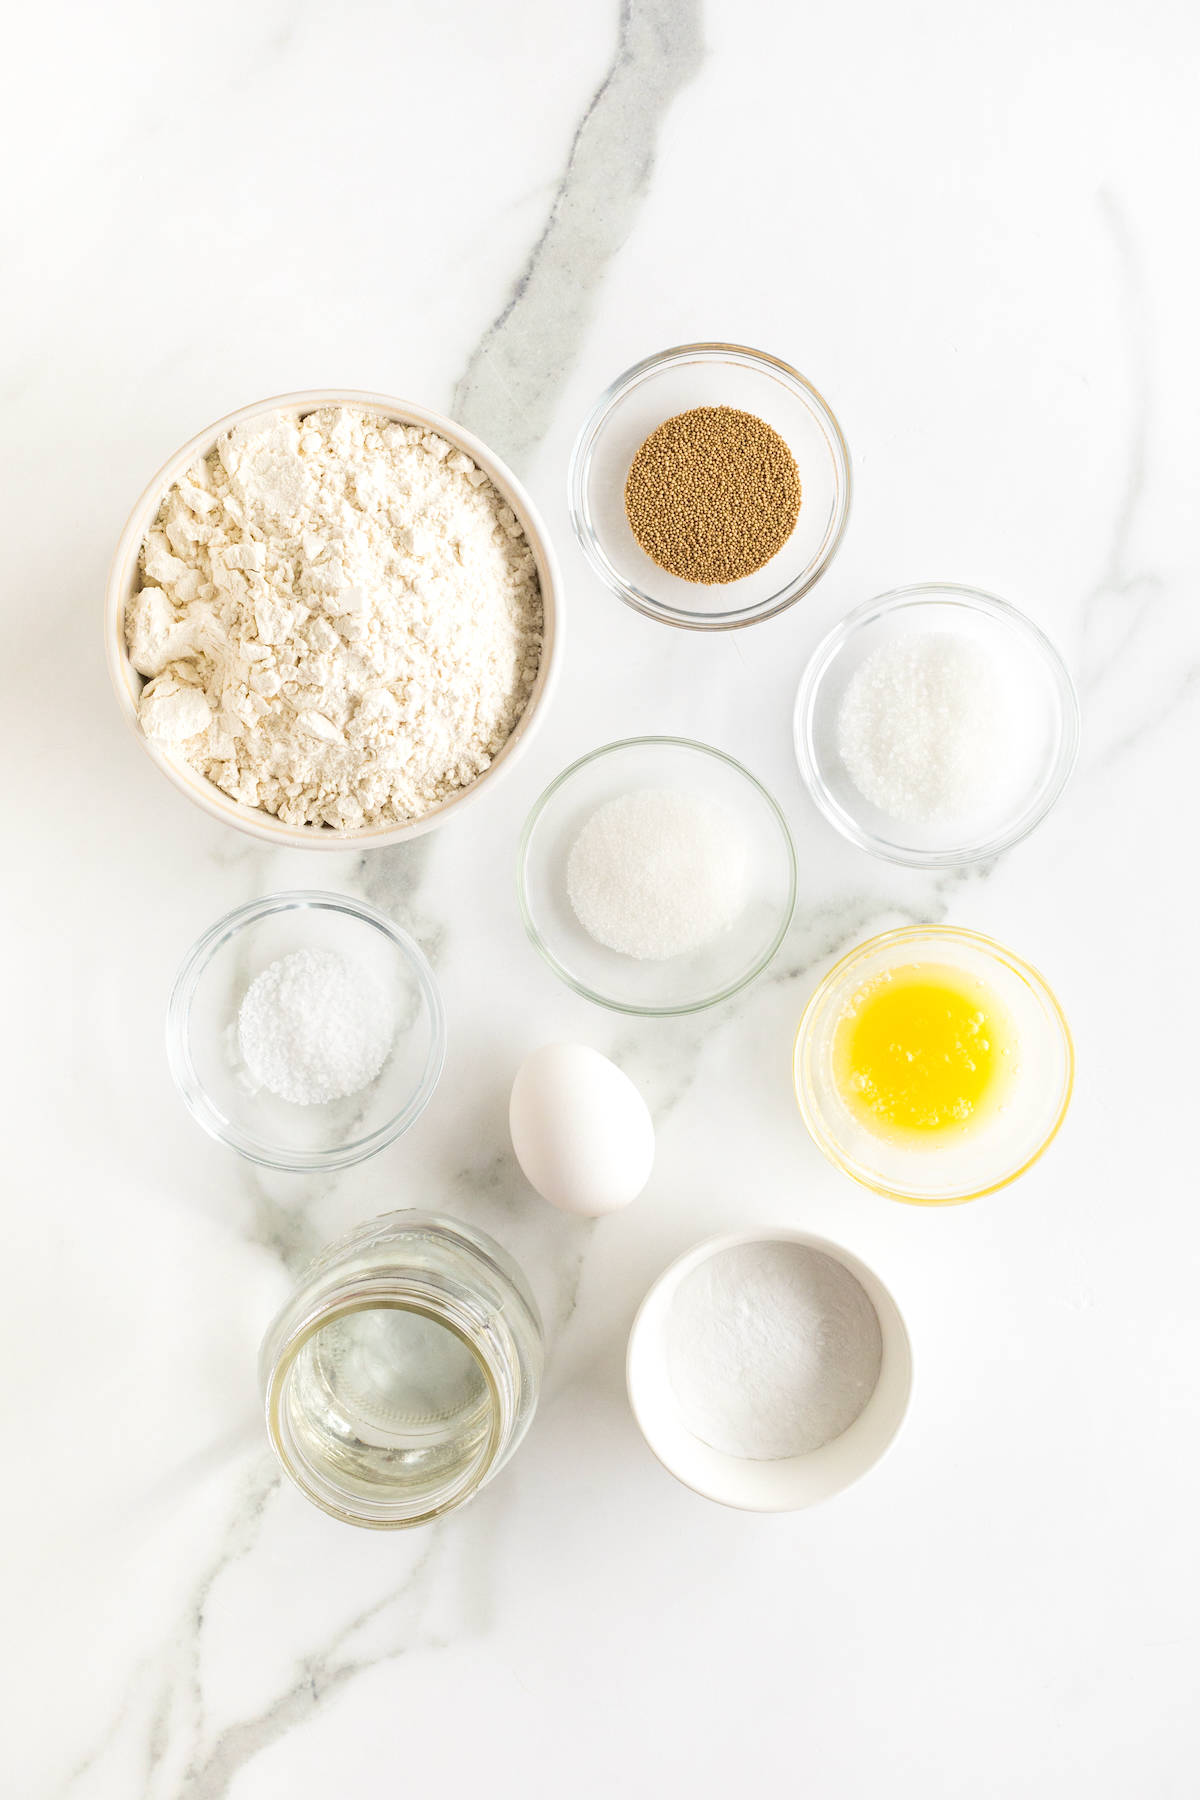
What Do I Need to Make Soft Pretzels?
(see recipe card for measurements and details)
- Active dry yeast
- Granulated sugar
- Warm water
- Unsalted butter
- Bread flour or all-purpose flour
- Kosher salt
- Baking soda
- Egg
- Coarse sea salt, for sprinkling
- Baking sheets
- Wire cooling rack
- Parchment paper
Did You Know?
The key to a great soft pretzel is dipping it in a hot baking soda solution. That’s what helps create that slightly crisp golden crust that makes biting into a pretzel so enjoyable!
How to Make Soft Pretzels
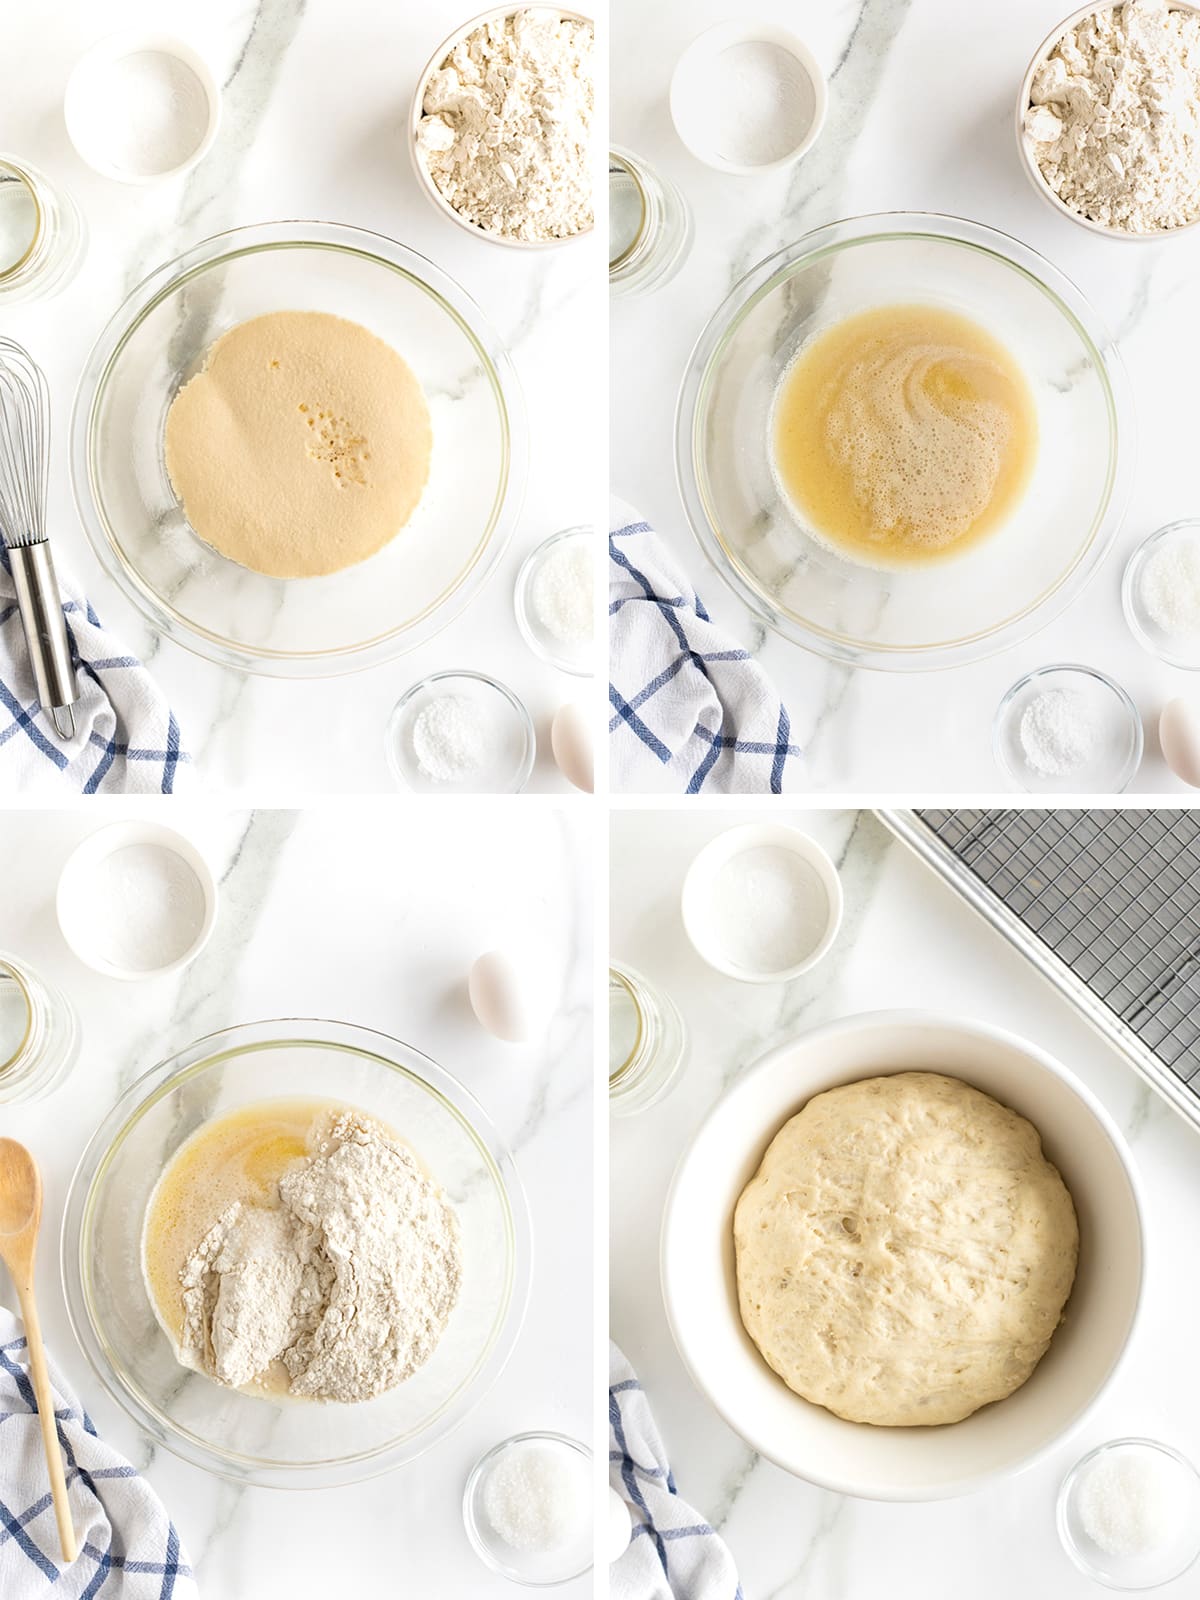
- In a large bowl, add the yeast and sugar. Gently pour the warm water over it and let proof until foamy, about 5 minutes.
- Whisk in the melted butter and then stir in the flour and salt until well combined. Using well-floured hands, form dough into a moist ball. Place in a lightly greased bowl and cover with a damp cloth. Let the dough rise in a warm place until doubled in size, about 1 hour.
- Bring 7 cups water and 1/3 cup baking soda to a slight boil in a large pot. Reduce heat to medium low.
- Preheat oven to 425°F. Cover one baking sheet with parchment paper. Set a wire rack over another baking sheet.
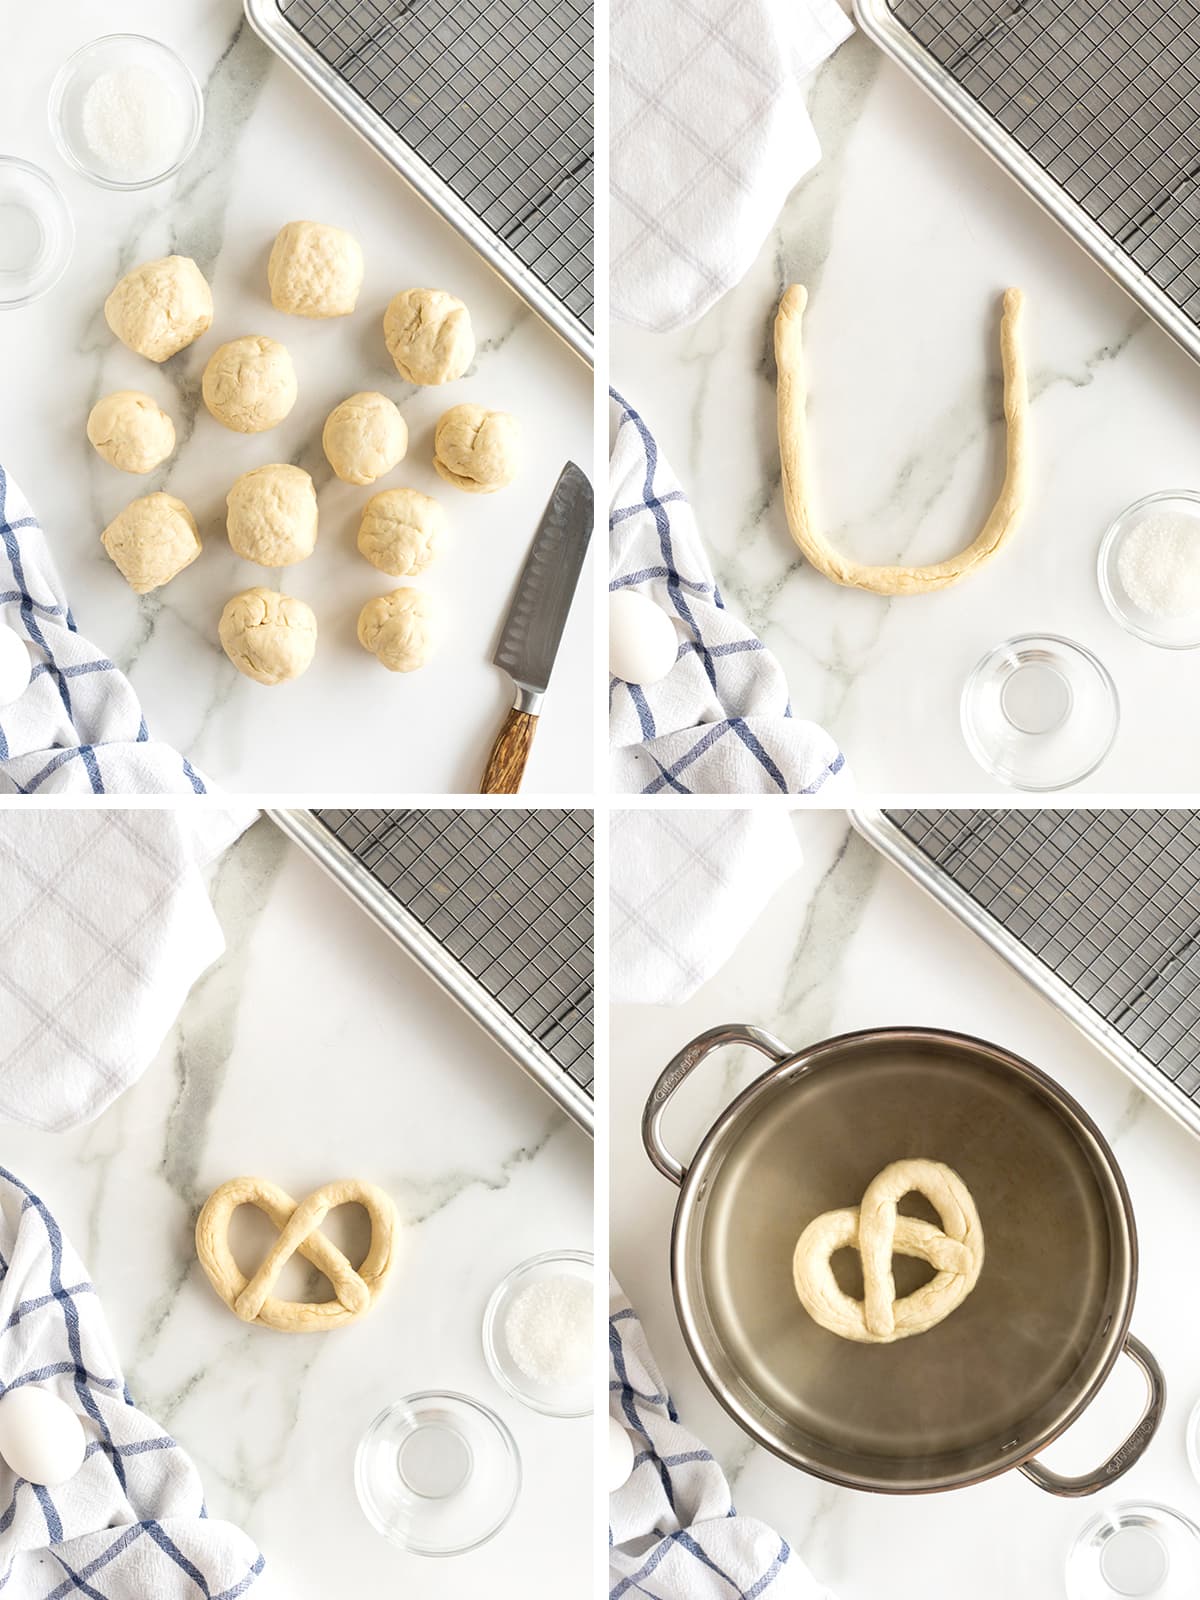
- Once the dough has doubled in size, divide into 12 equal portions, about 1/4 cup each. Place portions of dough back into the greased bowl and cover with the damp cloth while you work with one portion at a time.
- Roll and stretch a portion of dough into a 22-inch rope with your hands, working from the center to the ends.
- Twist the rope into a pretzel shape.
- Gently dip the pretzel into the hot baking soda solution, for about 30 seconds.
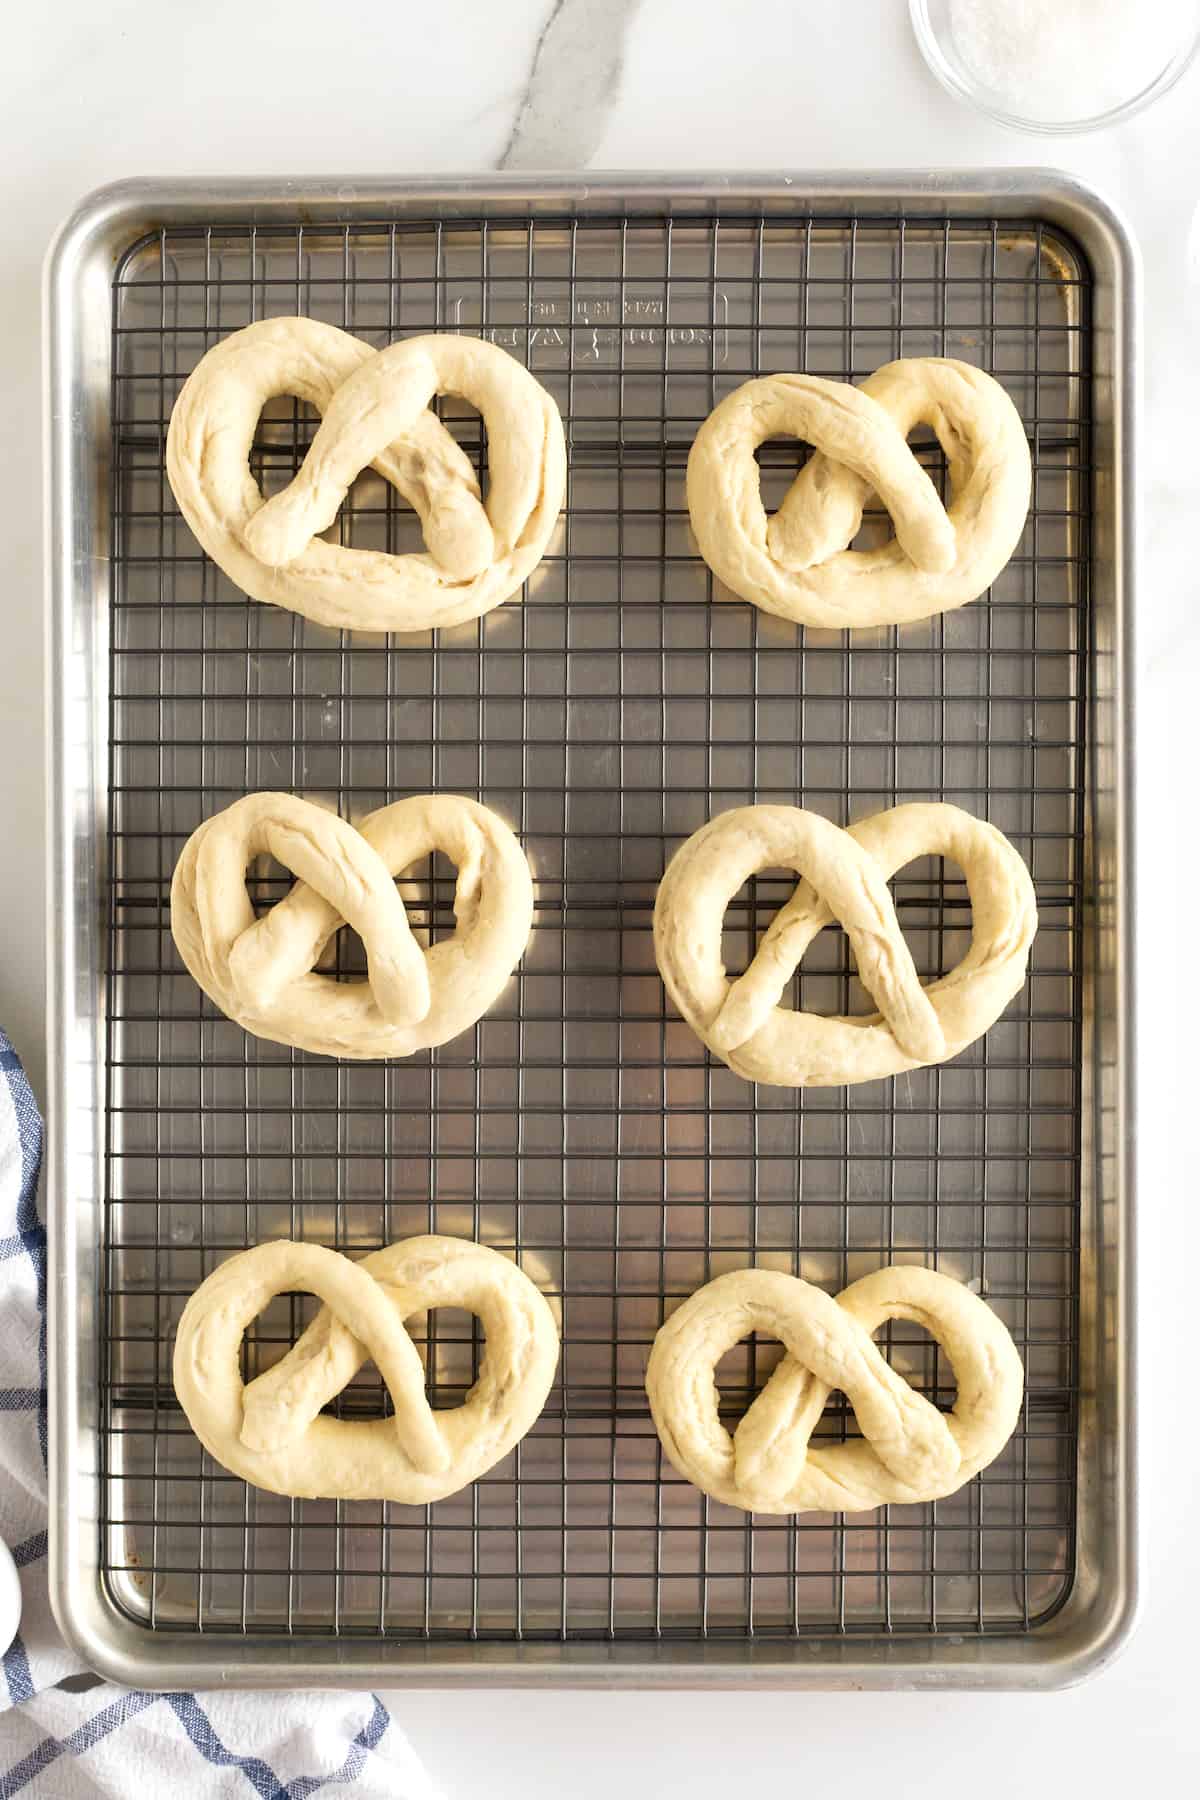
- Transfer to the wire rack. Repeat process with 5 more portions of dough, as you’ll just want to bake 6 pretzels at a time.
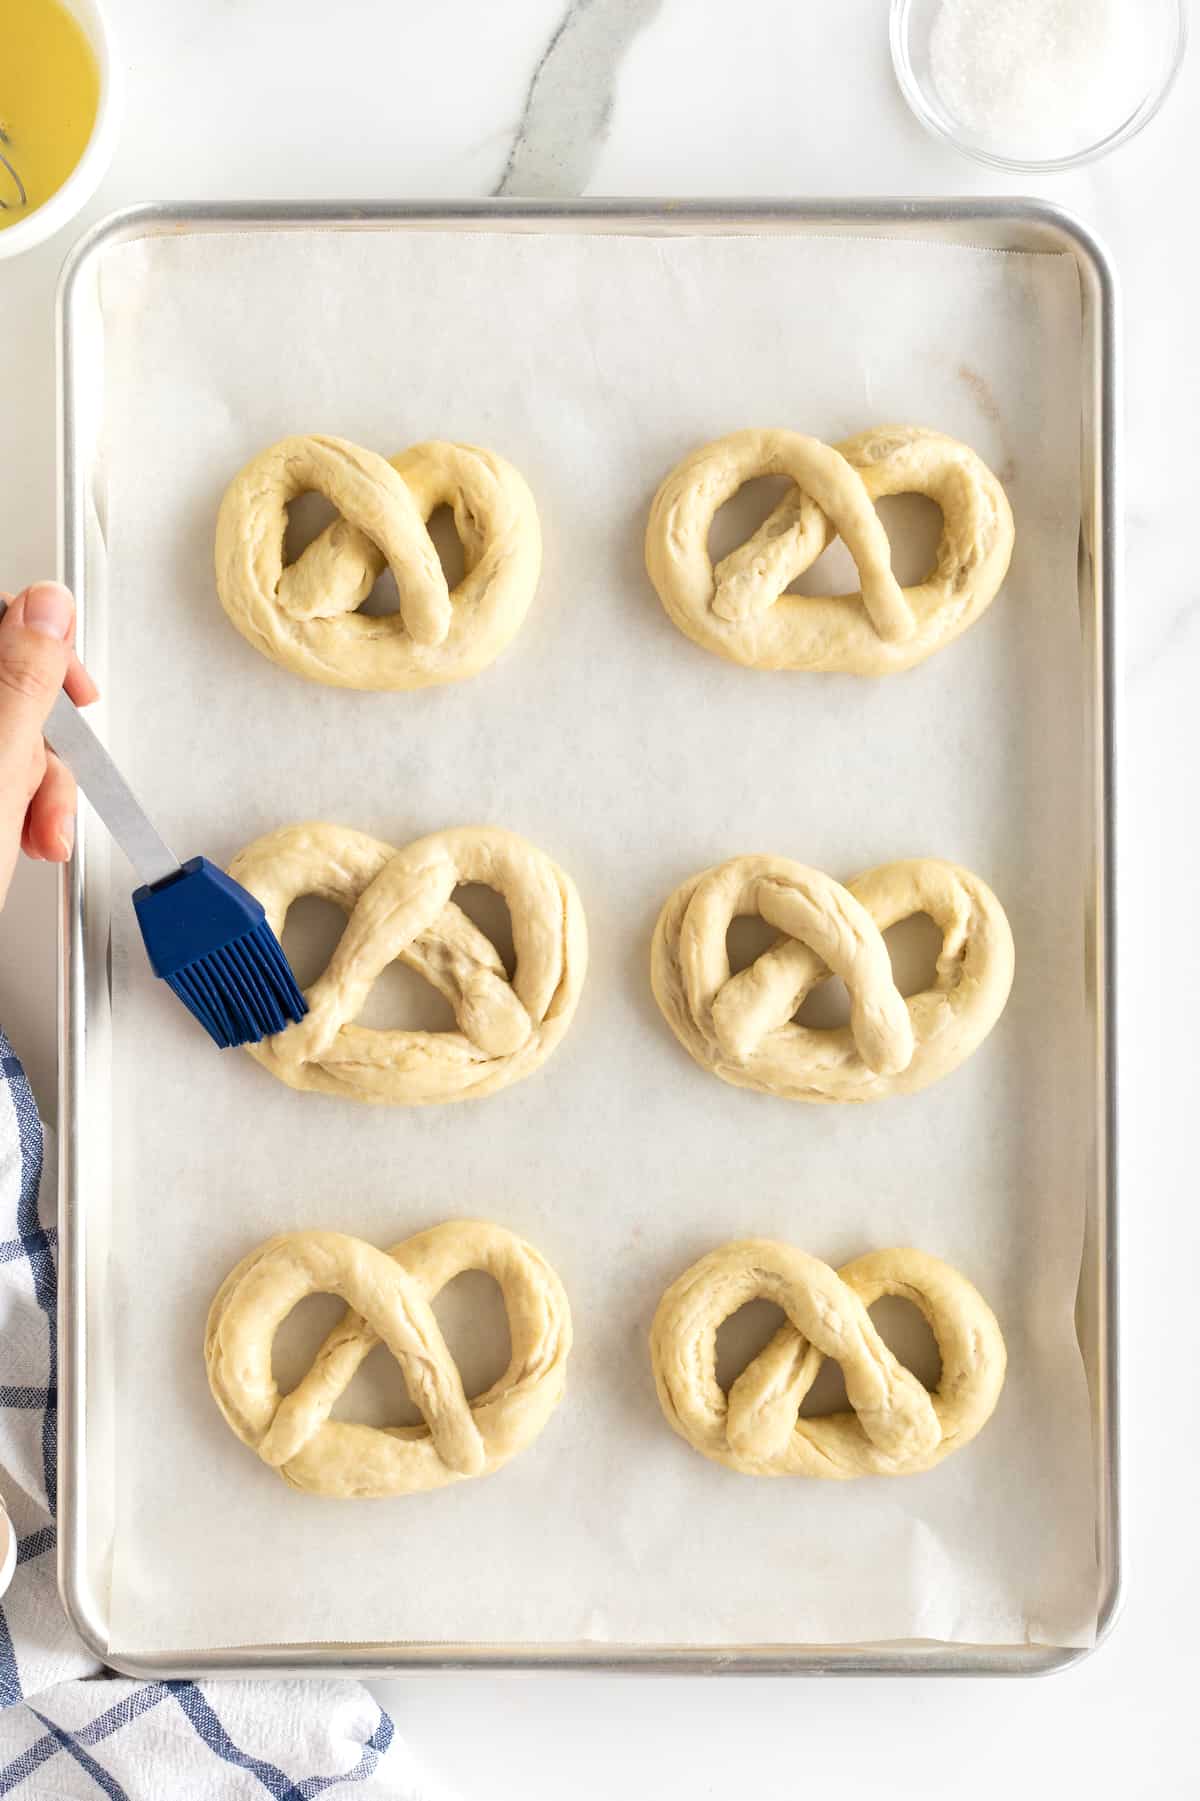
- Transfer the dipped pretzels to the parchment-lined baking sheet. Whisk together the egg and 1 teaspoon water. Brush the egg wash all over the tops and sides of each pretzel and immediately sprinkle generously with coarse salt.
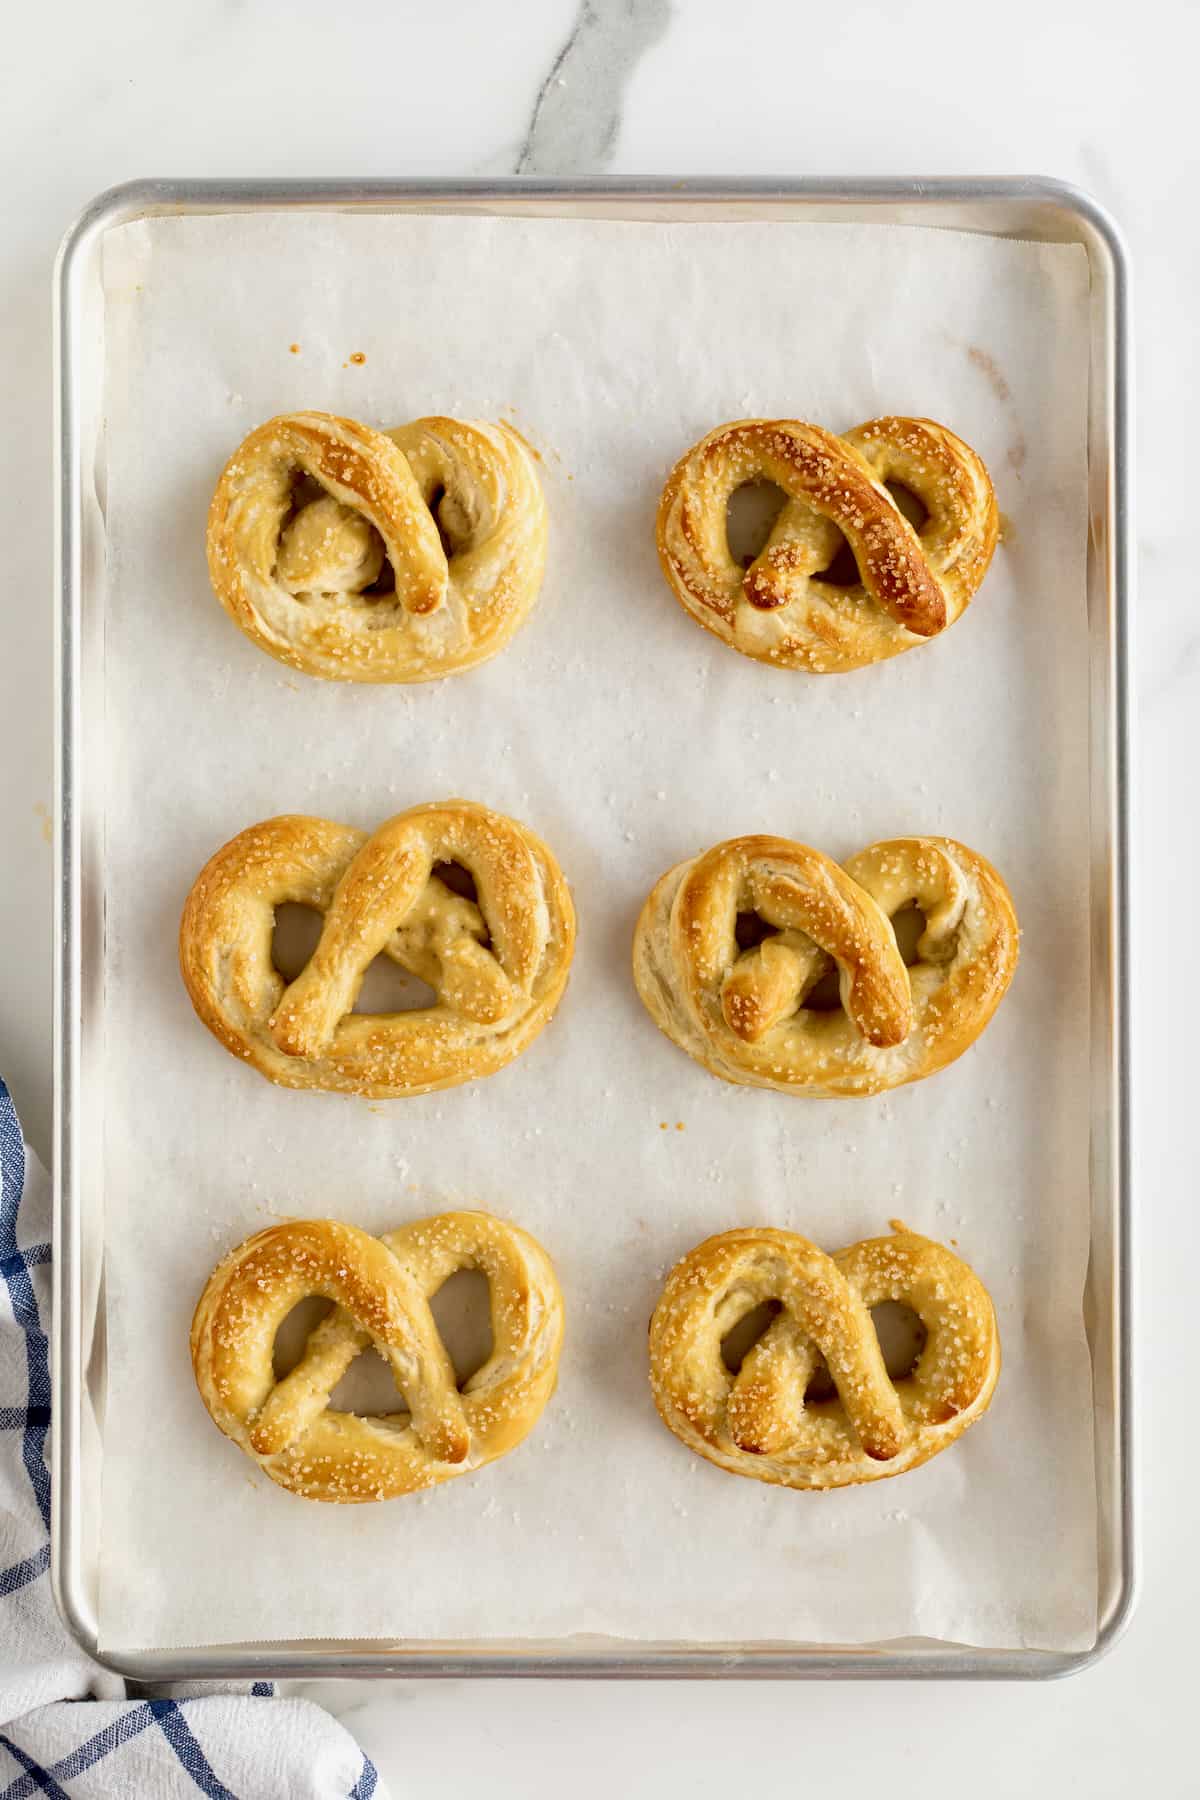
- Place the baking sheet on the middle rack of the oven and bake the pretzels until golden, 12-14 minutes, rotating the baking sheet halfway through the baking time.
- While the first batch of pretzels are baking, prepare the other 6 pretzels so they’re ready to go in the oven when the first batch comes out.
Bonus: How to Make Cheese Sauce
What you need:
- Unsalted butter
- All-purpose flour
- Milk
- American cheese slices
How to make the sauce:
- First, melt the butter in a small saucepan over medium heat.
- Then whisk in the flour and then slowly whisk in the milk. Continue whisking until it comes to a slight simmer. Reduce the heat to low.
- Add in the cheese and stir frequently until melted.
- Serve immediately or keep warm over low heat so it stays melty until you’re ready to serve it. Whisk in additional milk, 1 tablespoon at a time, if the cheese sauce starts to thicken.
More Winning Recipes for Football Season
You’ll score big with my Winning Recipes for Football Season! I’ve rounded up our favorite game day recipes that are sure to win everyone over at your football watch party!

How to Store Soft Pretzels
To store soft pretzels, let them cool completely and then store in a sealed container or baggie at room temperature for up to 3 days.
To freeze soft pretzels, let the pretzels cool completely and then wrap each pretzel in plastic wrap before placing in a freezer-safe baggie or container in the freezer for up to 2 months. When ready to enjoy, let the frozen pretzels defrost, loosely covered to release the moisture, at room temperature for a few hours.
To reheat soft pretzels, place them on a parchment-lined sheet pan on the middle rack in a 350°F oven or toaster oven for about 5 minutes until glistening and warm. Or heat in the microwave for about 15-30 seconds until warm.
If you make these Soft Pretzels, be sure to snap a picture and share it with me on Instagram @thebakermama so I can see. I just love seeing how inspired and creative y’all get with the recipes I share. Enjoy!
xoxo,


Soft Pretzels
- Prep Time: 20 mins
- Rising Time: 1 hour
- Cook Time: 14 mins
- Total Time: 1 hour 34 mins
- Yield: 12
- Category: snacks
Description
Super soft pretzels with a salty crust that are easy to make and better than the ones you’ll buy at the mall or a ballpark.
Ingredients
Dough:
- 1 (1/4 ounce) package active dry yeast (2 and 1/4 teaspoons)
- 1 tablespoon granulated sugar
- 1 cup warm water (110°F)
- 1 tablespoon unsalted butter, melted & slightly cooled
- 2 and 1/2 cups bread flour or all-purpose flour
- 1 teaspoon kosher salt
Other Ingredients:
- 7 cups water
- 1/3 cup baking soda
- 1 large egg
- 1 teaspoon water
- coarse sea salt, for sprinkling
Instructions
- In a large bowl, add the yeast and sugar. Gently pour the warm water over it and let proof until foamy, about 5 minutes.
- Whisk in the melted butter and then stir in the flour and salt until well combined. Using well-floured hands, form dough into a moist ball. Place in a lightly greased bowl and cover with a damp cloth. Let dough rise in a warm place until doubled in size, about 1 hour.
- Bring 7 cups water and 1/3 cup baking soda to a slight boil in a large pot. Reduce heat to medium low.
- Preheat oven to 425°F. Cover one baking sheet with parchment paper. Set a wire rack over another baking sheet.
- Once dough has doubled in size, divide into 12 equal portions, about 1/4 cup each. Place portions of dough back into the greased bowl and cover with the damp cloth while you work with one portion at a time.
- Roll and stretch a portion of dough into a 22-inch rope with your hands, working from the center to the ends. Twist the rope into a pretzel shape.
- Gently dip the pretzel into the hot baking soda solution, for about 30 seconds, and then transfer to the wire rack. Repeat process with 5 more portions of dough, as you’ll just want to bake 6 at a time.
- Transfer pretzels to the parchment-lined baking sheet. Whisk together the egg and 1 teaspoon water. Brush the egg wash all over the tops and sides of each pretzel and immediately sprinkle generously with coarse salt.
- Place the baking sheet on the middle rack of the oven and bake the pretzels until golden, 12-14 minutes, rotating the baking sheet halfway through baking time.
- While the first batch of pretzels are baking, prepare the other 6 pretzels so they’re ready to go in the oven when the first batch comes out.
- Serve with mustard or cheese sauce. Enjoy!

Cheese Sauce
- Cook Time: 5 minutes
- Total Time: 5 minutes
- Yield: 1.5 cups
Description
Pretzels + Cheese Sauce — there’s nothing like it! This cheese sauce is the perfect companion for soft pretzels and pretzel bites!
Ingredients
- 1 tablespoon unsalted butter
- 1 tablespoon all-purpose flour
- 1/2 cup milk, plus more if needed
- 8 ounces deluxe American cheese slices, cut into smaller pieces
Instructions
- Melt the butter in a small saucepan over medium heat.
- Whisk in the flour and then slowly whisk in the milk. Continue whisking until it comes to a slight simmer.
- Reduce the heat to low. Add in the cheese and stir frequently until melted.
- Serve immediately or keep warm over low heat so it stays melty until you’re ready to serve it. Whisk in additional milk, 1 tablespoon at a time, if the cheese sauce starts to thicken.


This was such an easy recipe to follow and the pretzels are so delicious! All the kids loved them. We will definitely make again.
Hi, Stacie! I’m go glad they were a hit. They’re a favorite in our house, too. Enjoy!
Hi Maegan. Just came across your recipe and the pretzels look very delicious. I’m sure it is after reading all the reviews. I’m very tempted to try it but just want to make sure I read the recipe correctly. There is no kneading? It’s music to my ears if that’s true. Hope you can confirm that before I try it out. Thanks. Sook
Hi Sook! That is correct, no dedicated kneading time, but the dough does get plenty of work from your hands when you form it into a ball and then when you divide it into smaller portions and definitely when you roll and stretch each portion of dough into a 22-inch rope. I hope this helps and that you enjoy making and eating them. They’re so good!
I never leave reviews, so this should tell you how freaking good these pretzels are. Recipe is easy to follow and I’m not kidding when I tell you they are delicious. These will be a regular for family movie nights. Thanks for the recipe.
Hi, Heather! I am so glad you enjoyed them! They are one of our favorites, too.
Hi, I was wondering how big these pretzels are once cooked, in the picture they look small so I’m just a bit confused on sizing.
Hi Alice! They’re about 4″ x 4″ once baked. Hope this helps! Enjoy!
Can the flour be switched out to gluten free flour in making these pretzels?
Hi Bobbi! I haven’t tested this recipe with a gluten free flour so I couldn’t say for sure if any adjustments would need to be made to get the same great results. I think they’re certainly worth a try with an all-purpose gluten free flour which usually works great as a substitute in a lot of recipes. If you give them a try, let us know how they turn out. Best wishes!
Because of these days’ yeast shortage, I’m left with rapid rise instant yeast, can I use that instead?🙈
Hi Nathalie! No need to worry! Active dry yeast and instant yeast can generally be used interchangeably, one-for-one (although active dry yeast tends to be slower to rise). Since the recipe calls for active dry and you want to use instant, reduce the rise time by about 10 to 15 minutes. Other than that the recipe can stay exactly the same and there is no need to make any changes. The differences in texture will be very minor and you shouldn’t run into any issues. Enjoy!