
Oh, by golly, it’s a Holly Jolly Kid’s Snack Board! This adorable snack board is as engaging as it is tasty (and healthy too!). The kids will love building and snacking on this festive board made with simple, wholesome ingredients. Holiday memories that will last a lifetime!
Do You Wanna Build a Snowman… and a Grinch?
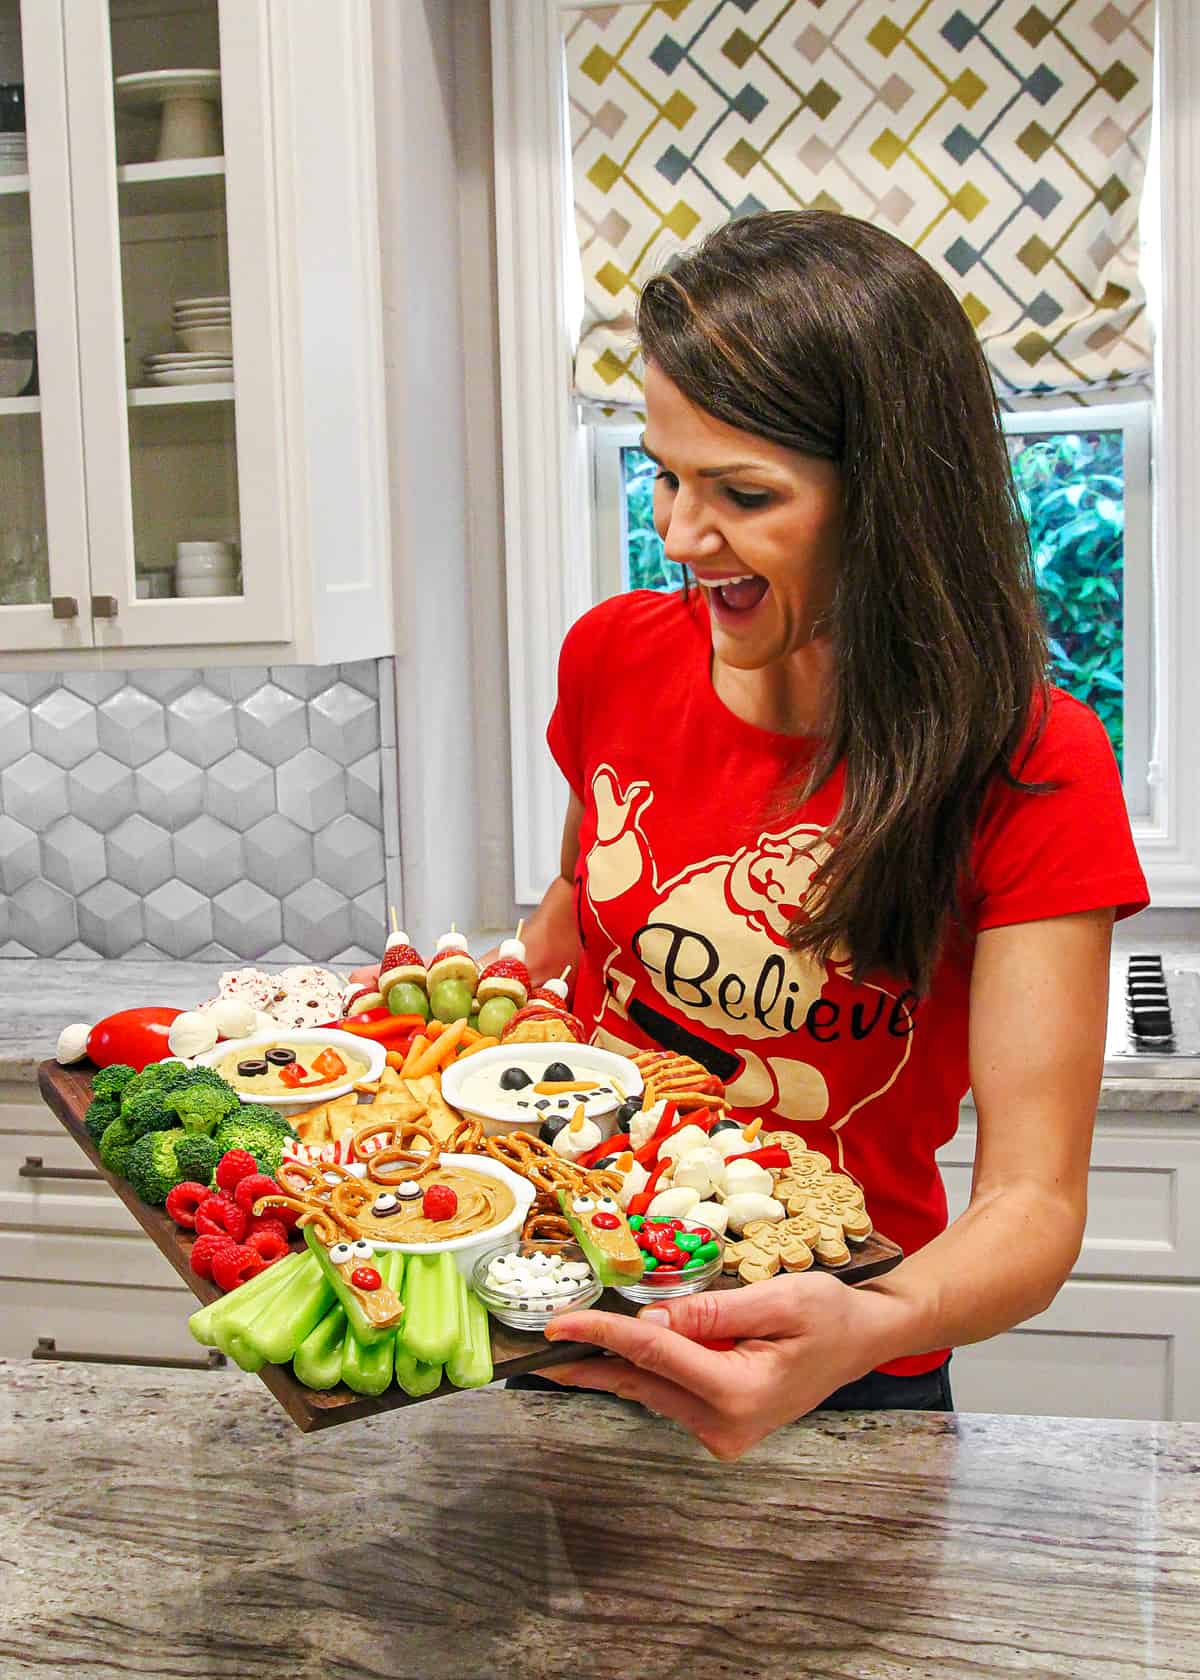
We had such a great time creating and snacking on this Holly Jolly Kid’s Snack Board, I couldn’t wait to share it with you. Something about that Rudolph reminds me of those totally cheesy (and totally wonderful) claymation movies we watched as kids. There’s so much fun and magic at the holidays that I feel like we captured in this fun, easy-to-build board.
Most of these ingredients may already be in your pantry and refrigerator! For a few of the more unique items, I’ve provided some helpful links in the recipe card to aid in your planning and shopping.
Calling all kids and kids at heart…let me show you how to build this adorable and delicious snack board!
What Do I Need to Make a Holly Jolly Snack Board?
- plain hummus
- ranch veggie dip
- creamy peanut butter
- red bell pepper
- mini mozzarella cheese balls
- whole black olives
- cherry tomato
- petite baby carrots
- Ritz snowflake crackers
- salami slices
- pretzel tiny twists
- chocolate chips
- raspberries
- celery stalks, each cut into fourths
- candy eyeballs
- holiday M&M candies
- broccoli florets
- mini marshmallows
- strawberries
- banana
- green grapes
- pita crackers
- Hershey’s candy cane kisses
- white chocolate & peppermint Pretzel Crisps
- gingerbread people cookies
How to Create Your Cast of Characters
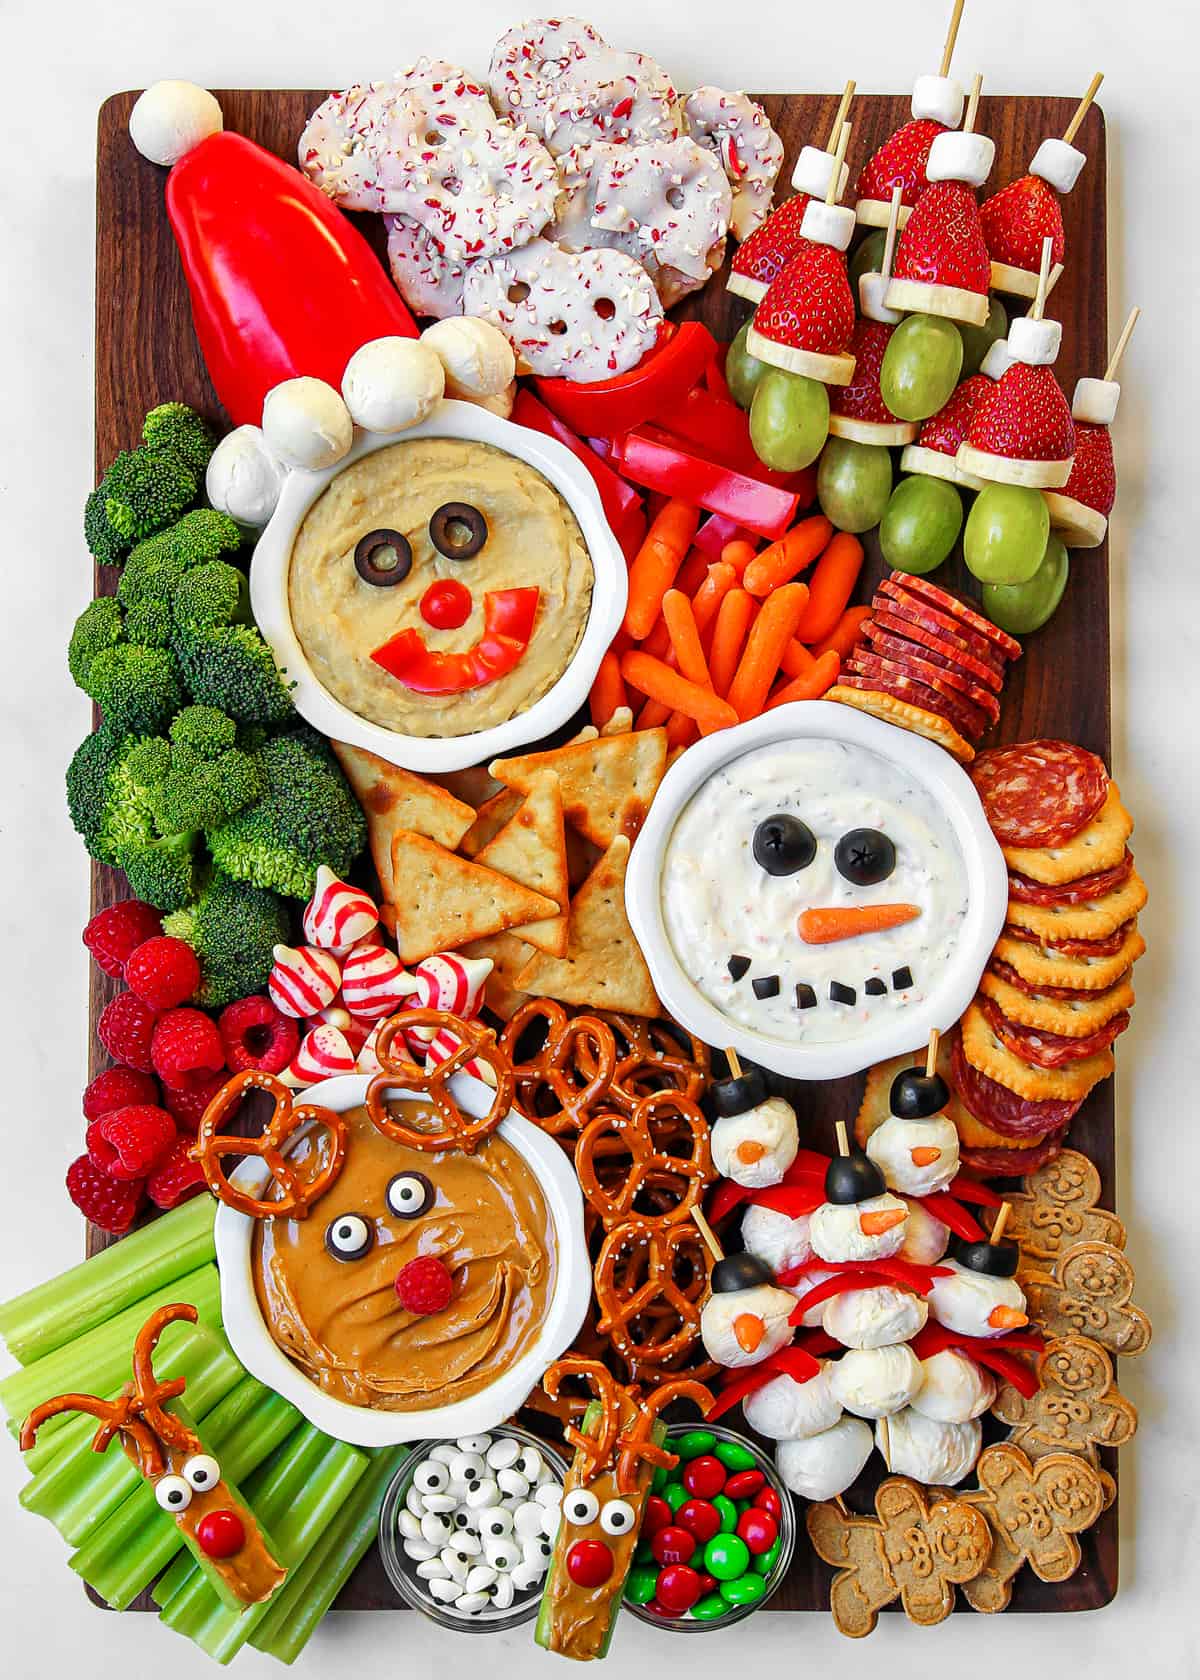
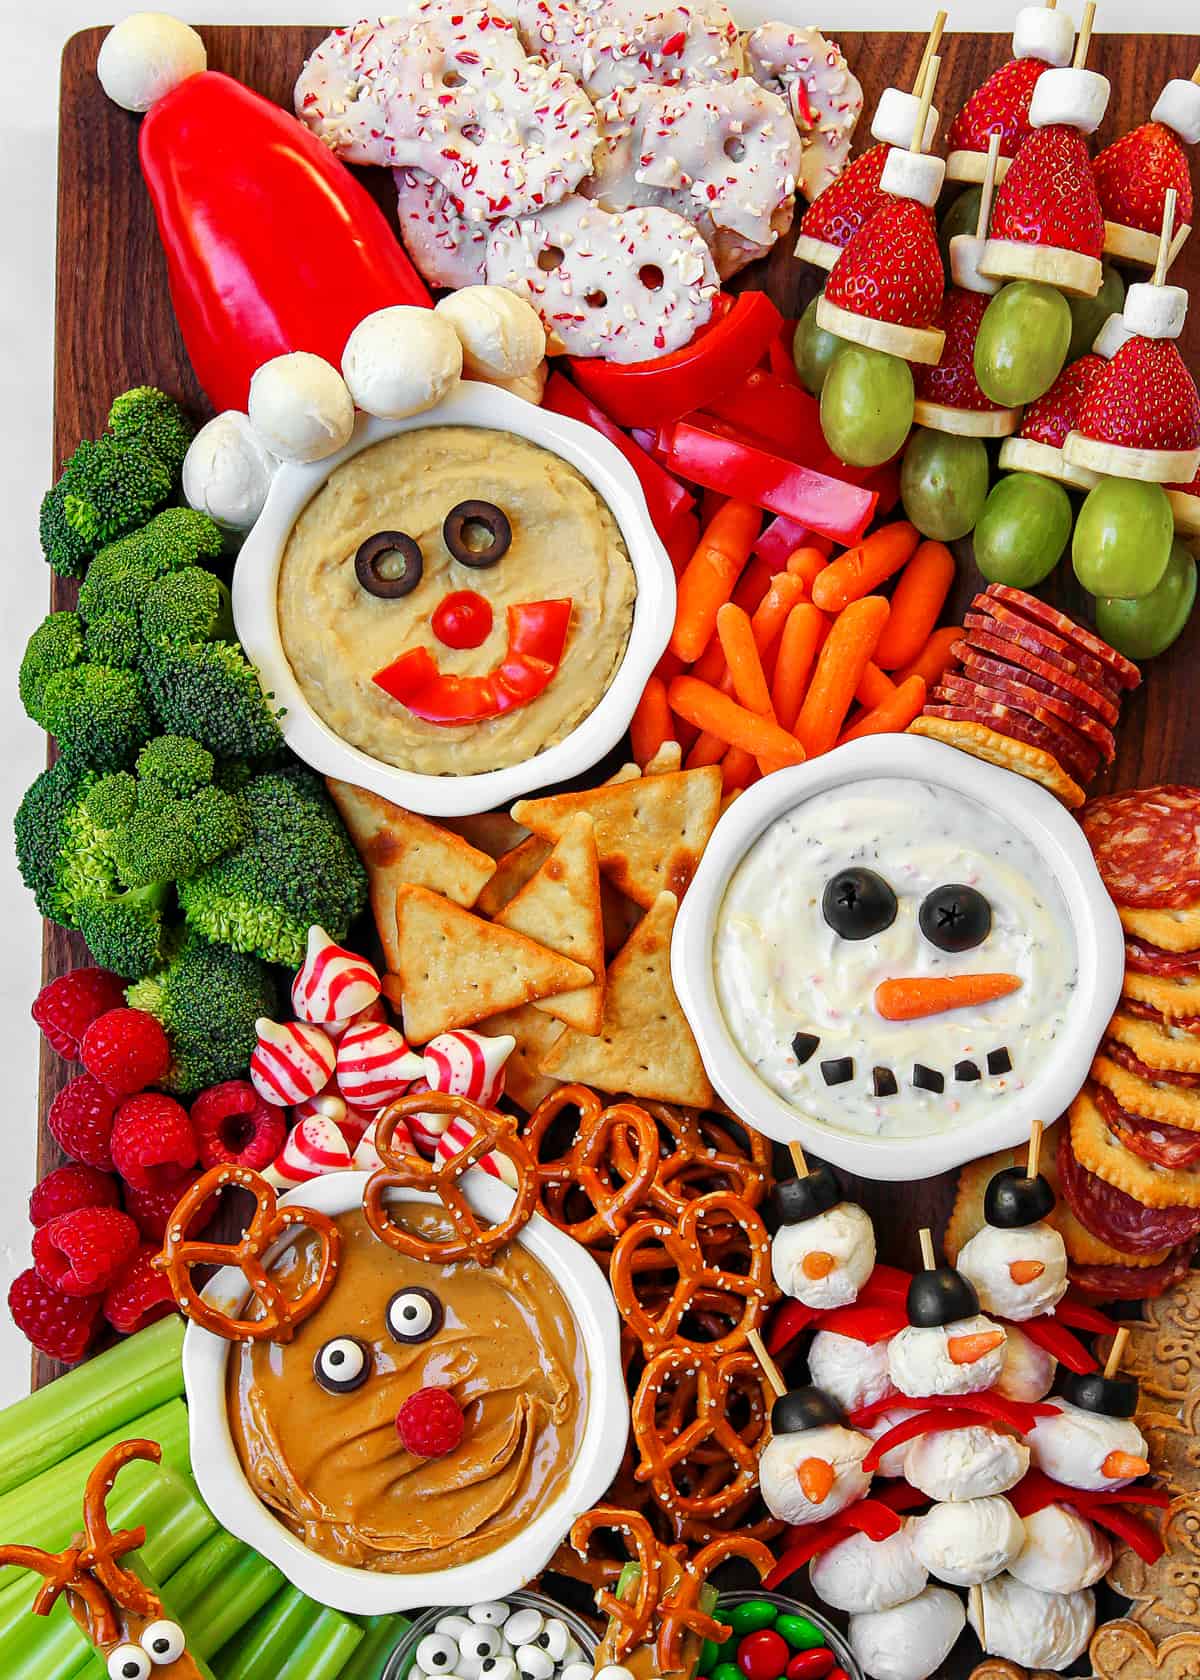
I built this snack board on our 18″ x 12″ walnut wood board.
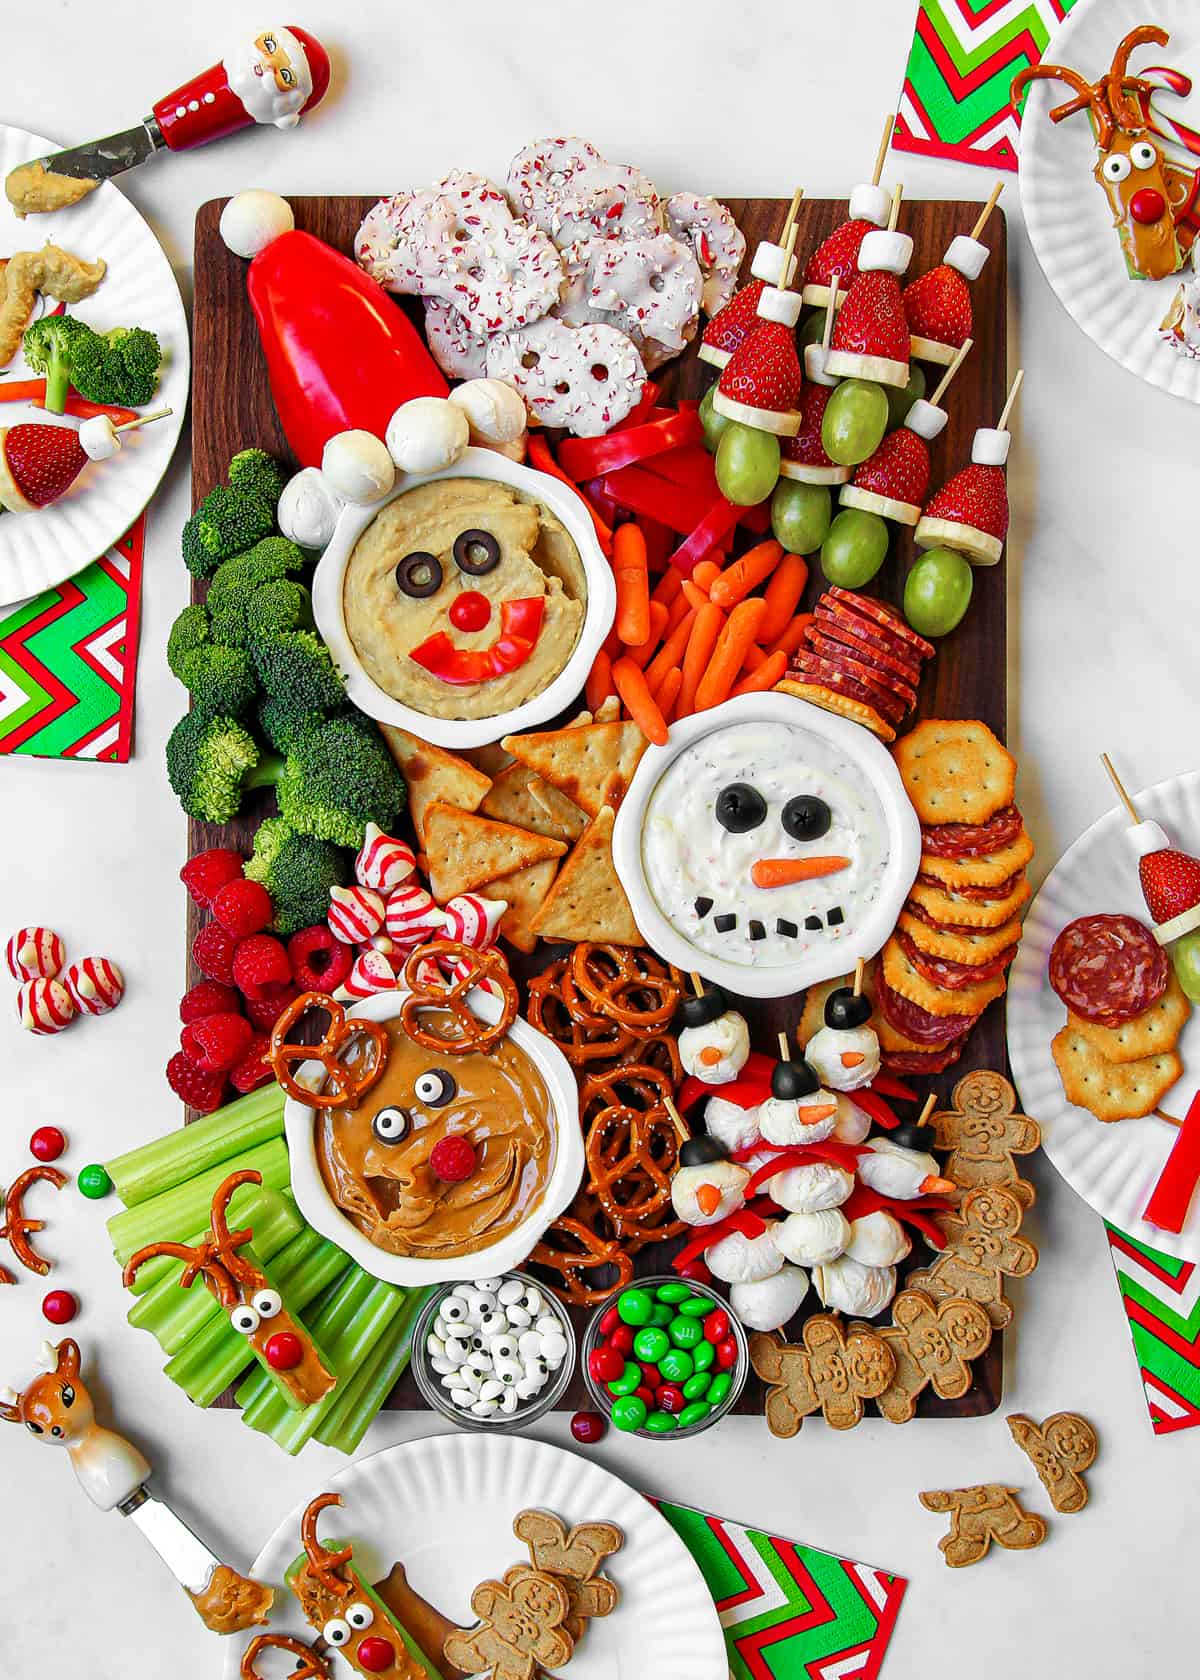
- Start by filling three round serving bowls with the hummus, ranch veggie dip, and peanut butter.
- Place the hummus filled bowl in the upper left corner of the board, the ranch veggie dip filled bowl on the middle right side of the board and the peanut butter filled bowl on the bottom left corner of the board.
Quick tip: Need an alternative to nut butter? Try a sweet hummus, like this chocolate hummus or this caramel dip. Rudolph will retain his beautiful brown face while avoiding any allergy disasters!
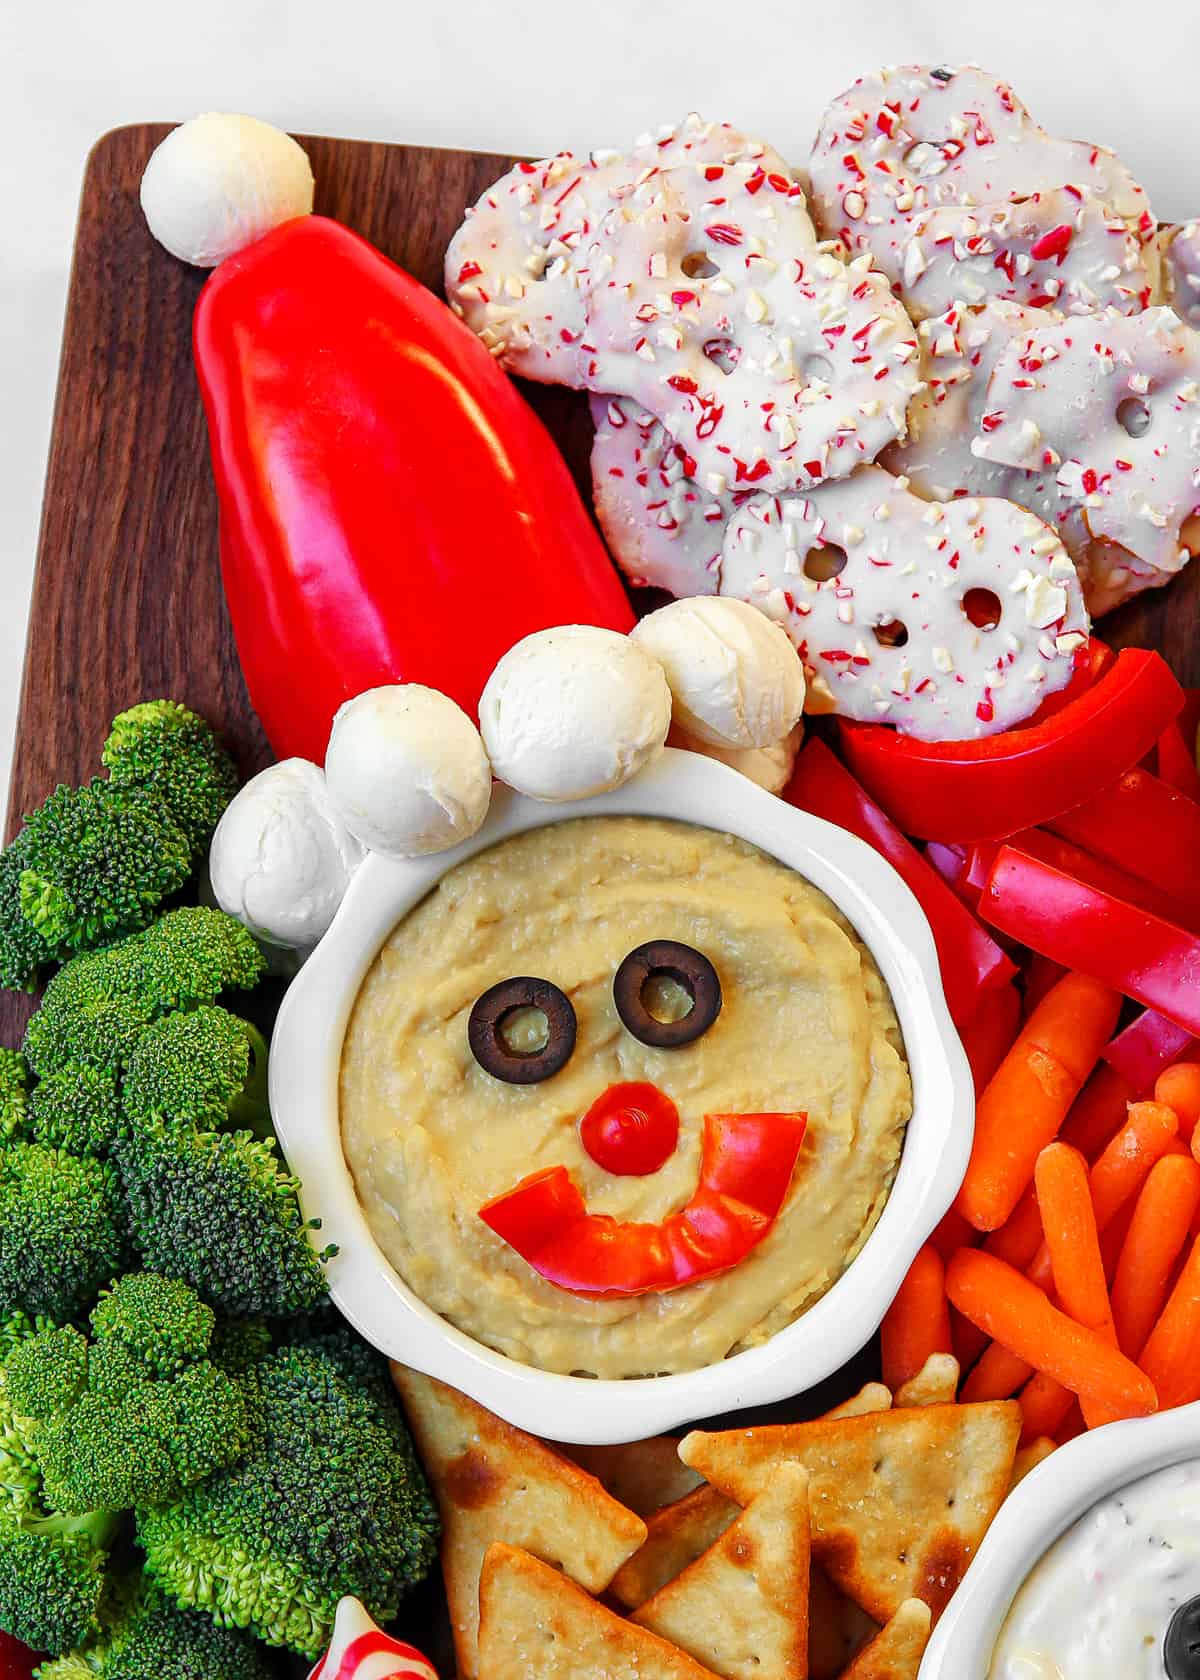
SANTA: To make the hummus bowl look like Santa:
- Place two black olive slices for the eyes. Put half of the cherry tomato in the center for the nose.
- Cut the top off of the red bell pepper, remove the stem and use a curved cut of the top for the smile.
- Remove the seeds from the red bell pepper and cut one of the sides with a pointed top to place on the board at the top of the hummus bowl for Santa’s hat.
- Prop the bell pepper Santa hat up with some mini mozzarella cheese balls under it, if necessary.
- Slice the remaining red bell pepper into strips and reserve 10 strips to make the mini mozzarella snowmen.
- Arrange six mini mozzarella cheese balls along the bottom of the red bell pepper hat, at the top of the serving bowl, and then one at the top to complete the Santa hat look. If the mini mozzarella balls won’t stay in place, slice just a little off the bottom of the cheese balls so they will set flat and that should do the trick.
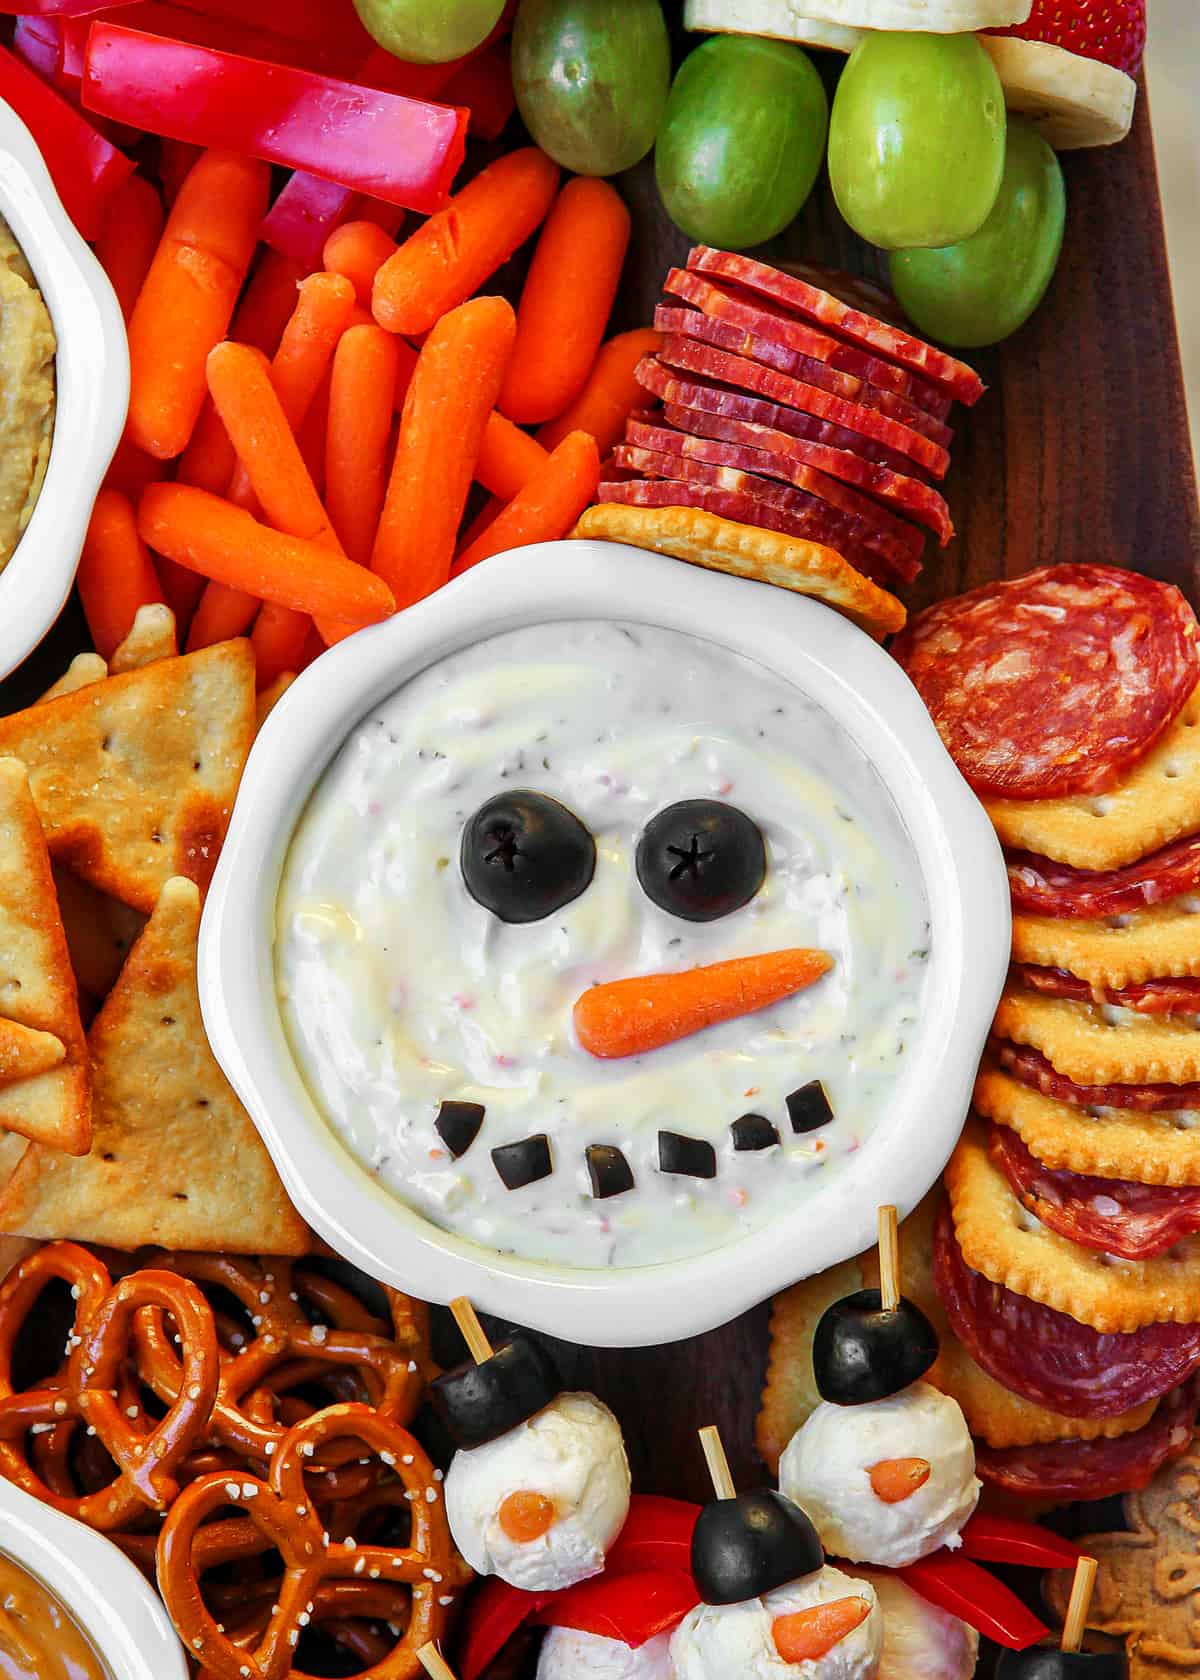
SNOWMAN: To make the ranch veggie dip bowl look like a Snowman’s face:
- Place two black olive halves for the eyes and six chopped olive pieces for the mouth.
- Put a pointed petite baby carrot in the middle for the nose.
- Prop a snowflake cracker at the top of the serving bowl and then nine slices of salami or pepperoni to look like the snowman’s hat.
RUDOLPH: To make the peanut butter bowl look like Rudolph:
- Arrange two tiny pretzel twists for the antlers.
- Place two chocolate chips, upside down, for the eyes and then top each chocolate chip with a candy eyeball.
- Put a raspberry in the center of the bowl for Rudolph’s nose.
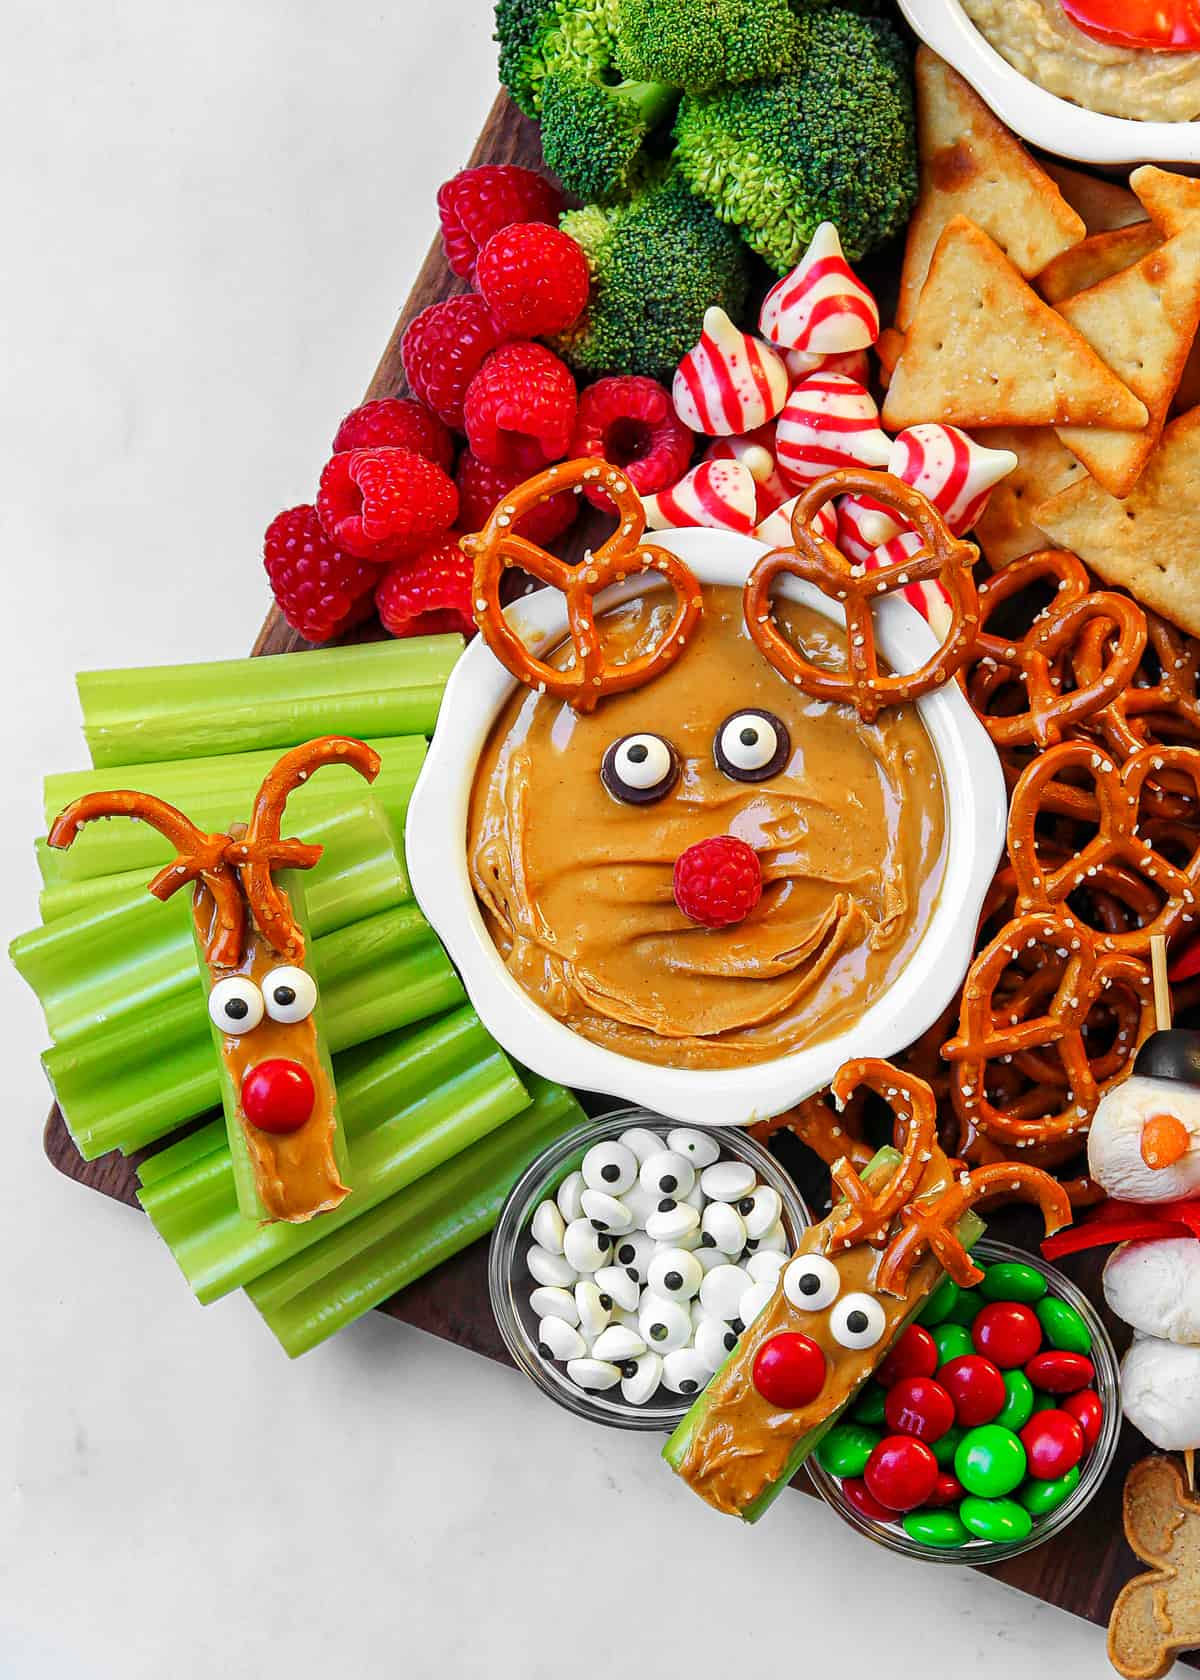
- Place the celery sticks, pretzel tiny twists, candy eyes and M&M’s next to the Rudolph peanut butter bowl so everyone can build their own edible Rudolph by spreading peanut butter in a celery stick and then arranging pretzel twist halves for the antlers, candy eyeballs and a red M&M for the nose. So fun!
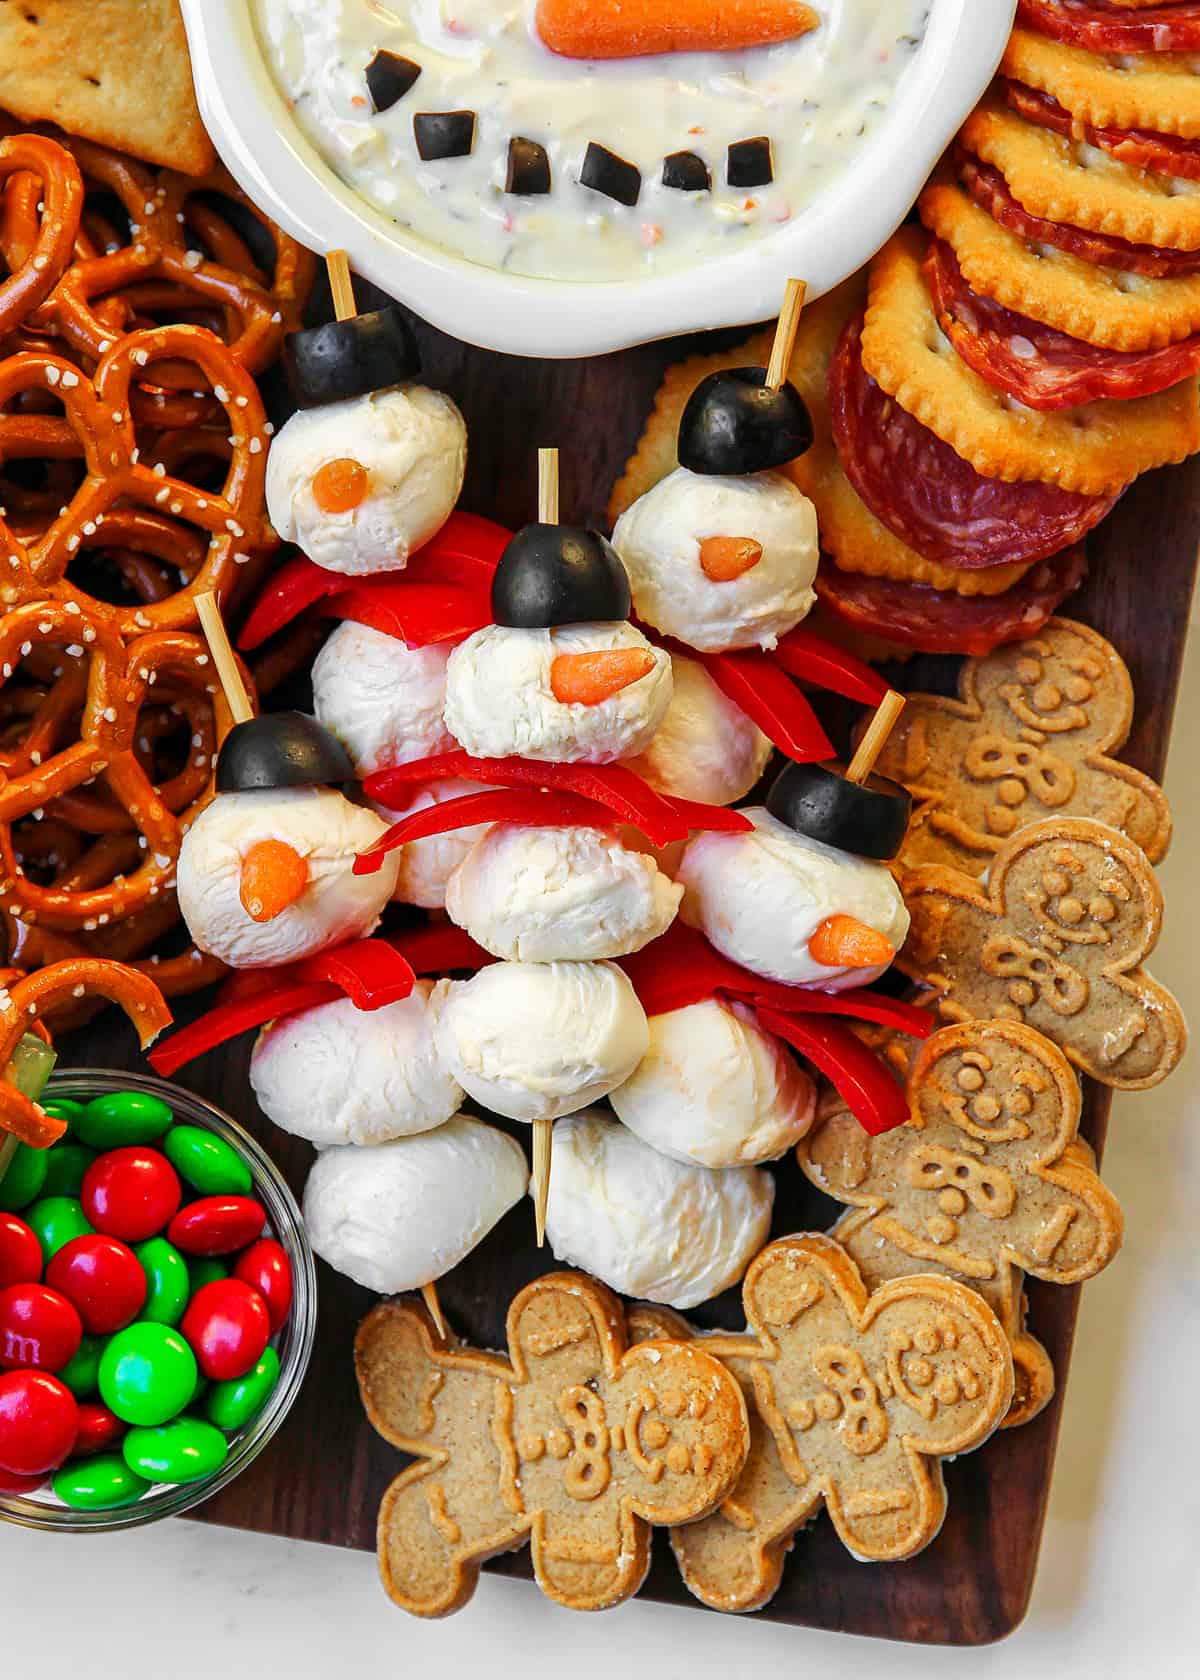
MINI SNOWMEN: to make the snowmen out of mozzarella balls:
- Arrange the following ingredients on a medium skewer or toothpick in the following order: slice of black olive, mini mozzarella ball, two red bell pepper strips. (for the scarf look!), and two more mini mozzarella balls.
- Cut the tip off of a baby carrot and press it into the top mozzarella ball for the nose. Repeat with remaining ingredients until you have five mozzarella snowman skewers.
- Place them below the snowman dip bowl. Too cute!
FRUIT SKEWERS: To make the Grinch fruit skewers:
- Arrange the following ingredients on a medium skewer or toothpick in the following order: mini marshmallow, strawberry, banana slice, green grape.
- Repeat with remaining ingredients until you have nine Grinch fruit skewers.
- Arrange them in the top right corner of the board. Super simple. The kids will love making these!

- Fill in the board with the remaining snacks. Place the broccoli florets to the left of the Santa hummus bowl.
- Arrange the remaining carrots and bell pepper slices to the right of the Santa hummus bowl.
- Put the pita crackers in the center of the board. Pile the raspberries and candy cane kisses above the Rudolph peanut butter bowl.
- Alternate and fan the remaining Ritz snowflake crackers and salami slices to the right of the snowman ranch dip bowl.
- Place the white chocolate & peppermint Pretzel Crisps in the top center of the board. Line the gingerbread people cookies in the bottom right corner of the board.
My kids’ eyes lit right up when this board was complete! No one is immune to the holiday magic and I’m no exception. I hope you and your kiddos love this Holly Jolly experience as much as we did. It’s a great way to spend time together making lasting holiday memories!
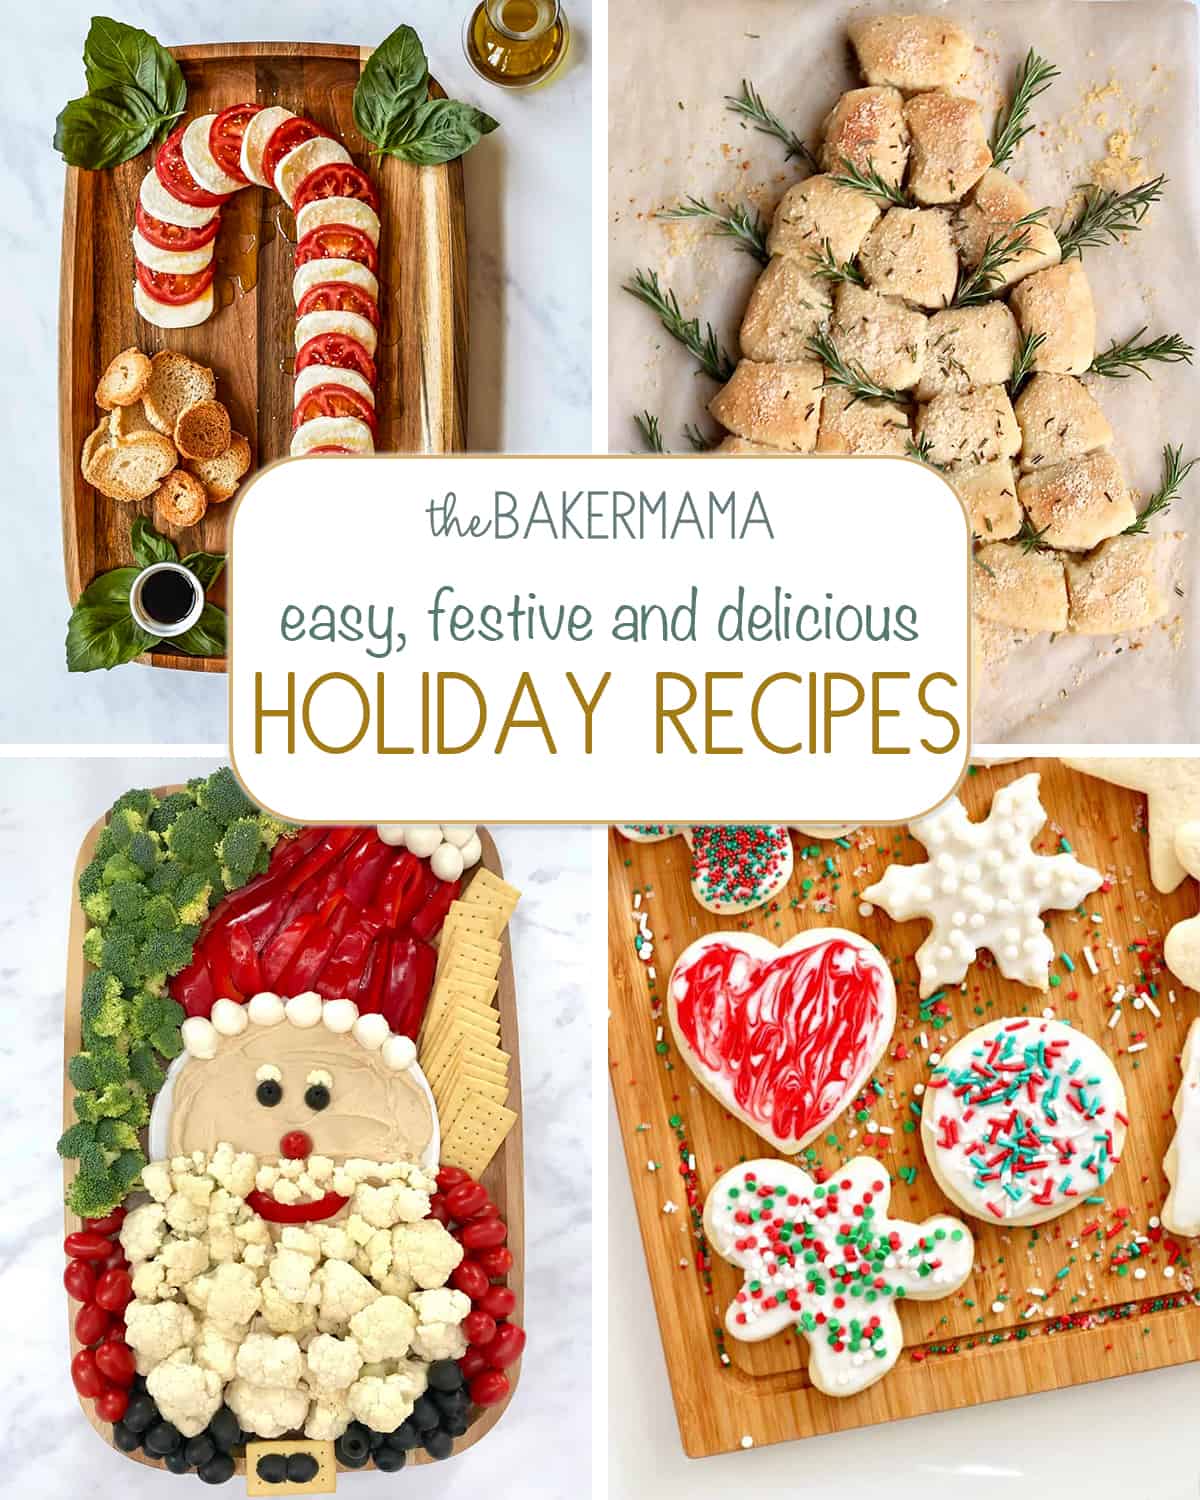
More Easy, Festive & Delicious Holiday Recipes
A collection of holiday recipes that are all so easy to make, festive to serve and sure to be enjoyed by all! These Easy, Festive and Delicious Holiday Recipes are sure to be a holiday hit!
If you’re inspired to re-create this Holly Jolly Snack Board, be sure to snap a picture and share it with me @thebakermama on Instagram so we can see. I love seeing how inspired and creative y’all get with the ideas and recipes I share.
Happy holidays and enjoy!
xoxo,


Holly Jolly Kid’s Snack Board
- Prep Time: 25 minutes
- Total Time: 25 minutes
- Yield: 6-8
Description
Oh, by golly, it’s a Holly Jolly Kid’s Snack Board! This adorable snack board is as engaging as it is tasty (and healthy too!). The kids will love building and snacking on this festive board made with simple, wholesome ingredients. Holiday memories that will last a lifetime!
Ingredients
- 3/4 cup plain hummus
- 3/4 cup ranch veggie dip
- 3/4 cup creamy peanut butter
- 1 large red bell pepper, divided
- 1 (8 ounce) container mini mozzarella cheese balls
- 5 whole black olives
- 1 cherry tomato
- 25 petite baby carrots
- 9 Ritz snowflake crackers
- 18 salami slices
- 25 pretzel tiny twists
- 2 chocolate chips
- 15 raspberries
- 4 celery stalks, each cut into fourths
- ¼ cup candy eyeballs
- ¼ cup holiday M&M candies
- 1 cup broccoli florets
- 9 mini marshmallows
- 9 strawberries, stems cut off
- 9 slices of banana (about 1 medium banana)
- 9 green grapes
- 12 pita crackers
- 10 Hershey’s candy cane kisses
- 10 white chocolate & peppermint Pretzel Crisps
- 5 gingerbread people cookies
Instructions
- Start by filling three round serving bowls with the hummus, ranch veggie dip and peanut butter. Place the hummus filled bowl in the upper left corner of the board, the ranch veggie dip filled bowl on the middle right side of the board and the peanut butter filled bowl on the bottom left corner of the board.
- To make the hummus bowl look like Santa: Place two black olive slices for the eyes. Put half of the cherry tomato in the center for the nose. Cut the top off of the red bell pepper, remove the stem and use a curved cut of the top for the smile. Remove the seeds from the red bell pepper and cut one of the sides with a pointed top to place on the board at the top of the hummus bowl for Santa’s hat. Prop the bell pepper Santa hat up with some mini mozzarella cheese balls under it, if necessary.
- Slice the remaining red bell pepper into strips and reserve 10 strips to make the mini mozzarella snowmen. Arrange six mini mozzarella cheese balls along the bottom of the red bell pepper hat, at the top of the serving bowl, and then one at the top to complete the Santa hat look. If the mini mozzarella balls won’t stay in place, slice just a little off the bottom of the cheese balls so they will set flat and that should do the trick.
- To make the ranch veggie dip bowl look like a Snowman’s face: Place two black olive halves for the eyes and six chopped olive pieces for the mouth. Put a pointed baby carrot in the middle for the nose. Prop a snowflake cracker at the top of the serving bowl and then nine slices of salami to look like the snowman’s hat.
- To make the peanut butter bowl look like Rudolph: Arrange two tiny pretzel twists for the antlers. Place two chocolate chips, upside down, for the eyes and then top each chocolate chip with a candy eye. Put a raspberry in the center of the bowl for Rudolph’s nose.
- Place the celery sticks, pretzel tiny twists, candy eyes and M&M’s next to the Rudolph peanut butter bowl so everyone can build their own edible Rudolph by spreading peanut butter in a celery stick and then arranging pretzel twist halves for the antlers, candy eyeballs and a red M&M for the nose. So fun!
- To make the mini mozzarella snowmen, arrange the following ingredients on a medium skewer or toothpick in the following order: slice of black olive, mini mozzarella ball, two red bell pepper strips (for the scarf look!), two more mini mozzarella balls. Cut the tip off of a baby carrot and press it into the top mozzarella ball for the nose. Repeat with remaining ingredients until you have five mozzarella snowman skewers. Place them below the snowman dip bowl. Too cute!
- To make the Grinch fruit skewers, arrange the following ingredients on a medium skewer or toothpick in the following order: mini marshmallow, strawberry, banana slice, green grape. Repeat with remaining ingredients until you have nine Grinch fruit skewers. Arrange them in the top right corner of the board. Super simple!
- Fill in the board with the remaining snacks. Place the broccoli florets to the left of the Santa hummus bowl. Arrange the remaining carrots and bell pepper slices to the right of the Santa hummus bowl. Put the pita crackers in the center of the board. Pile the raspberries and candy cane kisses above the Rudolph peanut butter bowl. Alternate and fan the remaining Ritz snowflake crackers and salami slices to the right of the snowman ranch dip bowl.
- Place the white chocolate & peppermint Pretzel Crisps in the top center of the board. Line the gingerbread people cookies in the bottom right corner of the board.
- Serve and Enjoy!
Notes
I built this snack board on our 18″ x 12″ walnut wood board.

I made snack trays for an adult Christmas luncheon based on this post. They came out great, and were lots of fun.