• Skip to primary navigation
  • Skip to main content
  • Skip to primary sidebar
  • Skip to footer

The BakerMama logo

Nav Social Menu

  • Facebook
  • Pinterest
  • Instagram
  • Twitter
  • YouTube
  • Nav Social Menu

    • Facebook
    • Pinterest
    • Instagram
    • Twitter
    • YouTube
  • Home
  • About
    • About
    • Contact
    • faq
    • Subscribe
    • Work With Me
  • Recipes
    • Recipes
    • Basics
    • Gathering Guides
    • Tips & Tricks
  • Cookbooks
    • Spectacular Spreads โ€“ NEW!
    • Beautiful Boards Cookbook
  • Boards by The BakerMama
    • Shop Boards
    • Board Inspiration
  • Shop
    • Amazon Favorites
    • Boards
    • Board Accessories
    • Family Favorites
    • Gift Guides
      • Anniversary Gifts
      • Gifts for the Baker
      • Gifts for the Homebody
      • Gifts for a New Mom
      • Gifts to Say Thank You
      • Gifts for the Sports Fan
      • Housewarming Gifts
      • Hostess Gifts
      • Kid’s Birthday Party Gifts
      • Teacher Gifts
      • Wedding Gifts
    • In The Kitchen
    • Around the House
    • Holiday Favorites
    • Shop All

Home ยป Recipes ยป Fresh Snow Ice Cream

Published on February 18, 2021 by The BakerMama

Fresh Snow Ice Cream

Jump to Recipe

When winter hands you the fluffy white stuff, grab your little helpers and make the most of it with a batch of sweet and delicious Fresh Snow Ice Cream. Super easy and oh so fun!

Fresh Snow Ice Cream

Fresh Snow Ice Cream

We get pretty excited to see snow in Texas. We dream of snowball fights and snowmen and cocoa by the fire. But when the snow came down this time, the power went out and stayed out. We layered up and hunkered down in front of the fireplace, and while we waited it out, we created our own fun. I am so proud of my little campers, y’all. Together, we made the best of a tricky situation. Silly games, popcorn on the stove, and Fresh Snow Ice Cream. As recipes go, it could not be more simple. And as fun goes, well, the kids loved every minute. So when the electricity came back on and the snow was still pretty and plentiful outside, we had to make snow ice cream again.

Channeling Your Inner Pioneer

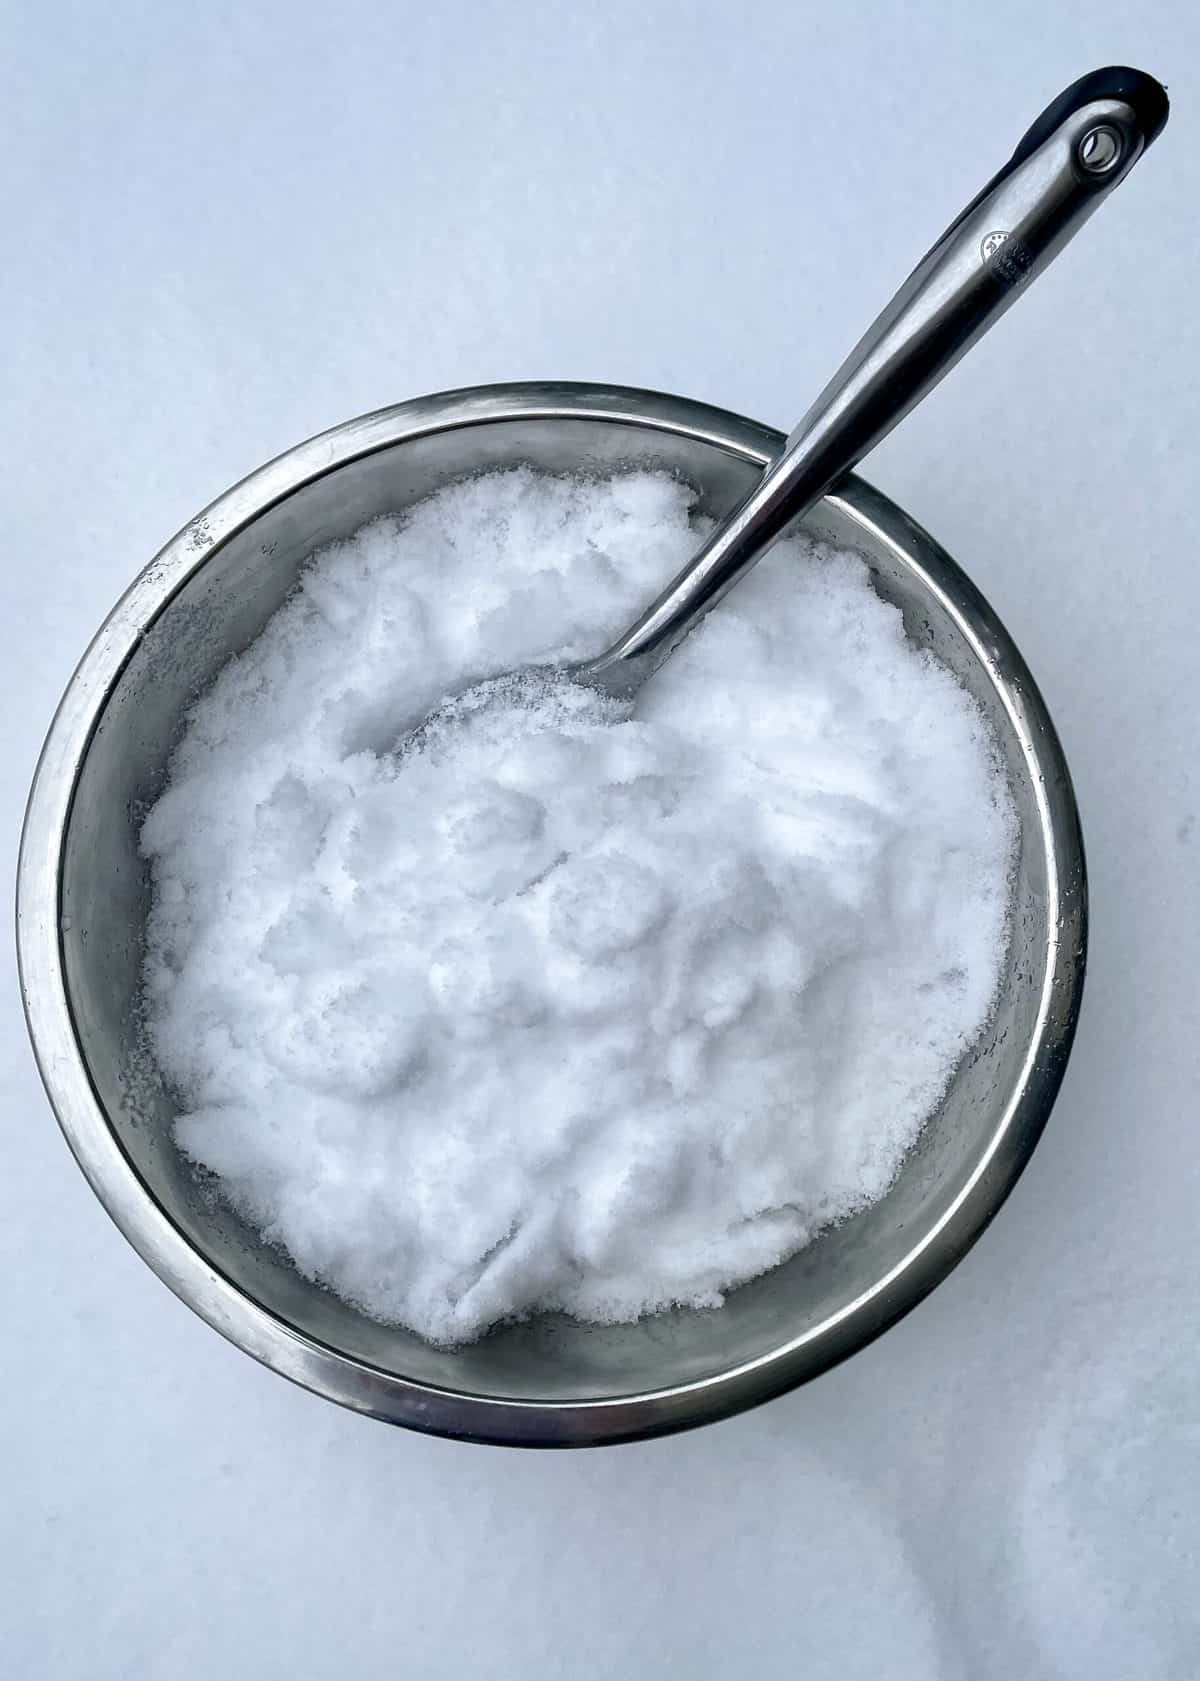
First and foremost, you’ll need to gather up about 9 cups of fresh, untouched snow. This is where I have to offer the disclaimer that snow is nature and I don’t know anything about the cleanliness of the snow where you live. The snow on our side yard was deep, fresh, and perfectly untouched so we took a gamble. Everyone seems okay 😜.

Next, you’ll need a 14-ounce can of sweetened condensed milk (1 and 1/4 cups)* and one cup of milk. Don’t have any sweetened condensed milk handy? No worries! You can make your own.

How to Make Sweetened Condensed Milk

Leave your snow in the freezer or the great outdoors while you make a batch of sweetened condensed milk (it takes about an hour). First, add 2 cups of milk and 1 cup of granulated sugar, honey, or maple syrup to a heavy saucepan over medium-low heat. Whisking continuously, bring it to a slow simmer. Continue to simmer, whisking often, for 35-40 minutes, or until the mixture has reduced by half, thickened and is starting to turn an off-white color. Then remove from the heat and whisk in the vanilla. Let the condensed milk cool completely before using to make the snow ice cream.

Make Your Own Ice Cream (And Fun!)

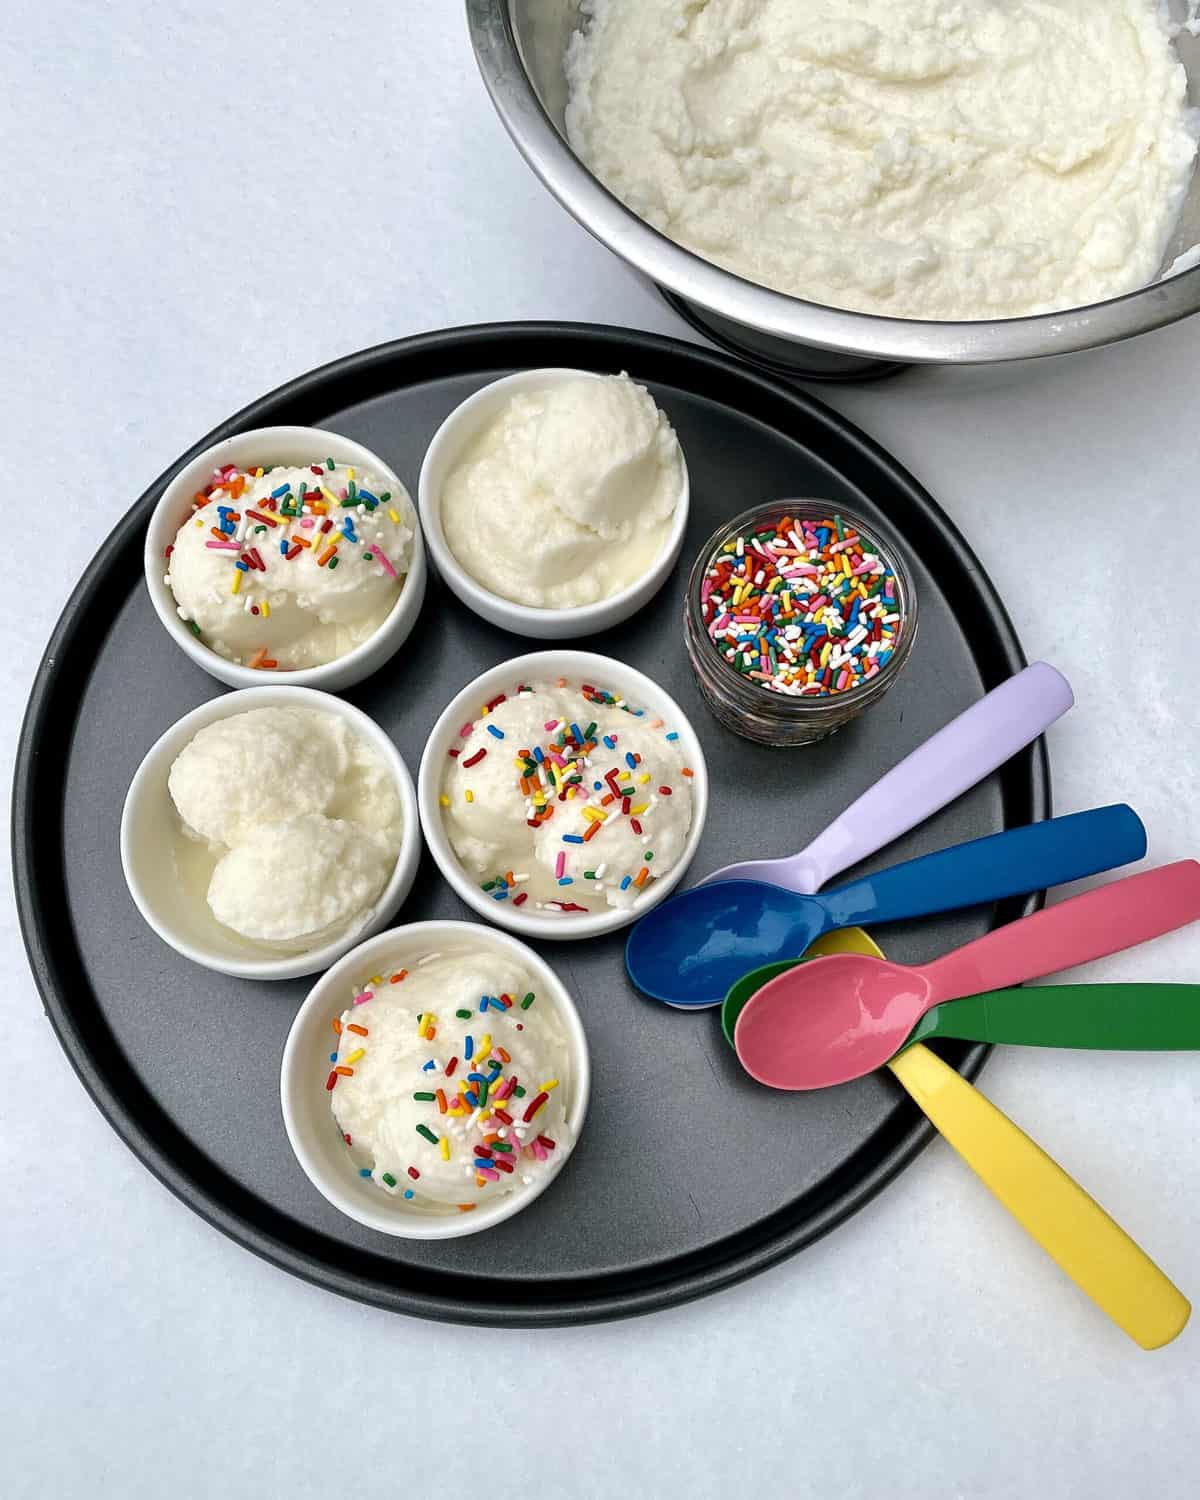
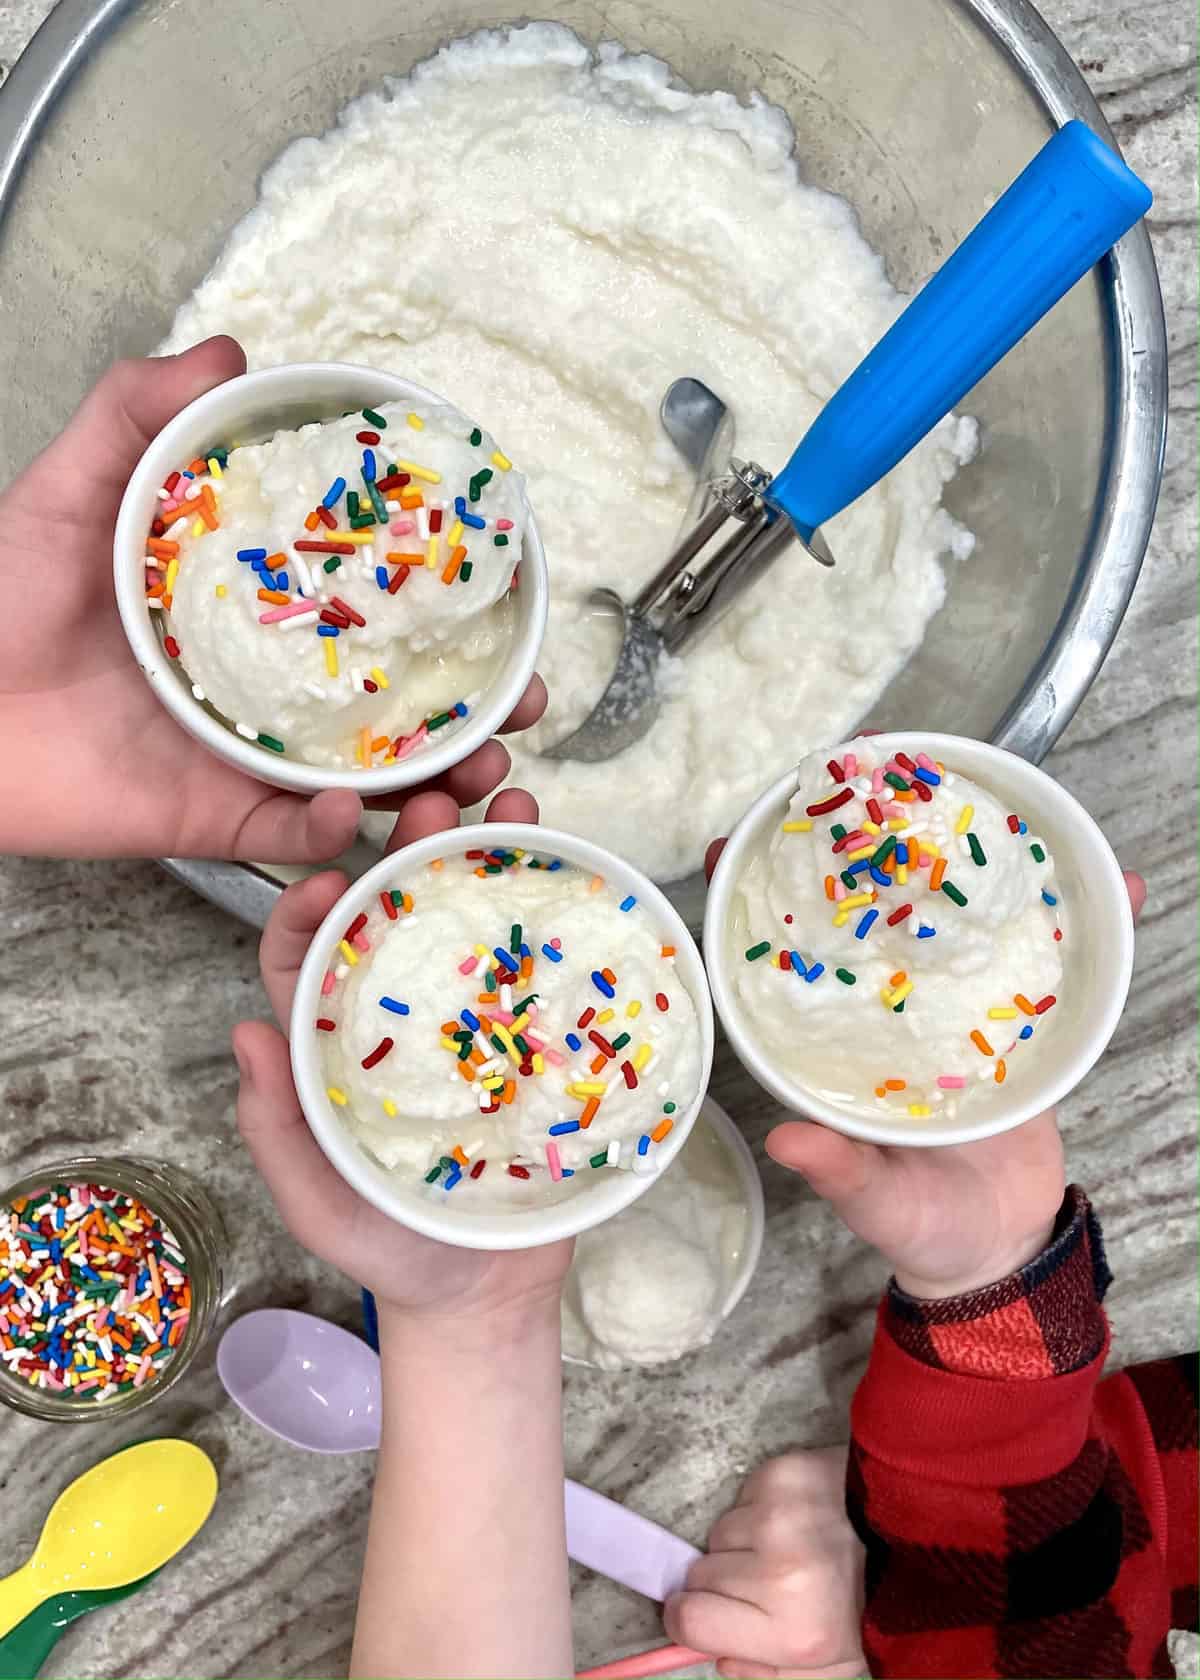
While the kids gathered snow, I raided the baking cupboard for some sprinkles. But sprinkles or no sprinkles, this unbelievably simple treat brings out a ton of fun.

Fill a 5-quart bowl with 9 cups of fresh untouched snow. Stir in the can of sweetened condensed milk (1 and 1/4 cups) along with 1 cup regular milk.

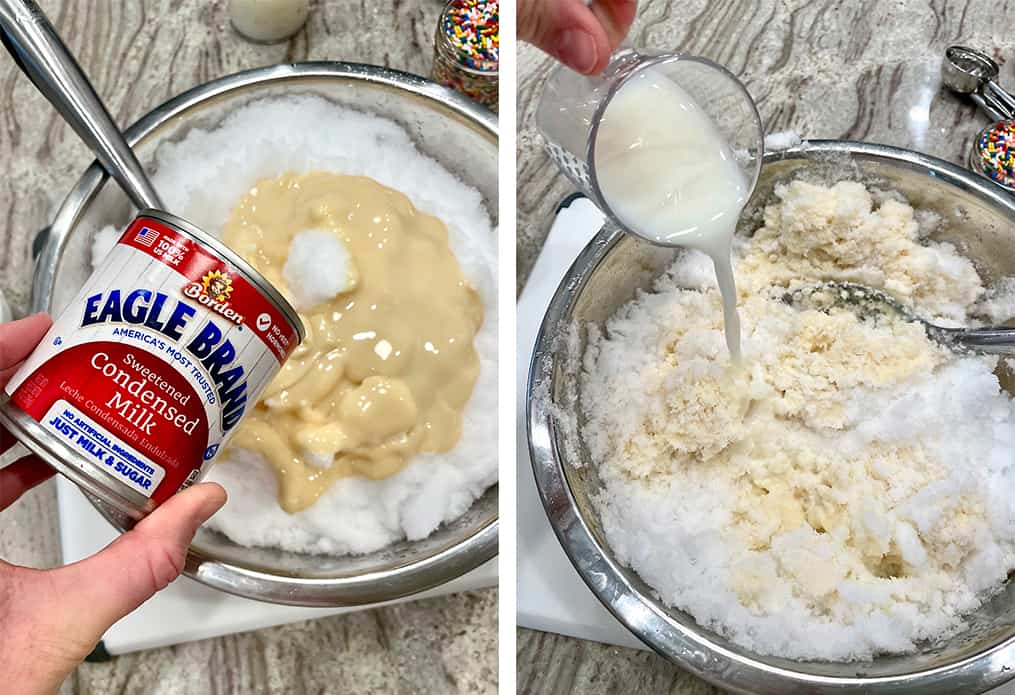
Add additional regular milk, stirring until it reaches the desired consistency. If your “ice cream” becomes too watery, add more snow. If it’s too thick, add more milk.

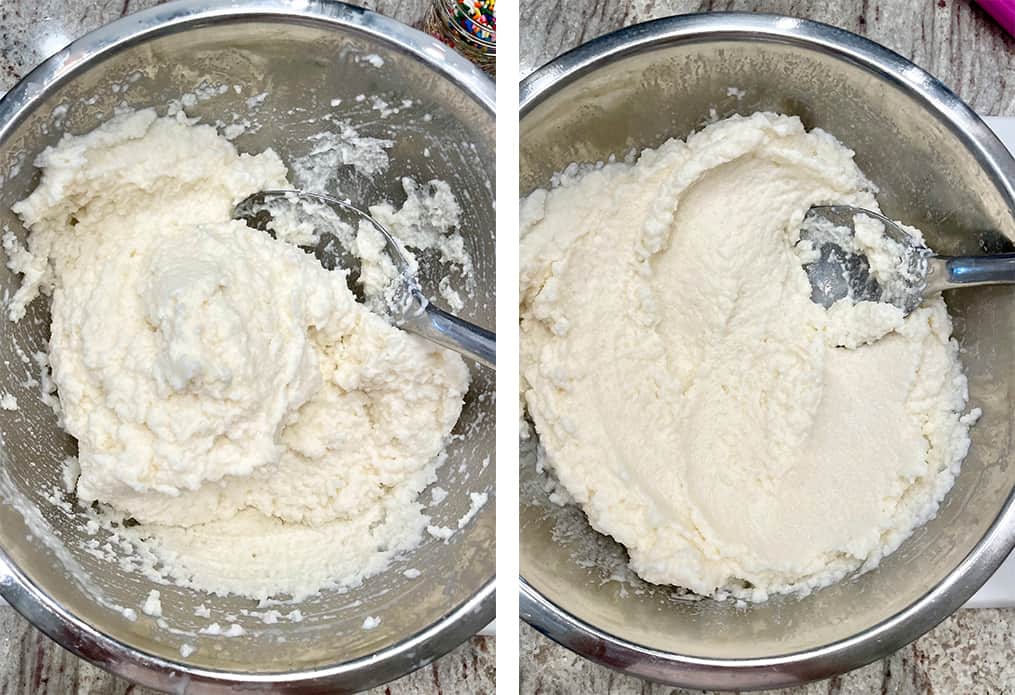
Sprinkle, serve immediately, and enjoy! The final texture will depend on the texture of the snow. If you’re working with a soft and fluffy snow, the ice cream will be creamier. If you’re working with an hard and icy snow, the ice cream will have more of a slushy texture.

Fresh Snow Ice Cream

Store any leftover ice cream in a sealed container the freezer for up to a week. Let rest at room temperature for 5-10 minutes before scooping to enjoy again.

That’s all there is to it, friends! I hope you’re inspired to make some Fresh Snow Ice Cream and that you stay warm and safe. Be sure to tag me on Instagram @thebakermama when you make it so I can see. I love seeing how inspired and creative y’all get with the ideas and recipes I share!

xoxo,

Print
clock clock iconcutlery cutlery iconflag flag iconfolder folder iconinstagram instagram iconpinterest pinterest iconfacebook facebook iconprint print iconsquares squares iconheart heart iconheart solid heart solid icon
Fresh Snow Ice Cream

Fresh Snow Ice Cream

  • Author: The BakerMama
  • Prep Time: 5 minutes
  • Total Time: 5 minutes
  • Yield: 6-8
Print Recipe
Pin Recipe

Description

When winter hands you the fluffy white stuff, grab your little helpers and make the most of it with a batch of sweet and delicious Fresh Snow Ice Cream. Super easy and oh so fun!


Ingredients

  • 9 cups of fresh snow
  • 1 (14 ounce) can sweetened condensed milk (1 and 1/4 cups)
  • 1 cup milk

Instructions

  1. Fill a 5-quart bowl with 9 cups of fresh untouched snow.
  2. Stir in the can of sweetened condensed milk and 1 cup regular milk.
  3. Add additional regular milk until of desired consistency. If your “ice cream” becomes too watery, add more snow. If it’s too thick, add more milk.
  4. Serve immediately and enjoy!

Notes

Store in a sealed container the freezer for up to a week. Let rest at room temperature for 5-10 minutes before scooping to enjoy again.

The final texture will depend on the texture of the snow. If you’re working with a soft and fluffy snow, the ice cream will be creamier. If you’re working with an hard and icy snow, the ice cream will have more of a slushy texture.

Did you make this recipe?

Tag @thebakermama on Instagram and hashtag it #thebakermama

Print
clock clock iconcutlery cutlery iconflag flag iconfolder folder iconinstagram instagram iconpinterest pinterest iconfacebook facebook iconprint print iconsquares squares iconheart heart iconheart solid heart solid icon
How to Make Sweetened Condensed Milk

How to Make Sweetened Condensed Milk

  • Author: The BakerMama
  • Prep Time: 5 min
  • Cook Time: 40 min
  • Total Time: 45 minutes
  • Yield: 1 and 1/4 cups
Print Recipe
Pin Recipe

Description

To make your own sweetened condensed milk, all you need is a little time and some simple ingredients.


Ingredients

  • 2 cups milk
  • 1 cup granulated sugar, honey or maple syrup
  • 1 teaspoon vanilla

Instructions

  1. Add the milk and sugar into a heavy saucepan over medium-low heat. Whisking continuously, bring to a slow simmer.
  2. Continue to simmer, whisking often, for 35-40 minutes, or until the sugar milk mixture has reduced by half, thickened and is starting to turn an off-white color.
  3. Remove from the heat and whisk in the vanilla. Let the condensed milk cool completely before using to make the snow ice cream.

Notes

Store in a sealed jar or container in the refrigerator for up to 1 week.

Did you make this recipe?

Tag @thebakermama on Instagram and hashtag it #thebakermama

You may also like

  • Three Spectacular MilkshakesThree Spectacular Milkshakes
  • Homemade S’mores BlizzardHomemade S’mores Blizzard
  • We All Scream for Ice CreamWe All Scream for Ice Cream
  • Chocolate Peanut Butter Ice Cream PieChocolate Peanut Butter Ice Cream Pie
  • Build-Your-Own Ice Cream Sundae BoardBuild-Your-Own Ice Cream Sundae Board

Sharing is caring!

101 shares

Reader Interactions

Comments

  1. Maggie says

    February 25, 2021 at 2:59 pm

    Just a bit of caution. As an older adult, (70’s) I grew up in a rural area. We enjoyed a fist full of snow occasionally. But I have since learned that one should know about possible pollutants and or bacteria in the snow. Even if snow is fresh (no chemicals for melting, or other stuff), it may be of concern. You may want to look it up online, reading from a reputable website one can make a more informed decision. This is especially true if one has an impaired immune system.

    Reply

Leave a Reply Cancel reply

Your email address will not be published. Required fields are marked *

Primary Sidebar

NEVER MISS A RECIPE

Sign up to get new recipes via email

Order Now! Spectacular Spreads Cookbook

Spectacular Spreads cookbook by The BakerMama

Beautiful Boards Cookbook

Beautiful Boards cookbook by The BakerMama

Boards by The Bakermama

Hi, I’m Maegan!

Maegan, the BakerMama

Welcome to The BakerMama! Iโ€™m so happy youโ€™re here! To learn more about me, click here.

Let’s Socialize

  • Facebook
  • Pinterest
  • Instagram
  • Twitter
  • YouTube
  • RSS

Trending Now

American Flag Caprese Salad by The BakerMama

American Flag Caprese Salad

Pancake Flag Board by The BakerMama

Pancake Flag Board

Hot Dog Flag Board by The BakerMama

Hot Dog Flag Board

Patriotic Party Mix

Patriotic Party Mix

Instagram

thebakermama

Maegan Brown ~ The BakerMama
13 stripes, one EPIC cheese tray! ๐Ÿ‡บ๐Ÿ‡ธ๐Ÿคฉ Thi 13 stripes, one EPIC cheese tray! ๐Ÿ‡บ๐Ÿ‡ธ๐Ÿคฉ This stunning patriotic platter makes for the perfect July 4th appetizer. It's super easy to make, complete with red, white, and blue cheeses, meats, fruits and accompaniments. ๐Ÿ˜ Click the link in my profile @thebakermama for all the details and more inspiration. ๐Ÿ‡บ๐Ÿ‡ธโค๏ธ #BoardsByTheBakerMama #TheBakerMama #BeautifulBoardsCookbook

https://thebakermama.com/recipes/american-flag-cheese-tray/
said โ€œYESSSโ€ to the new @safeandfair Wedding C said โ€œYESSSโ€ to the new @safeandfair Wedding Cake Drizzled Popcorn! ๐Ÿ’๐Ÿ’˜ It was LOVE at first bite! Tastes just like classic vanilla wedding cake but in popcorn form. ๐Ÿง๐Ÿฟ๐Ÿ’– Irresistible! Love the crunch of popcorn with the creamy flavor of buttercream icing and sparkly natural blue sprinkles. A delicious addition to this beautiful Engagement Ring Dessert Board that would be perfect to serve at an engagement party, bachelorette party, bridal shower, anniversary celebration or wedding, of course! ๐Ÿ’๐Ÿ˜
 
Safe + Fair kettle-popped popcorn is clean label, gluten-free, non GMO, vegan, kosher AND allergy friendly! I love all of their products, but especially this new popcorn flavor. Itโ€™s a must try! ๐Ÿ˜‹โœจ
 
Click the link in my profile or stories to easily order Wedding Cake Drizzled Popcorn and use the discount code BAKERMAMA10 for 10% off your order! Perfect for a special day or any day! #BoardsbyTheBakerMama #safeandfair #weddingwednesday #sponsored
๐Ÿ“Grilled Brie with Strawberries๐Ÿ“ is one of o ๐Ÿ“Grilled Brie with Strawberries๐Ÿ“ is one of our favorite summer appetizers! The smokiness of the gooey Brie with the sweetness of the fresh strawberries and the tang of the balsamic vinegar is love at first bite. A taste of summer youโ€™ll want over and over again! ๐Ÿง€๐Ÿ“๐Ÿคค Here's the recipe:

https://thebakermama.com/recipes/grilled-brie-with-strawberries/

Ingredients:
โ€ข 1 (8 ounce) wheel soft-ripened brie cheese
โ€ข 1 cup diced strawberries
โ€ข 2 teaspoons balsamic vinegar
โ€ข 2 teaspoons olive oil, plus more for brushing
โ€ข 2 teaspoons honey, plus more for drizzling
โ€ข 1 tablespoon chopped fresh mint leaves, for garnishing
โ€ข sea salt, for garnishing
โ€ข crackers, for serving

Instructions:
1. Heat the grill to medium and brush the grates with oil.
2. While the grill is heating up, wash and dice the strawberries.
3. In a medium mixing bowl, whisk together the balsamic vinegar, olive oil and honey. Add to the strawberries and gently stir to combine. Set aside.
4. Brush one side of the wheel of brie cheese with olive oil and place the oiled side down on the heated grill. Brush the other side of the brie with olive oil while the bottom side is grilling. Grill for the 2-3 minutes on each side.
5. Remove the grilled brie with a spatula and place on a serving plate. Top with the strawberry balsamic mixture.
6. Drizzle with honey. Sprinkle with chopped fresh mint and sea salt.
7. Serve warm with crackers.

ENJOY! #TheBakerMama
4th of July is just one week away! Here are some f 4th of July is just one week away! Here are some fun & festive board and tray ideas that are perfect for a patriotic party! ๐Ÿ‡บ๐Ÿ‡ธ๐Ÿ˜‹๐ŸŽ‰โค๏ธ

๐Ÿ‡บ๐Ÿ‡ธ Cheese Tray ๐Ÿง€
๐Ÿ‡บ๐Ÿ‡ธ Hot Dog Board ๐ŸŒญ
๐Ÿ‡บ๐Ÿ‡ธ Pancake Board ๐Ÿฅž
๐Ÿ‡บ๐Ÿ‡ธ Caprese Salad ๐Ÿ…
๐Ÿ‡บ๐Ÿ‡ธ Sโ€™mores Tray ๐Ÿ”ฅ
๐Ÿ‡บ๐Ÿ‡ธ Star-Spangled Sweets Board ๐Ÿ’ฅ

I hope yโ€™all are gearing up for a fantastic 4th weekend! Click the link in my profile for more details to recreate these show-stoppers! ๐Ÿ‡บ๐Ÿ‡ธ๐Ÿ˜‹๐ŸŽ‰๐Ÿ’ฅ #BoardsByTheBakerMama #TheBakerMama

https://thebakermama.com/recipes/fun-and-festive-4th-of-july-recipes/
Load More... Follow on Instagram

Footer

Hi, I’m Maegan!

Maegan, the BakerMama

Welcome to The BakerMama! Iโ€™m so happy youโ€™re here! To learn more about me, click here.

  • Facebook
  • Pinterest
  • Instagram
  • Twitter
  • YouTube
  • RSS

NEVER MISS A RECIPE

Sign up to get new recipes via email

Copyright © 2022 The BakerMama, LLC, All Rights Reserved. | Privacy Policy Website by Bright Coconut

101 shares