
Birthday dreams do come true with this amazing Birthday Dessert Board covered in every sweet, sprinkled treat you could wish for!
What better way to celebrate someone’s birthday than with this incredible board of sprinkled sweet treats?! From a simple mini layered vanilla cake to a sweet & salty birthday snack mix with mini candy coated bugle party hats, it’s got the ultimate selection to celebrate big with!
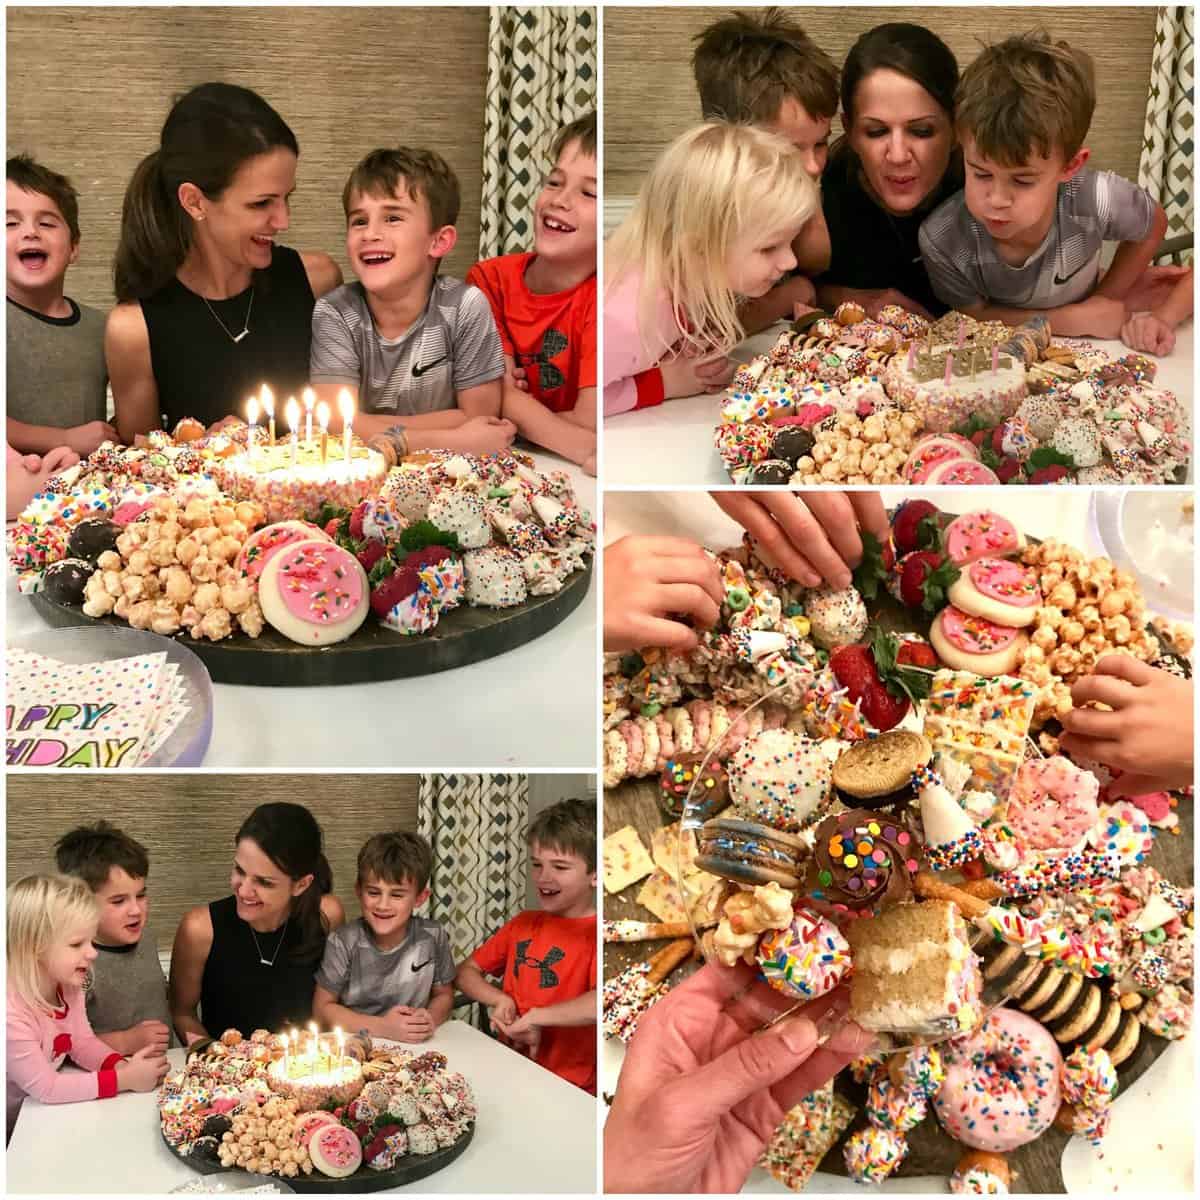
I’ve been itching to build this Birthday Dessert Board idea for a while now and decided I couldn’t let my own birthday (which is today!) come and go without it. So here she is…in all her sweet sprinkled gloriousness!
It came together exactly how I dreamed it to be…actually better! The excitement and enjoyment it brought to myself and the loved ones I shared it with will stick with me forever. I can’t wait to make birthday boards for all the birthdays to come!
Let me break down all the delicious details for you so you can make one (or request someone to make one for you!) for a birthday soon!
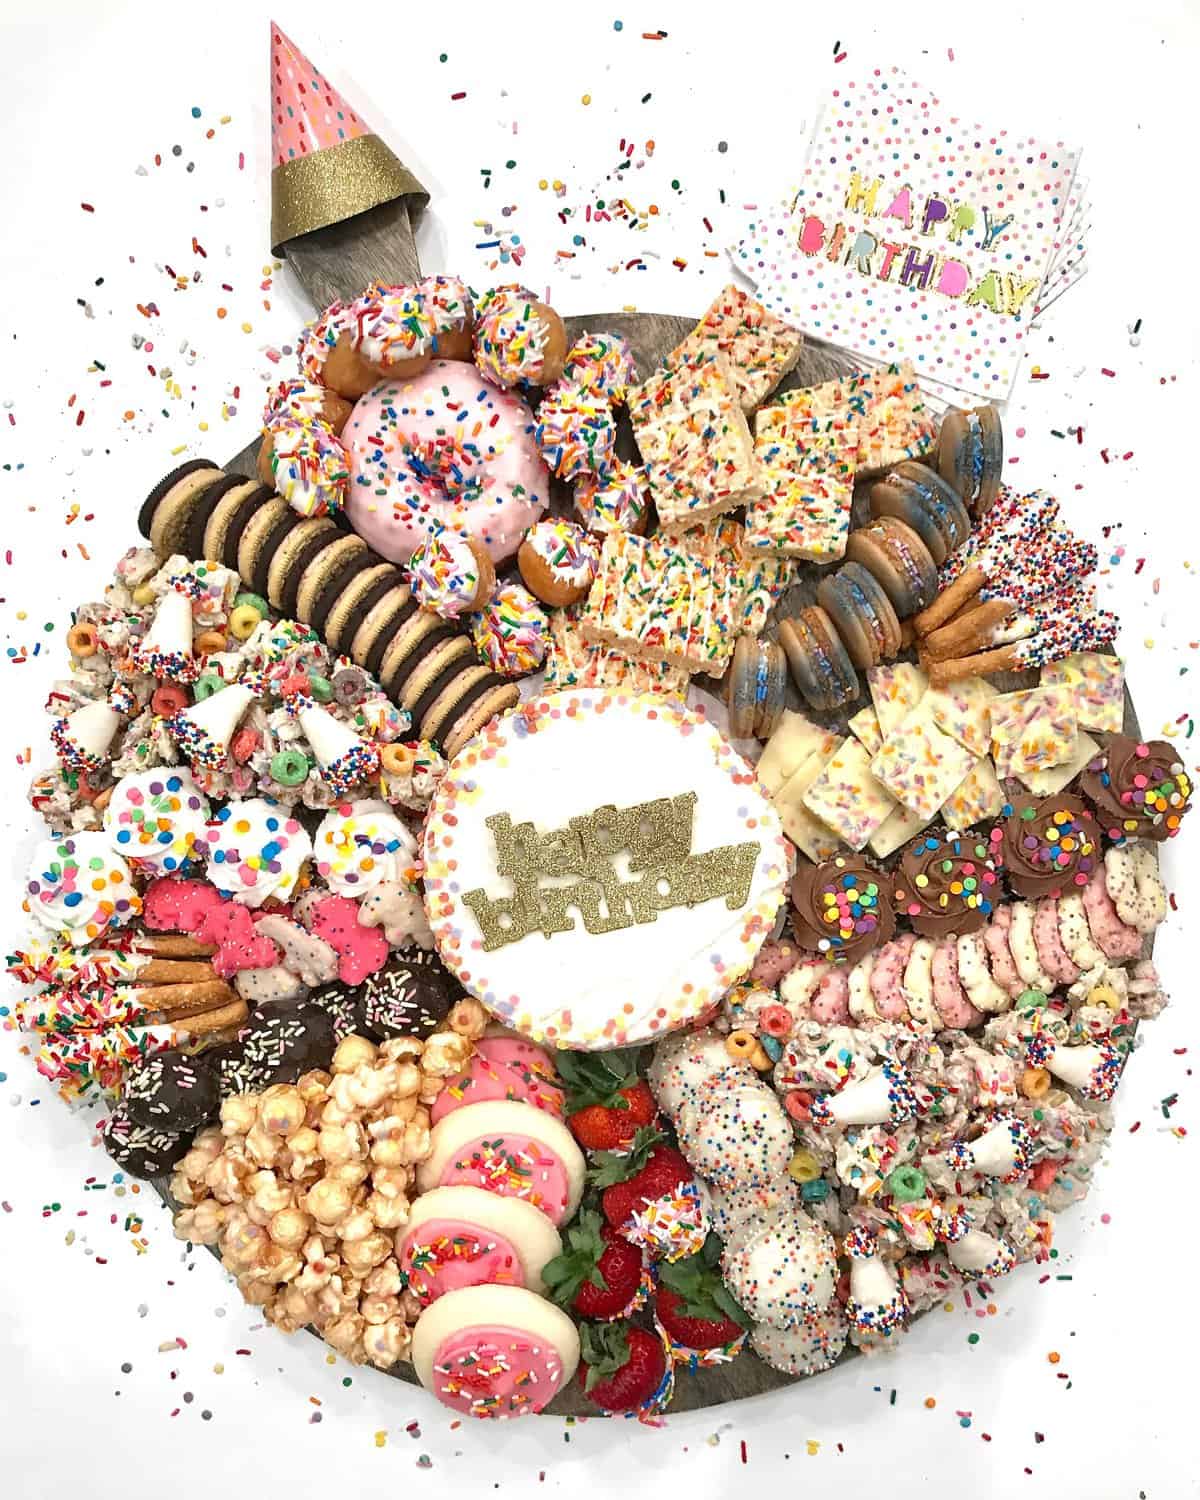
I used my favorite Mango Wood Board from Sur La Table. This beautiful 20 inch round board with a handle is the perfect size and shape for the amount of treats I wanted to put on it. You could certainly use a smaller or larger board depending on the number of people you’re planning to serve. The Birthday Dessert Board I created here could serve 12-14 happily.
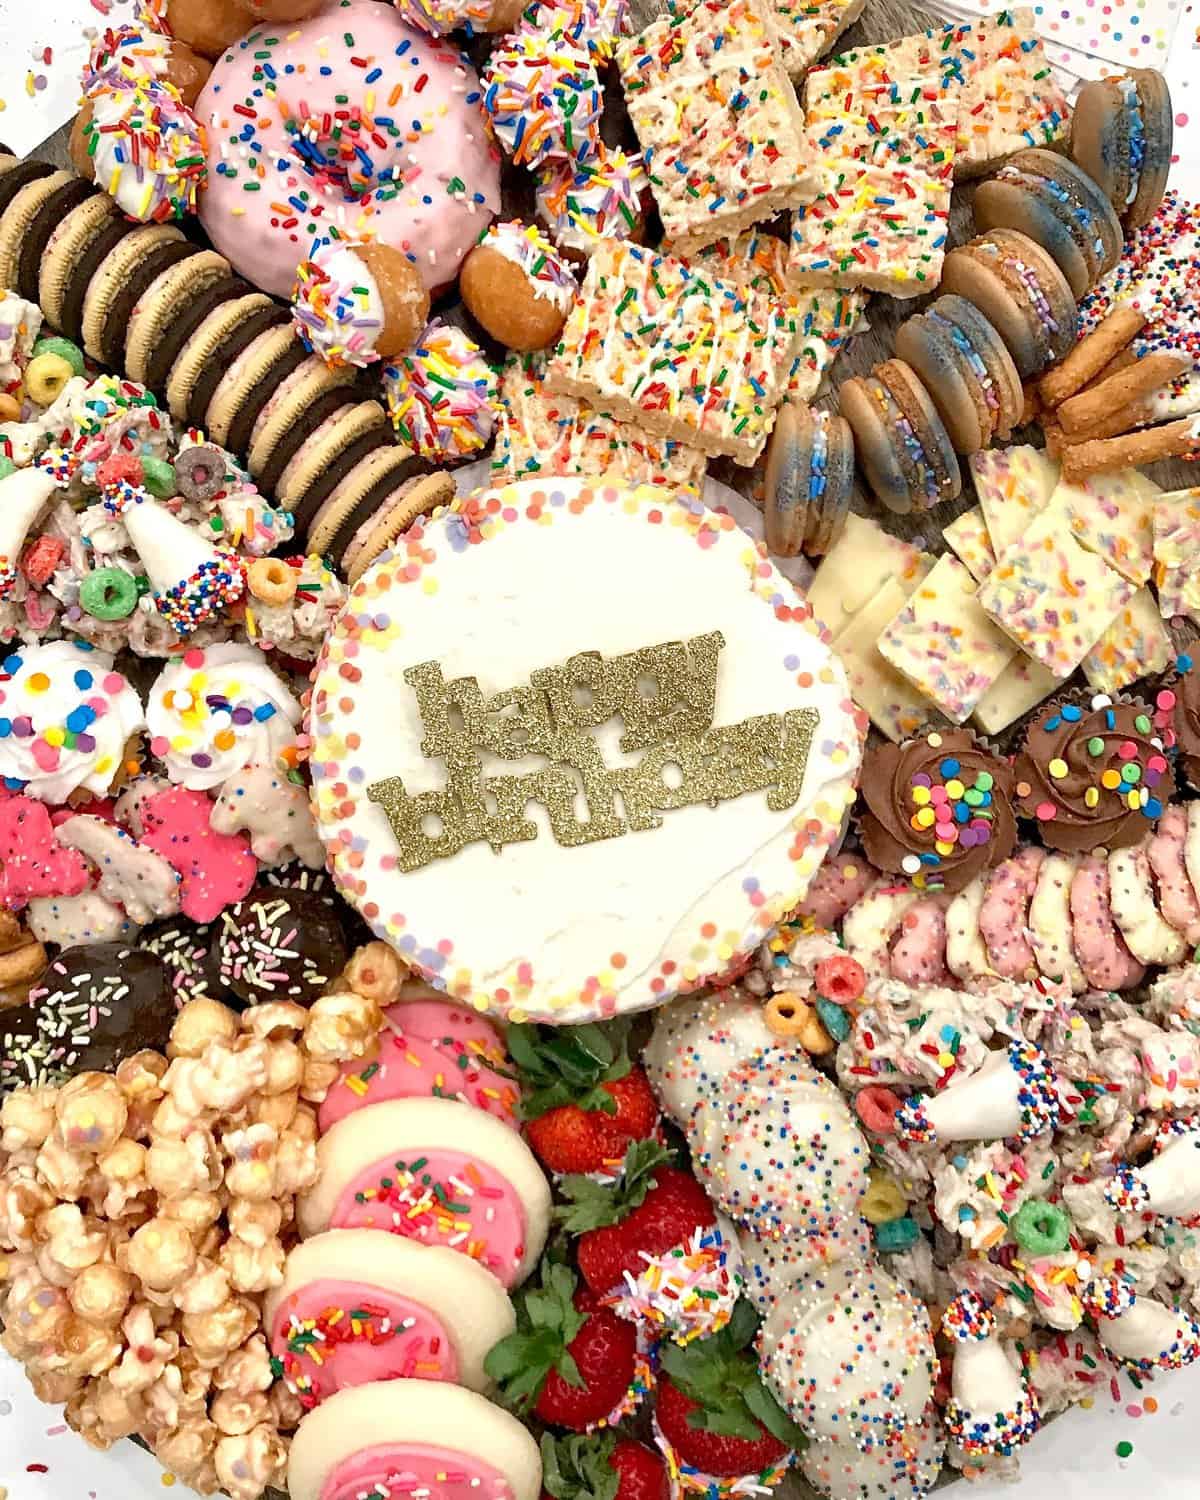
Now, let’s chat about all the yummy desserts on the board…
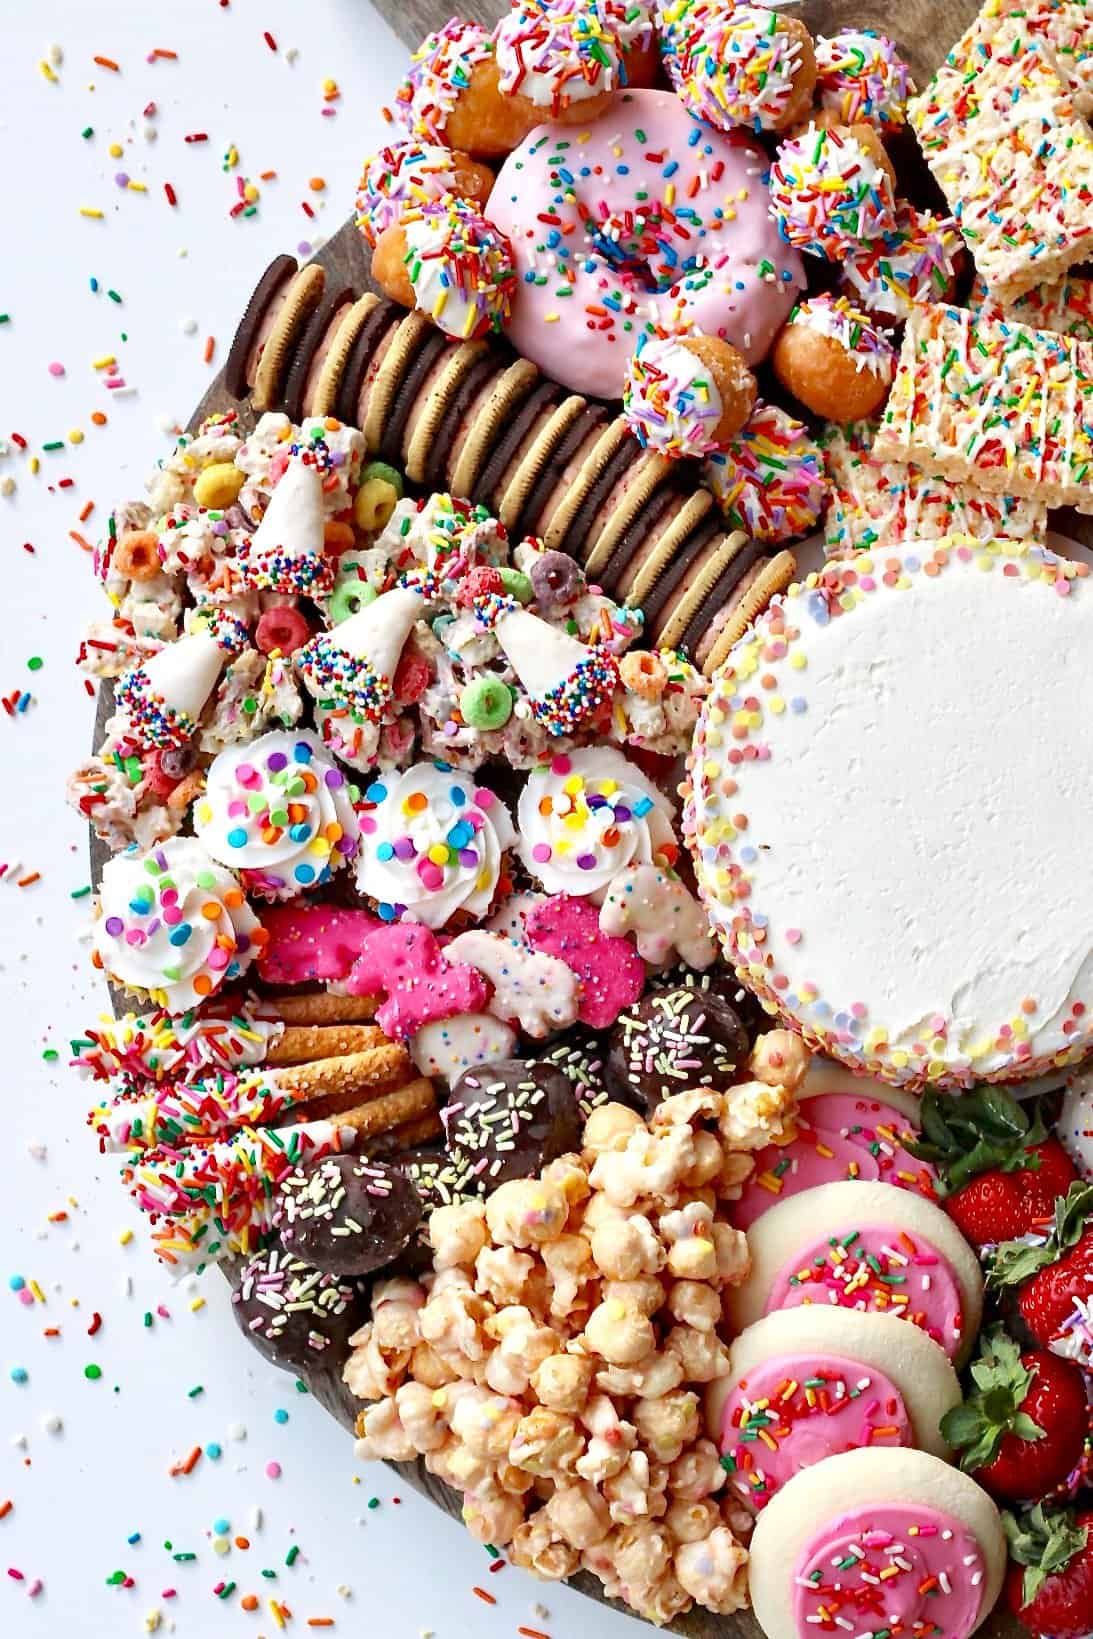
It all starts with a mini 6-inch round decorated layer cake in the middle of the board. I got the Party Cake from Trader Joe’s, but you could always make your own or purchase one from your favorite bakery. The Trader Joe’s Party Cake is a steal of a deal though. For only $6.99 you get two layers of fluffy, white, vanilla cake, covered in a rich, vanilla buttercream frosting and decorated with rainbow-colored confetti sprinkles. It’s adorable and delicious!

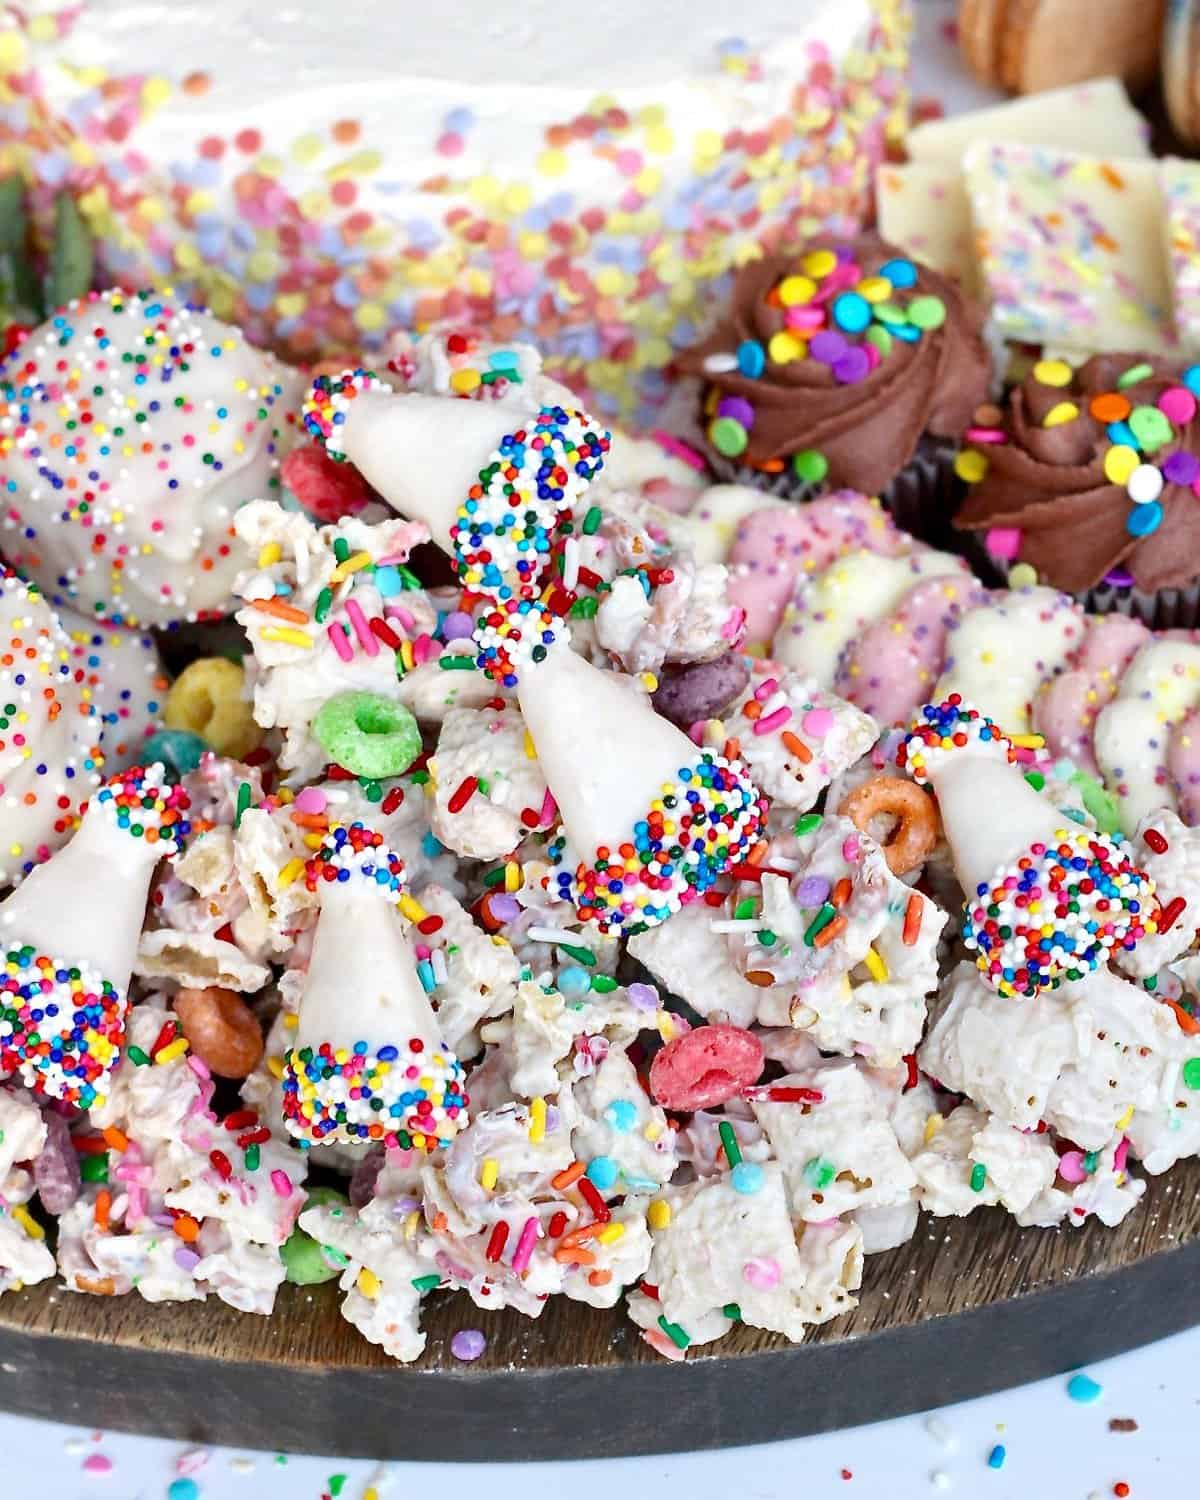
Then comes an epic selection of sprinkled and colorful treats fanning out from the cake. A masterpiece of some simple homemade treats along with some fun and yummy store-bought goodies.
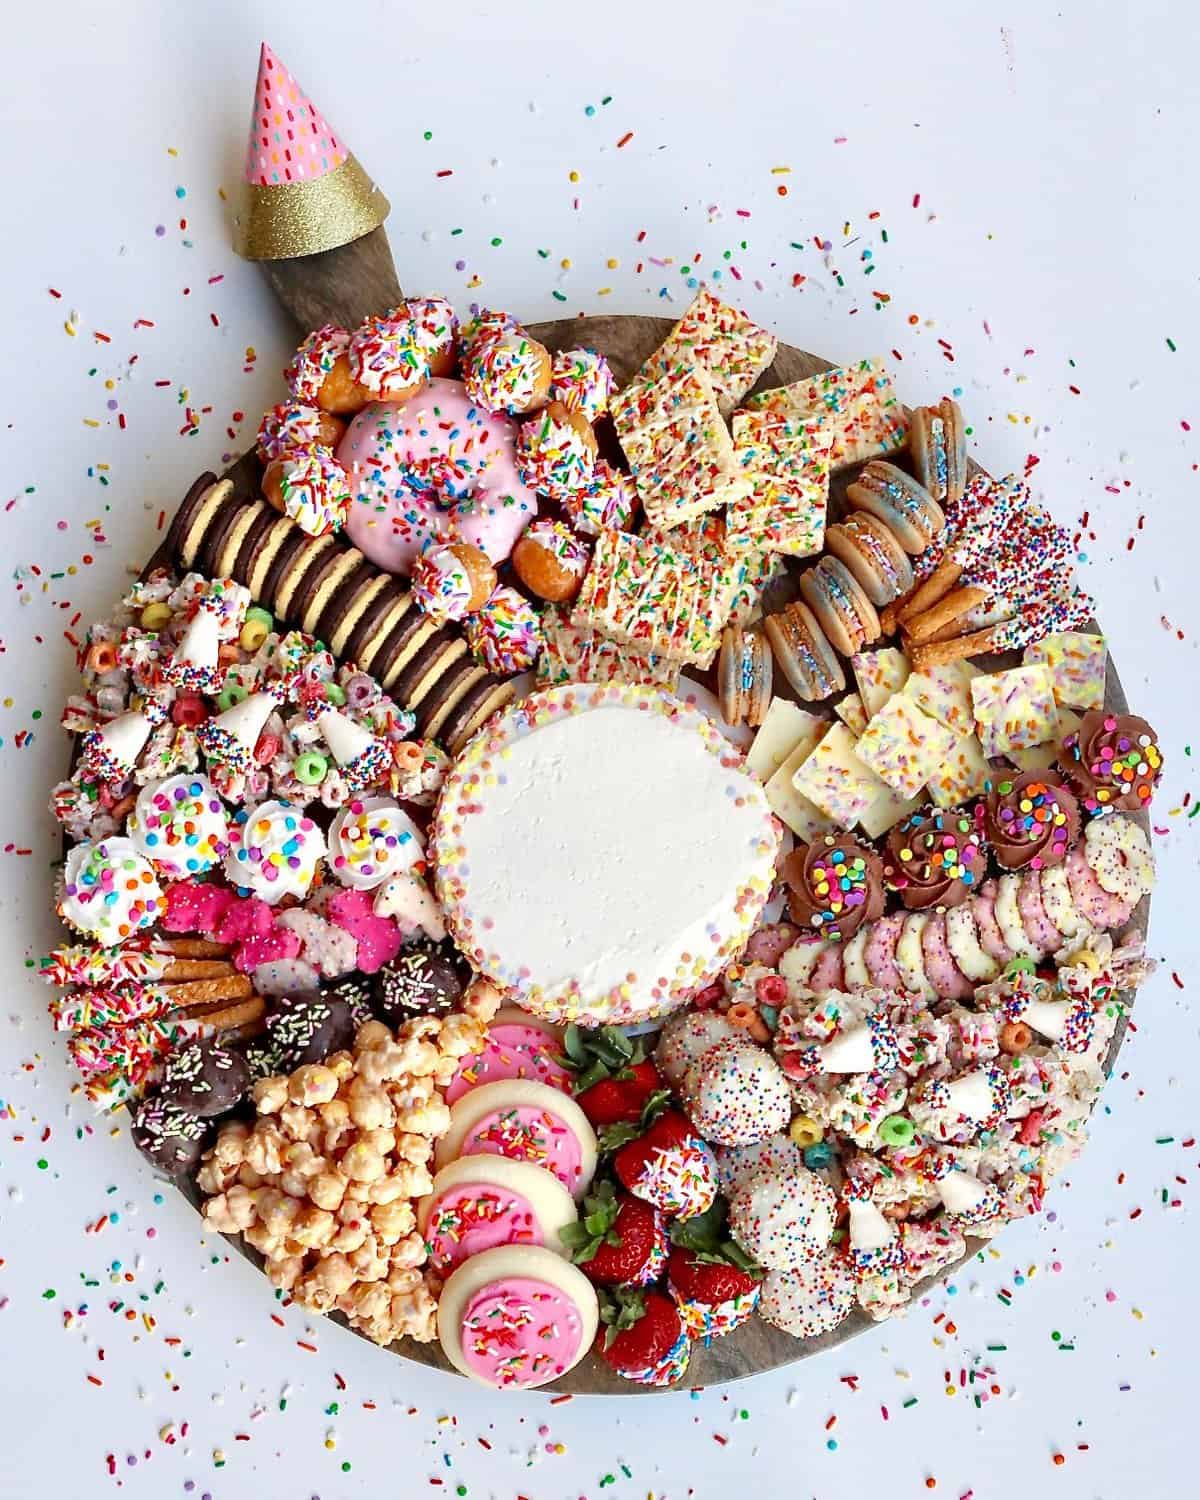
Simple Homemade Treats:
Dipped Pretzel Sticks with Sprinkles – I used Trader Joe’s honey wheat pretzel sticks and dipped each one halfway into melted vanilla candy coating, laid it on a piece of parchment paper and then immediately sprinkled with sprinkles. Let set and serve.
Dipped Strawberries with Sprinkles – I dipped each strawberry halfway into melted vanilla candy coating and laid on a piece of parchment paper before immediately sprinkling with sprinkles. Let set and serve.
Store-Bought Goodies:
Donuts from Top Pot Doughnuts (one pink-frosted cake with sprinkles and a dozen donut holes that I dipped in vanilla candy coating and sprinkled with rainbow sprinkles)
Neapolitan Joe-Joe’s Cookies from Trader Joe’s
Chocolate & Vanilla Mini Cupcakes from Target
Frosted Circus Animals from Target
Joe-Joe’s Truffles from Trader Joe’s
Birthday Cake Popcorn from Trader Joe’s
Lofthouse Pink Frosted Sugar Cookies from Tom Thumb
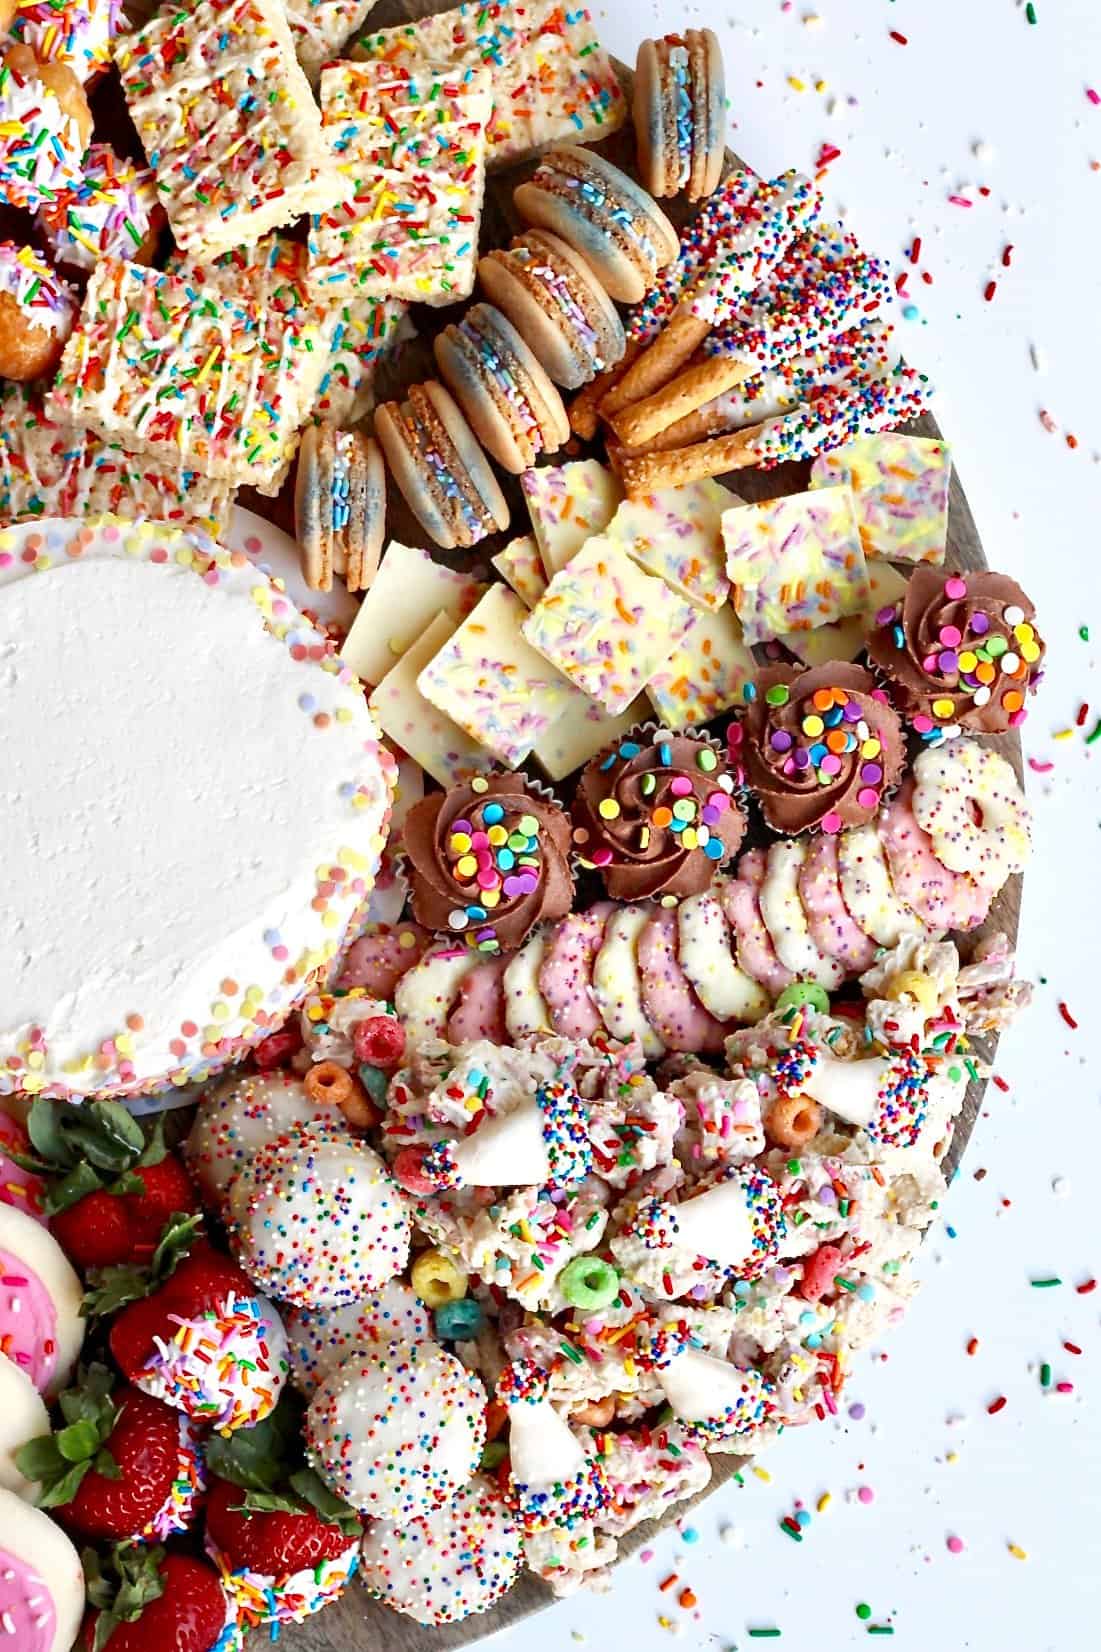
Rice Krispies Marshmallow Birthday Cake Snack Bars from Target
Birthday Cake Macarons from Whole Foods
Birthday Cake Bar from Trader Joe’s
Pinks & Whites Shortbread Cookies with Yogurt Coating and Sprinkles from Trader Joe’s
Birthday Tea Cakes from Tom Thumb
Finished it off with a gold Happy Birthday cake topper from Swoozie’s and a mini party hat from Target on the handle.
There you have it! And the great thing about this Birthday Dessert Board is that you can customize it to the birthday person’s favorites. Just find out their favorite desserts and/or colors and try to coordinate accordingly. Or just stick to the bright, colorful sprinkles scheme with a variety of treats that are sure to make everyone at the party happy, especially the person being celebrated!
I hope you love making, serving and enjoying this board as much as I did. It’s party perfect! Happy Happy Birthday to whomever you make it for!
xoxo,

Birthday Dessert Board
- Prep Time: 45 mins
- Total Time: 45 mins
- Yield: 12-14
- Category: Dessert
Description
Birthday dreams do come true with this amazing Birthday Dessert Board covered in every sweet, sprinkled treat you could wish for!
Ingredients
- 6-inch Party Cake from Trader Joe’s
Simple Homemade Treats:
- Birthday Snack Mix
- Dipped Pretzel Sticks with Sprinkles
- Dipped Strawberries with Sprinkles
Store-Bought Goodies:
- Donuts from Top Pot Doughnuts (one pink-frosted cake with sprinkles and a dozen donut holes that I dipped in vanilla candy coating and sprinkled with rainbow sprinkles)
- Neapolitan Joe-Joe’s Cookies from Trader Joe’s
- Chocolate & Vanilla Mini Cupcakes from Target
- Frosted Circus Animals from Target
- Joe-Joe’s Truffles from Trader Joe’s
- Birthday Cake Popcorn from Trader Joe’s
- Lofthouse Pink Frosted Sugar Cookies from Tom Thumb
- Rice Krispies Marshmallow Birthday Cake Snack Bars from Target
- Birthday Cake Macarons from Whole Foods
- Birthday Cake Bar from Trader Joe’s
- Pinks & Whites Shortbread Cookies with Yogurt Coating and Sprinkles from Trader Joe’s
- Birthday Tea Cakes from Tom Thumb
Instructions
- I used my favorite Mango Wood Board from Sur La Table. This beautiful 20 inch round board with a handle is the perfect size and shape for the amount of treats I wanted to put on it. You could certainly use a smaller or larger board depending on the number of people you’re planning to serve. The Birthday Dessert Board I created here could serve 12-14 happily.
- It all starts with a mini decorated layer cake in the middle of the board. I got the 6-inch Party Cake from Trader Joe’s, but you could always make your own or purchase one from your favorite bakery. The Trader Joe’s Party Cake is a steal of a deal though. For only $6.99 you get two layers of fluffy, white, vanilla cake, covered in a rich, vanilla buttercream frosting and decorated with rainbow colored confetti sprinkles. It’s adorable and delicious!
- Then comes an epic selection of sprinkled and colorful treats fanning out from the cake. A masterpiece of some simple homemade treats along with some store-bought goodies. Happy Birthday!!!

This is GORGEOUS! How much would you charge for something like this?
Hi Anastasia! Thank you! I don’t cater my boards, I just make them for us to enjoy with our loved ones and to inspire others so they can make them for their loved ones. I hope all the details in this blog post help.
Do you think for the price of the board, it’s worth it?
Absolutely! It was a huge hit, especially for a crowd at a birthday party. If you’re serving a smaller crowd, just use less treats on the board. Enjoy!
I shamelessly copied this for a quadruple bday party (ages ranging from 3 to 42), and it was a HIT! Thank you for the great idea. And searching for all the birthday stuff at Trader Joe’s was like a bonus treasure hunt 😉
Hi there this looks amazing and I’ll will be making something similar and will post. Can I make .y baked a day prior??
Hi Itza! Are you asking if you can prep the whole board the day before or bake the cake the day before? I would recommend building the board the day you plan to serve it so that everything is fresh. You can certainly bake a cake and prep any of the sweets a day or more before and store it until you’re ready to build the board. Have fun celebrating!
That’s one of the coolest things I’ve ever seen. Why haven’t I thought of this sooner?
Wow.. you are just SO creative! I might have to try this! I do need to invest in a good board though… ( I am thinking that’s a good Christmas gift!)