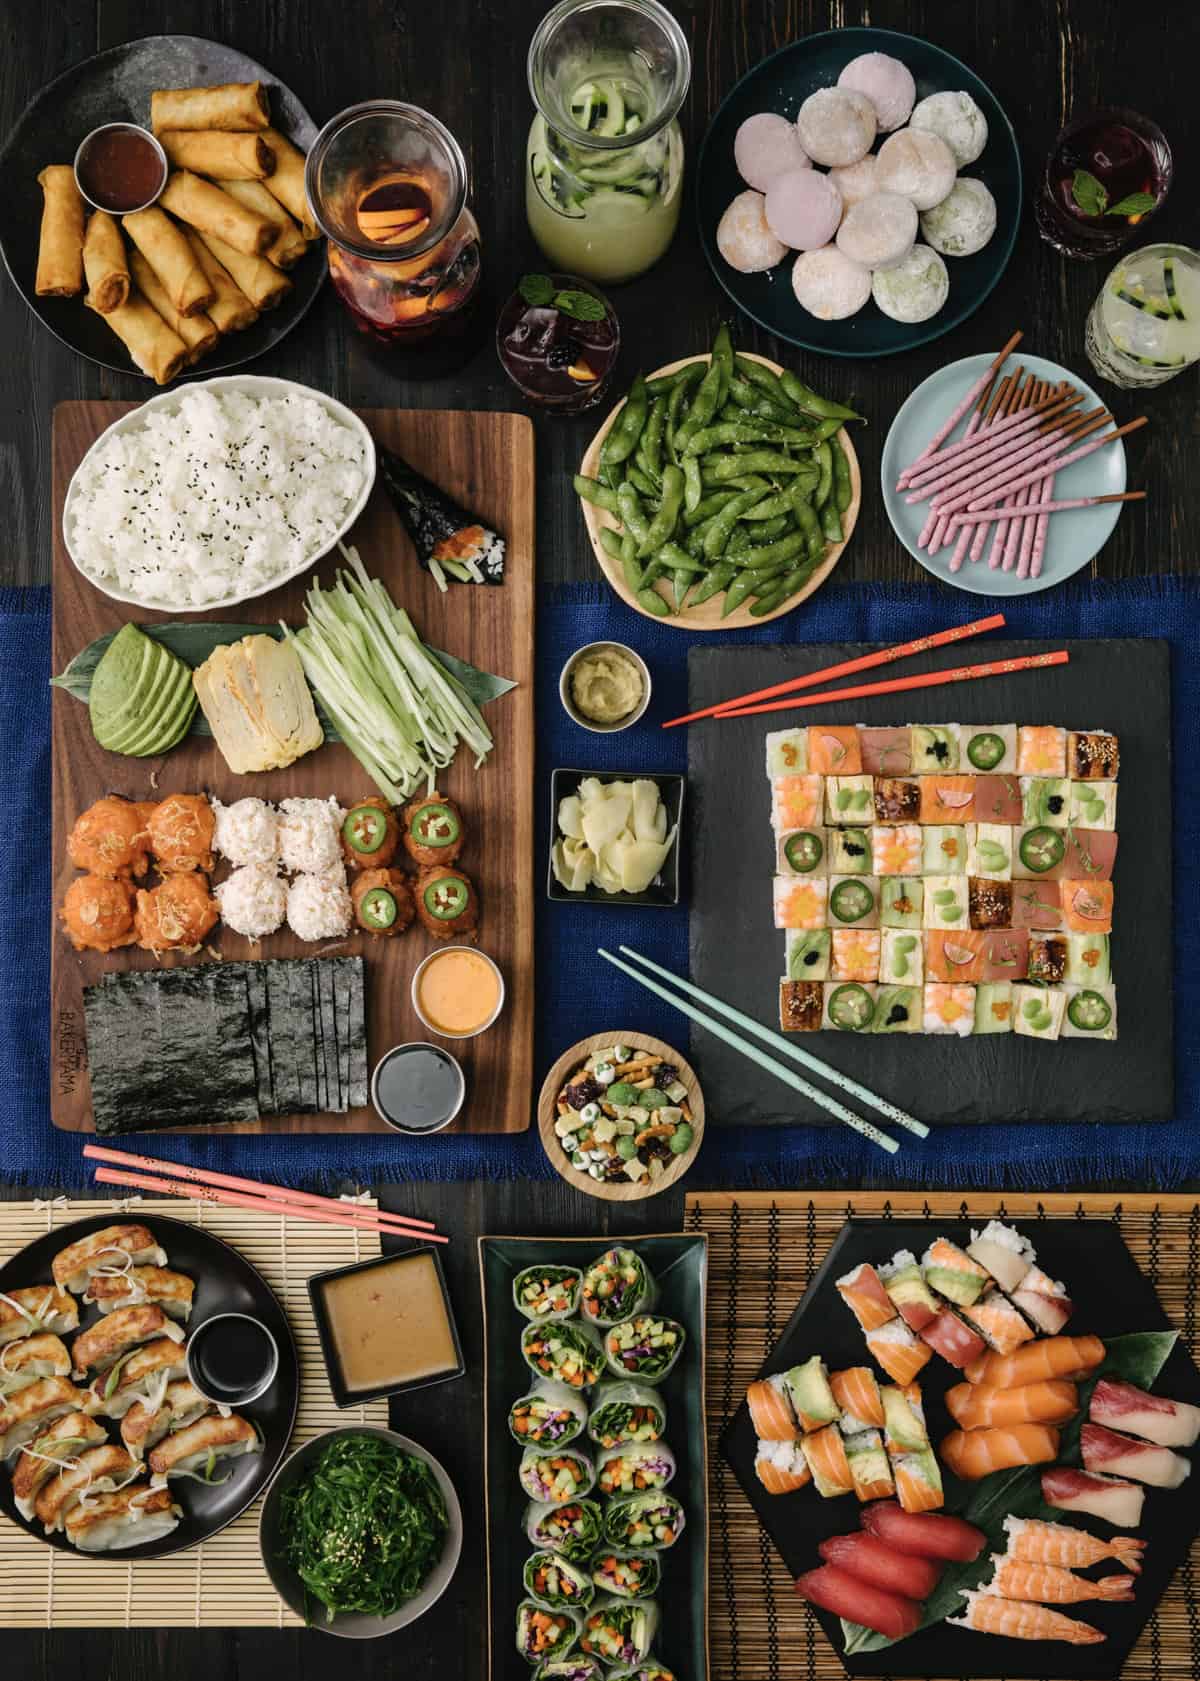
Homemade touches with restaurant ease come together in this semi-homemade Sushi and Sangria Spread. Fresh Summer Rolls and two delicious Sake Sangria recipes elevate your take-out sushi into entertaining perfection.
Homemade Touches and Restaurant Ease
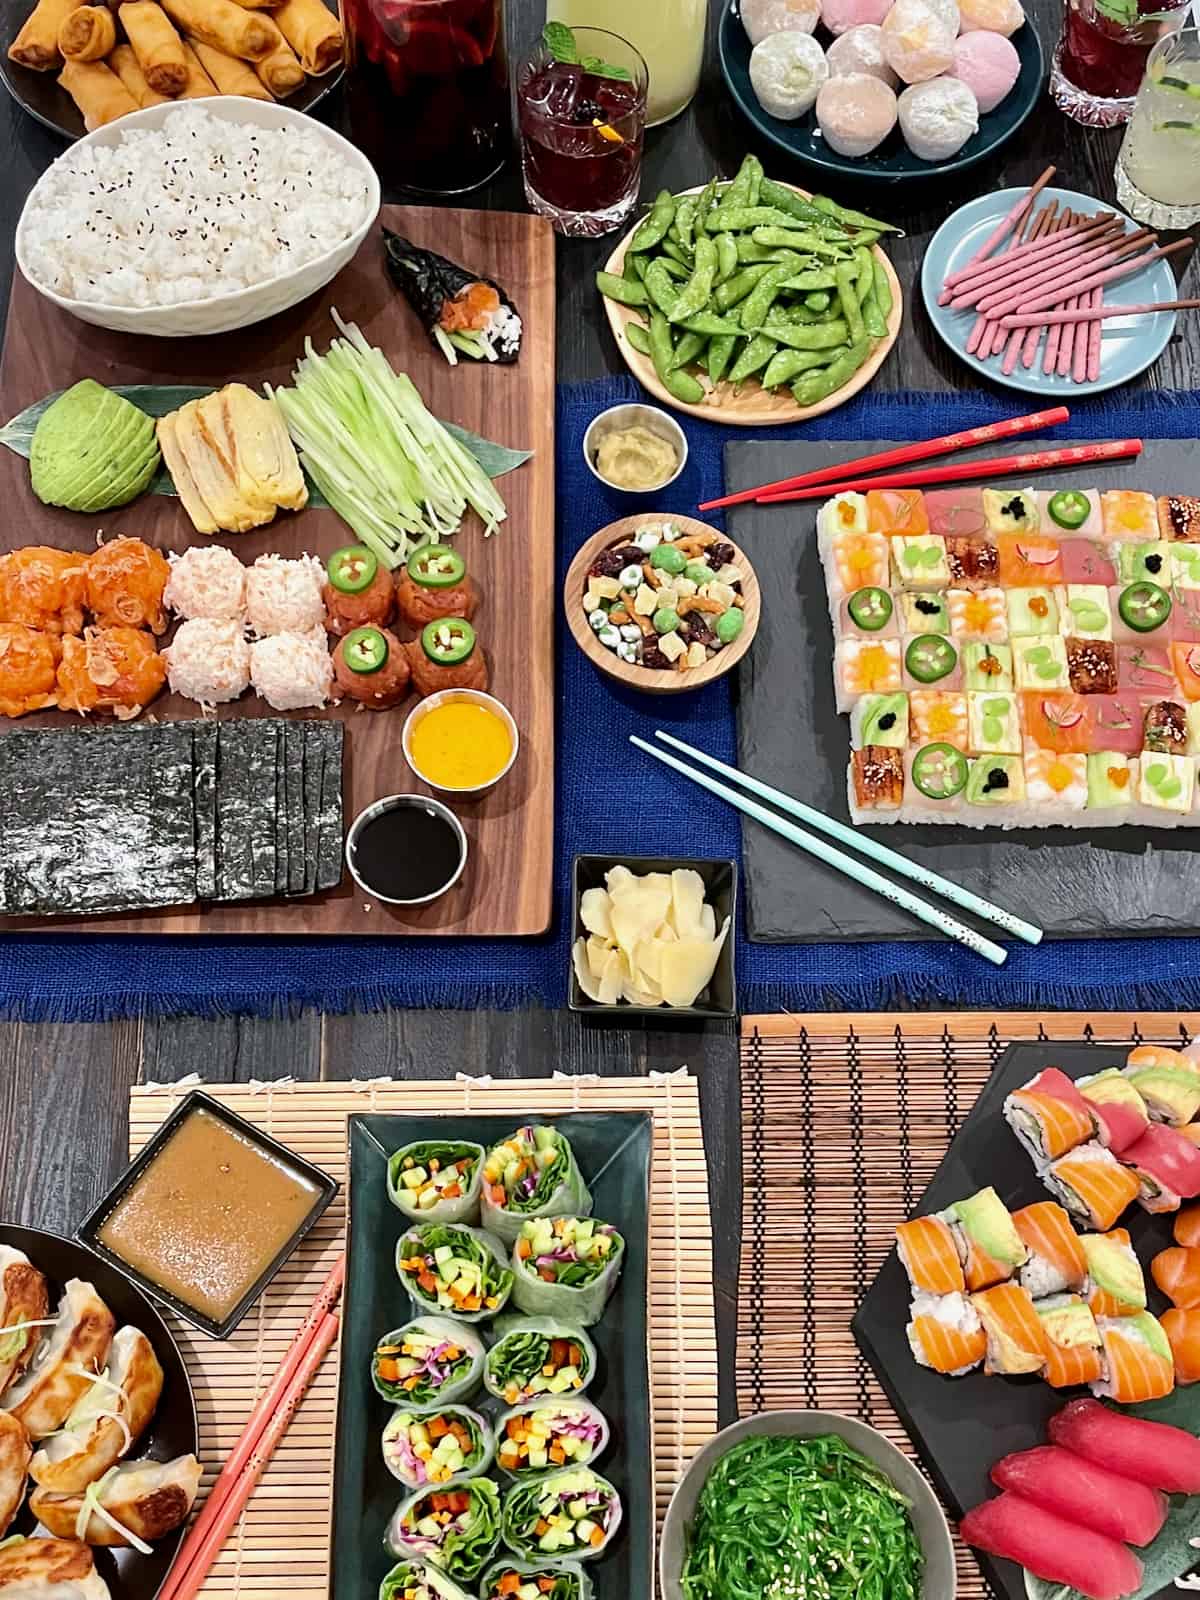
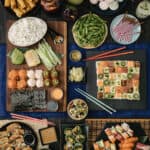
You don’t have to be an expert sushi chef to put on a great sushi night for friends with this Sushi and Sangria spread! This spread is the best of both worlds – homemade touches and restaurant ease. Call in an order of your favorite sushi take out, make some Fresh Summer Rolls along with some truly delicious Sake Sangrias, and then spend a few magical hours enjoying great friends and delicious food. This spread is perfect for a ladies’ night get-together or dinner in with friends. Invite the new neighbors over for an easy and impressive get-to-know-you. It really is the perfect spread for an out-of-the-box casual entertaining experience that everyone is sure to ooh and aah over!
A couple of quick tips!
- Keep the sushi plated and in the refrigerator until ready to add it to the spread.
- Make it a potluck-style gathering with your friends where each friend or couple brings a different dish to complete the spread.
- If everyone is willing to contribute and you want to keep it simple, have everyone contribute to the cost of the take-out foods. It’s much cheaper than everyone going out where you’ll likely pay more for drinks and service.
Recipes in this Spread
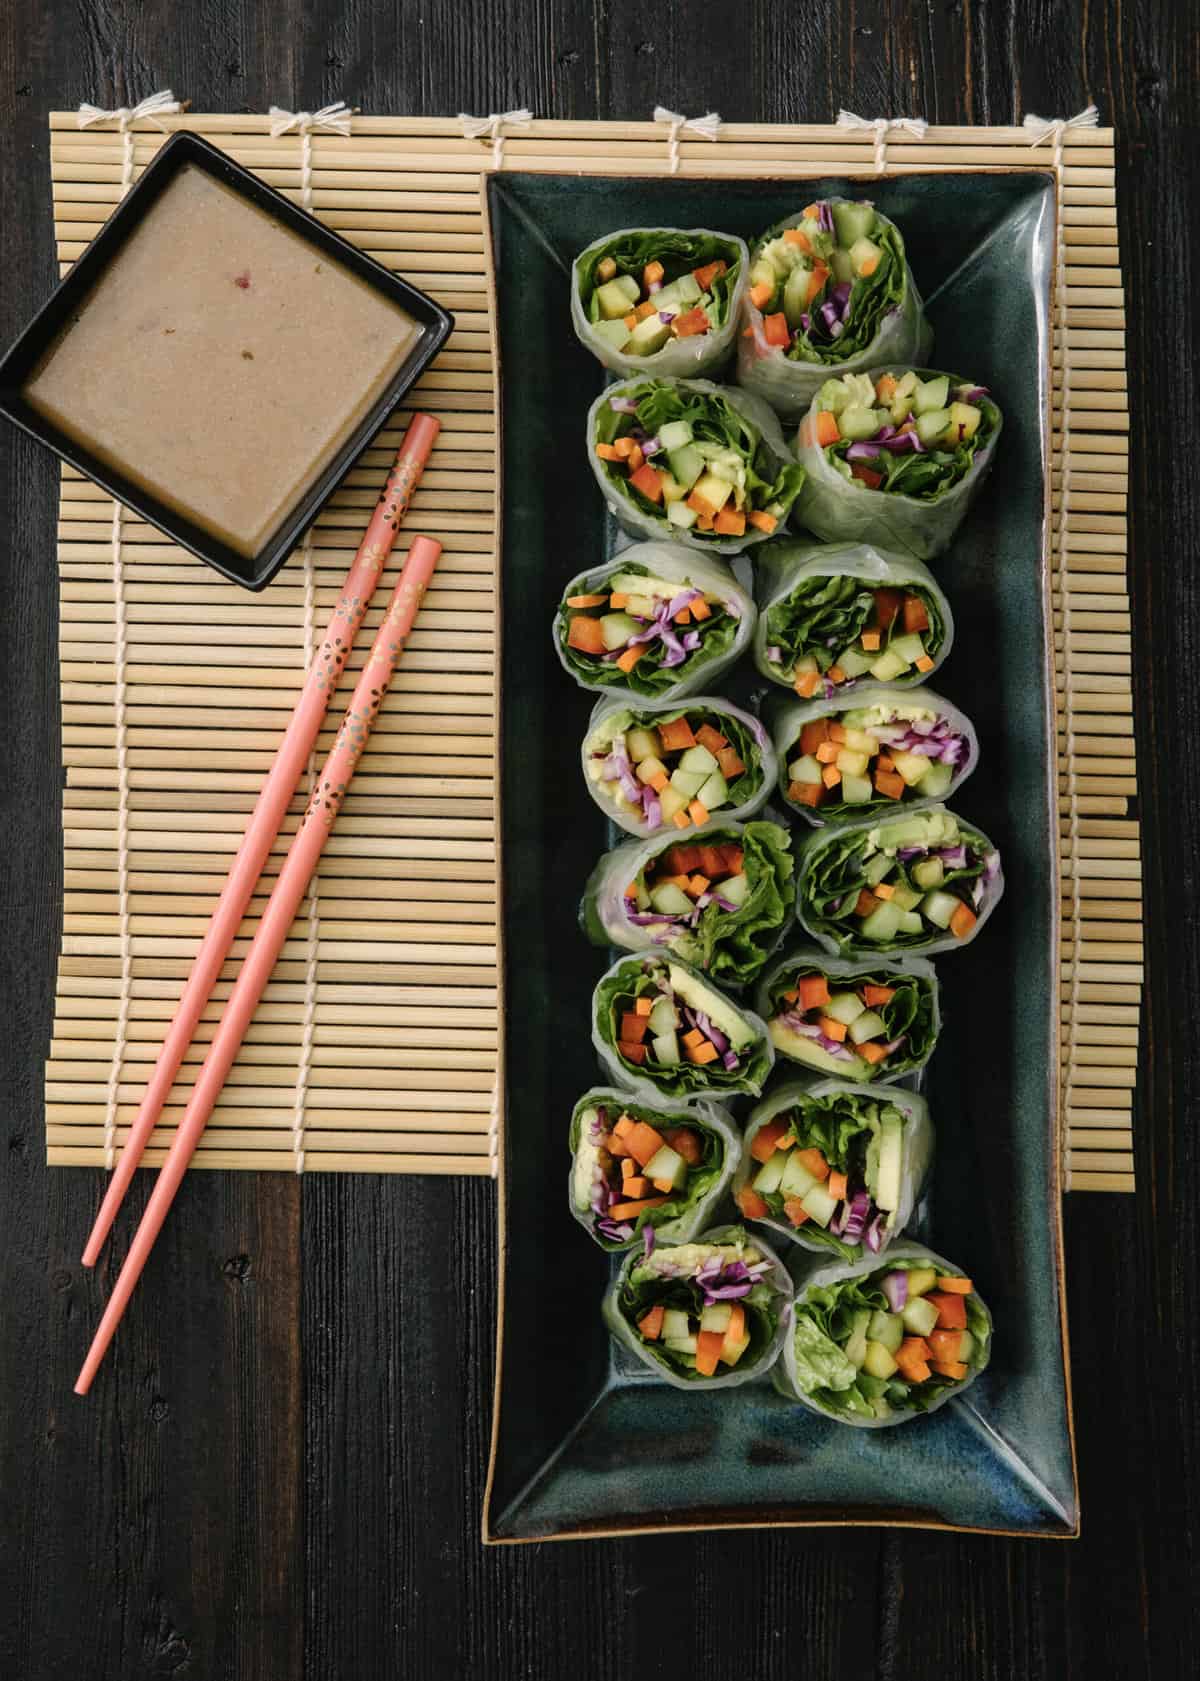
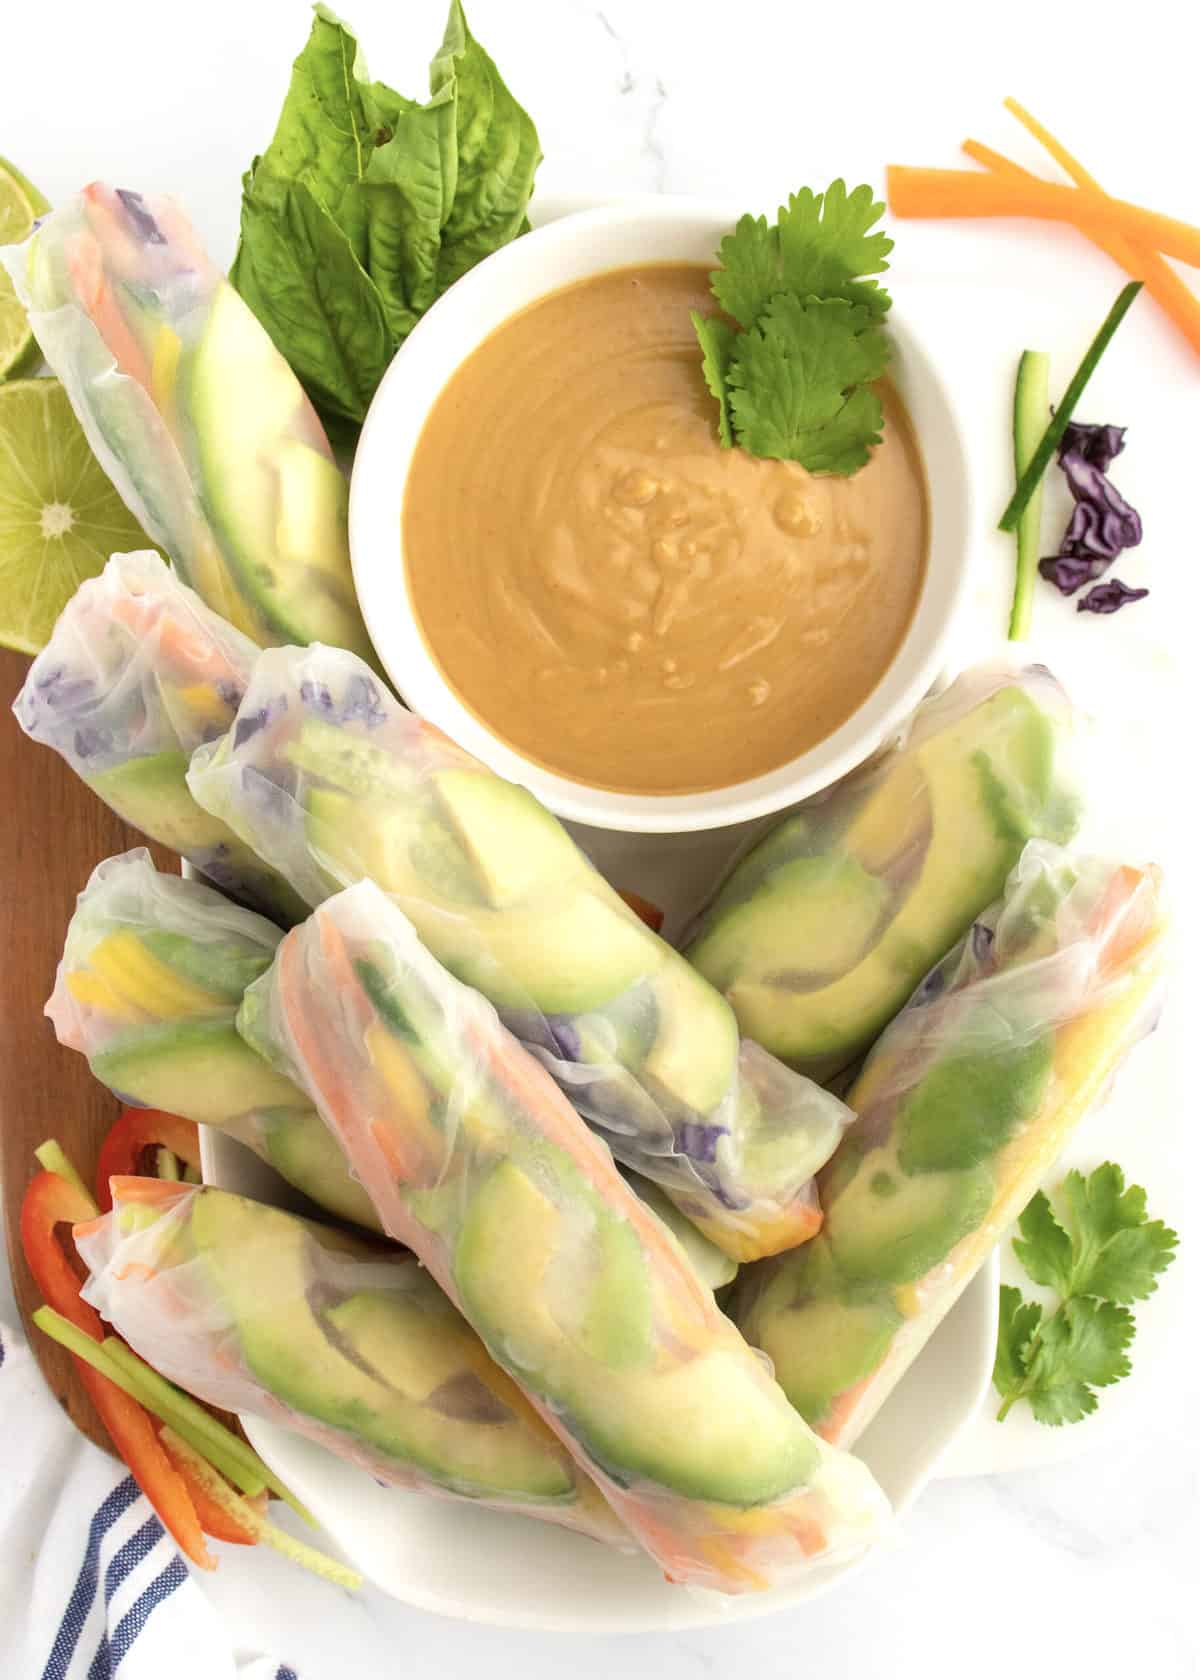
Fresh Summer Rolls
Crisp vegetables, sweet mango, creamy avocado and an irresistible peanut dipping sauce make these Fresh Summer Rolls your new favorite Asian-inspired appetizer.
Sake Sangria
These Sake Sangria recipes will take your take-out sushi night to the next level! Cucumber Ginger Sake Sangria and Red Sake Sangria make a delicious addition to your sushi night in. Kanpai!

Spread Details
- 12 Gyoza (Japanese dumplings): pan-fried, pork + veggie filled dumplings served with ¼ cup soy sauce or dumpling sauce
- 12 fried vegetable spring rolls
- ¼ cup sweet chili sauce
- 2 cups edamame, steamed and salted
- 2 cups seaweed salad
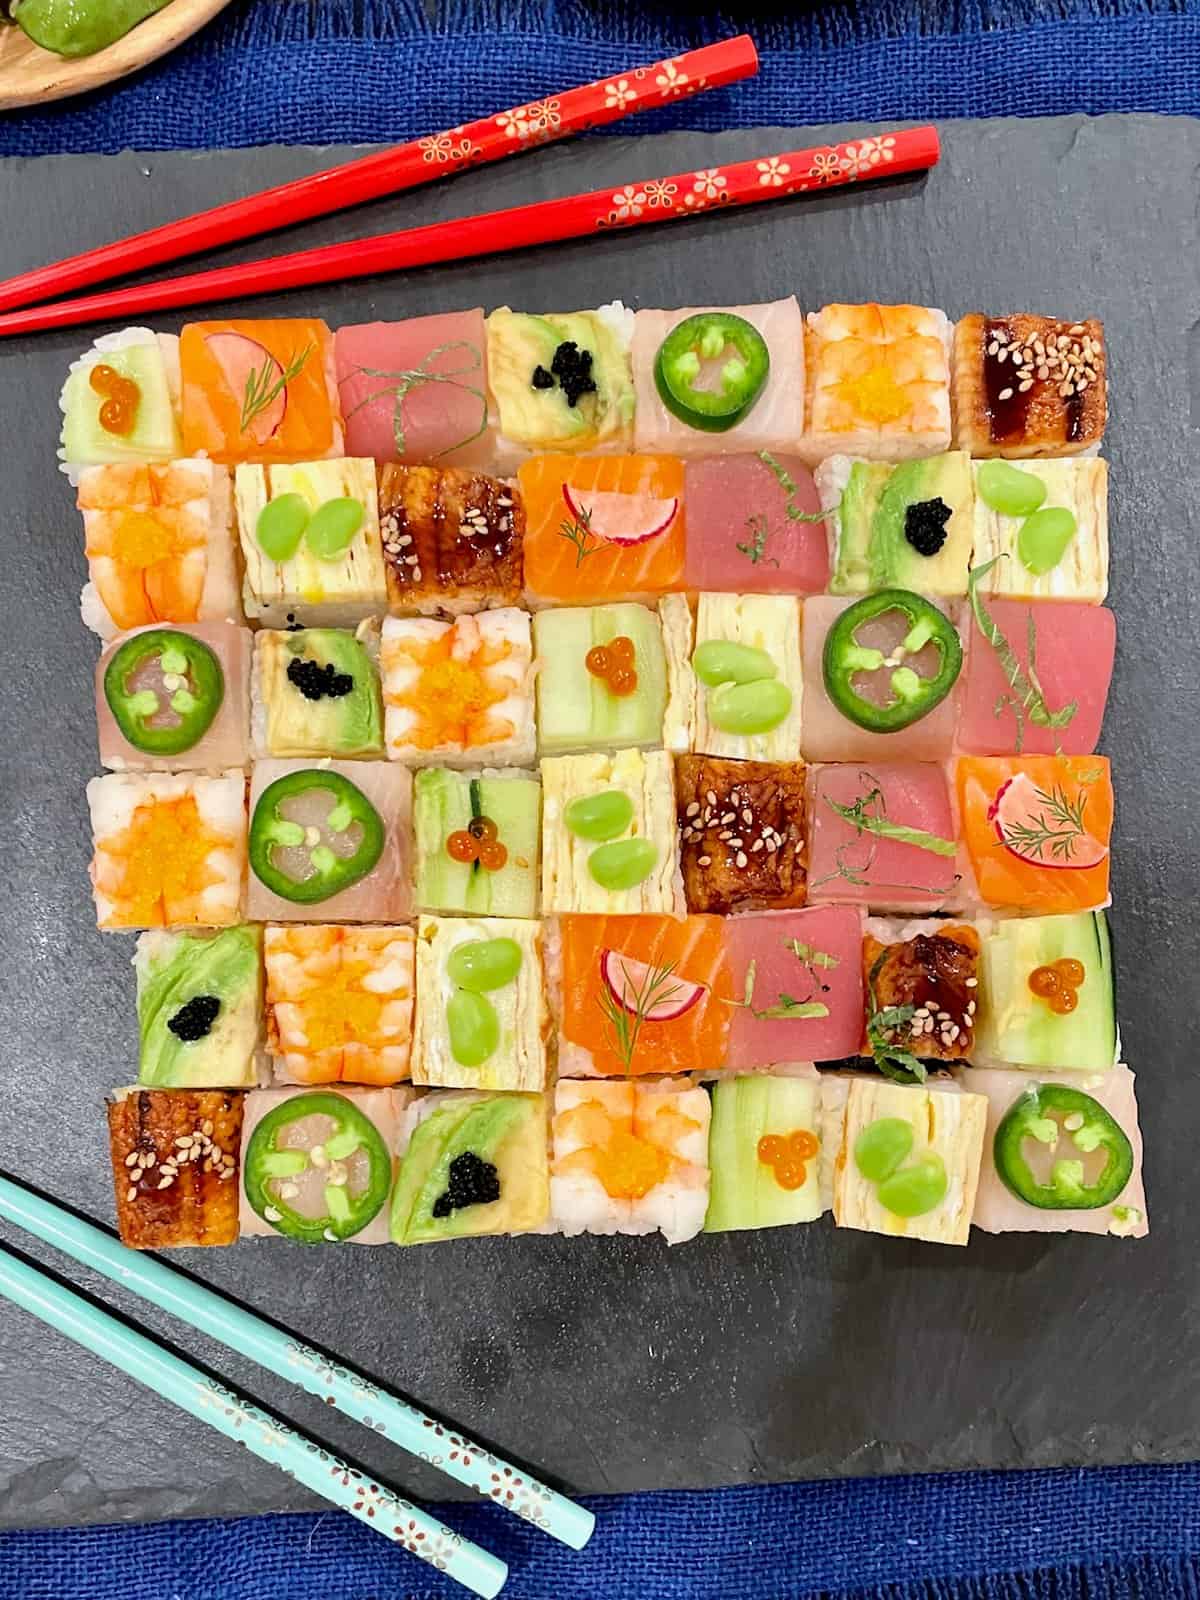
- 42 mosaic sushi squares: pressed sushi, cut into bite-sized squares and arranged in a gorgeous pattern with the following toppings: tuna, salmon, yellowtail, shrimp, unagi (broiled eel), avocado, cucumber, tamango (japanese omelet)
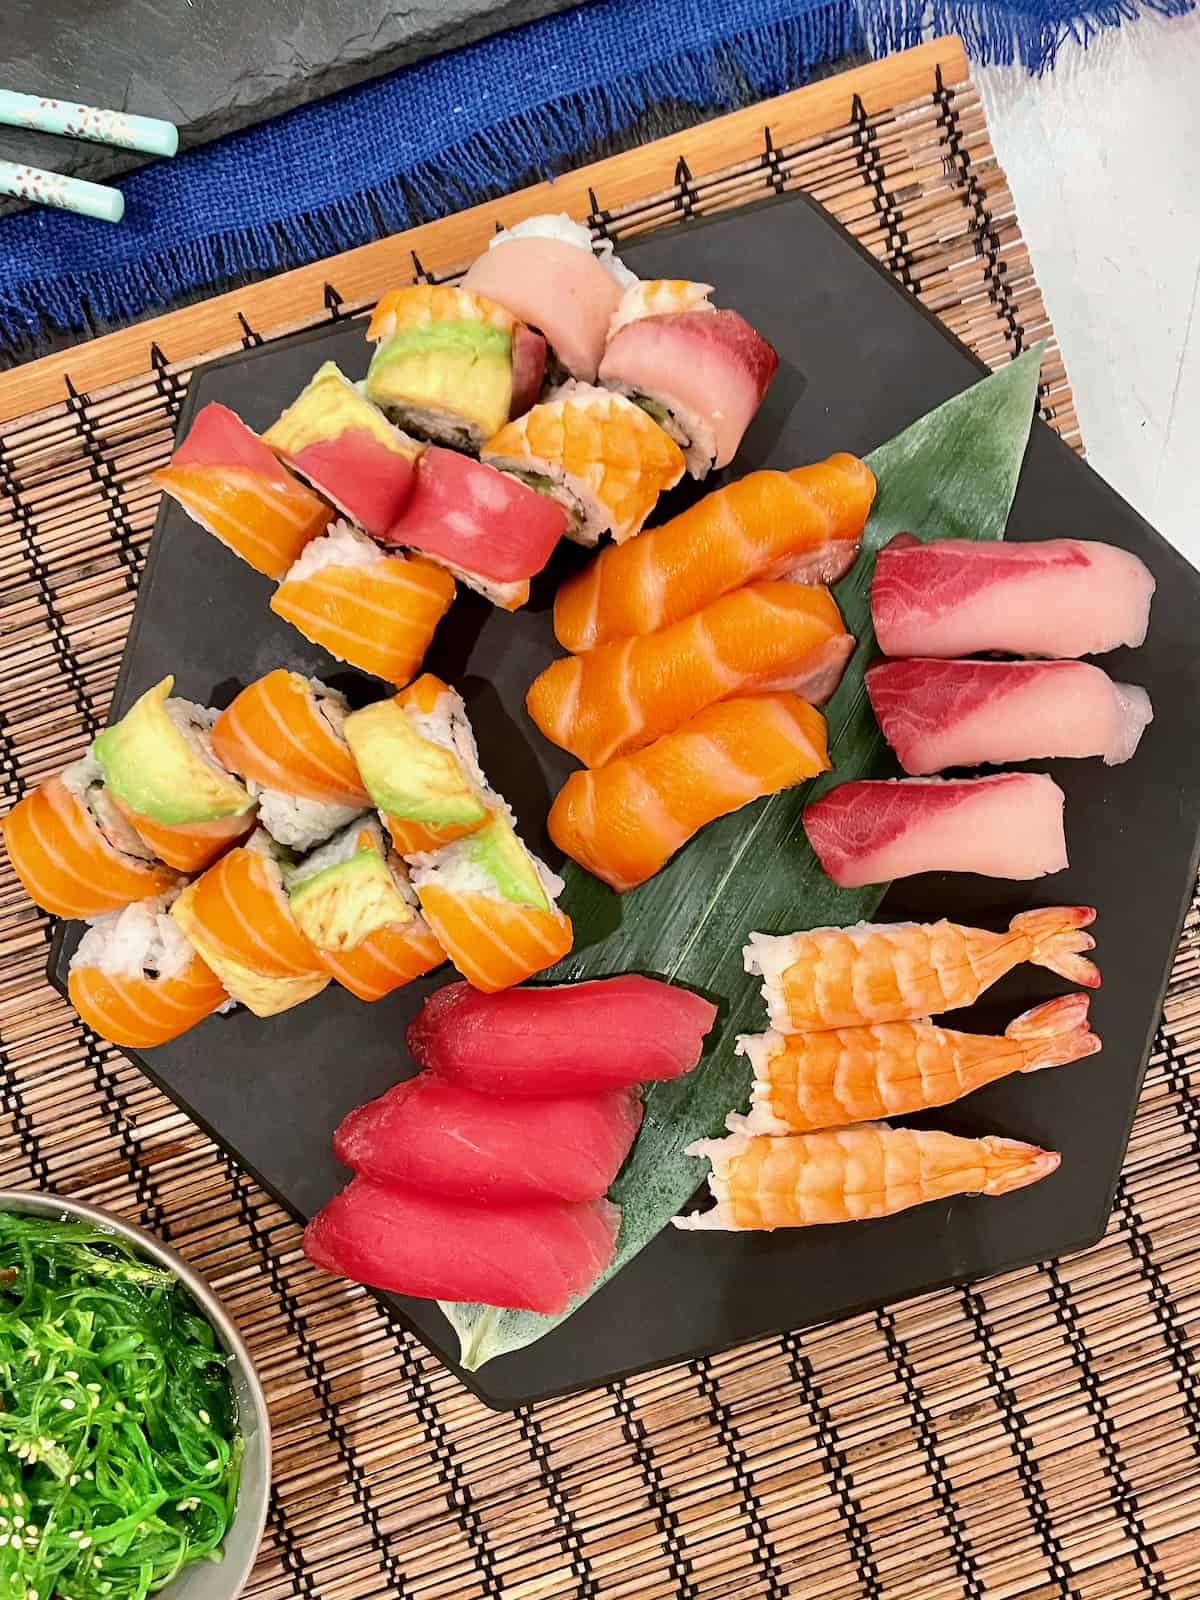
- 2 rainbow sushi rolls (8 pieces each)
- 12 nigiri (salmon, shrimp, tuna, yellowtail)
- Build-Your-Own Temaki Handroll Board:
- Nori seaweed sheets
- Seasoned sushi rice
- Crab Mix
- Spicy tuna with jalapeno
- Salmon
- Avocado
- Kappa (cucumber)
- Tamango (japanese omelet)
- ¼ cup Soy sauce
- ¼ cup Chili mayo sauce
- 16 Strawberry Cream Covered Chocolate Pocky sticks
- 1 cup Sweet & Spicy Wasabi Snack Mix: Wasabi Peas, Wasabi Peanuts, Honey Sesame Sticks, dried Pineapple, dried Cranberries, salted Peanuts
- Pickled Ginger
- Wasabi
- 16 fresh summer rolls with ⅓ cup peanut dipping sauce (see recipe)
- Red Sake Sangria (see recipes)
- Cucumber Ginger Sake Sangria (see recipes)
- 12 assorted Mochi balls (strawberry, mango, green tea, chocolate)
How to Set the Sushi and Sangria Spread
Order most of the dumplings, rolls and sushi items from your favorite sushi restaurant or get them from a grocery store that carries them. Or do a mix of some items from the grocery store (like the edamame, spring rolls and dumplings) and the fresh sushi from your favorite sushi restaurant. Several grocery stores have sushi counters where they make fresh sushi so definitely check there for reasonable sushi for a crowd. We love ordering from Sushi de Handroll here in Dallas.
Keep everything chilled in the refrigerator until you’re ready to serve the spread.
Make the Fresh Summer Rolls, but wait to cut them until you’re ready to serve the spread. These can be made a day in advance and stored in the refrigerator.
Make the sake sangrias and keep them in the refrigerator until you’re ready to serve the spread.
When you’re ready to serve the spread, start reheating the gyoza, spring rolls, and edamame according to package or restaurant instructions.
Put all of the sauces in small serving bowls on the spread table. Put the snack mix in a serving bowl and pokey sticks on a small plate on the spread table.
Arrange the Build-Your-Own Temaki Handroll ingredients on a wood board along with the serving bowls of soy sauce and chili mayo sauce.
How To Make A Temaki Sushi Handroll:
- Place 1 ounce sushi rice on the seaweed and place 1 ounce of your favorite fillings on top of the rice.
- Pick up the bottom left corner of the seaweed and roll it toward the top right.
Cut the fresh summer rolls and arrange them on a platter then set it on the spread table with the peanut sauce next to them. Put the seaweed salad in a small serving bowl on the spread table.

Add a platter of mosaic sushi and a platter of sushi rolls and nigiri to the spread table.
Put the sangrias on the spread table with a bucket of ice and glasses to serve them in.
Add the warm foods (gyoza, spring rolls and edamame) to the spread table. Put some soy sauce or dumpling sauce on the plate with the gyoza and some sweet chili sauce on the plate with the spring rolls.
Set out plenty of chopsticks and tongs for everyone to bring food to their plates with.
Have the mochi balls prepped in the freezer and ready to bring to the spread when everyone is ready for sweet treats. Sushi is best eaten the day it is made. If it sits out for a long period of time, it is best not to eat the leftovers.
If you make this Sushi and Sangria Spread, be sure to snap a picture and share it with me or tag me on Instagram @thebakermama so I can see.  I love seeing how inspired and creative y’all get with the recipes I share. Enjoy!
xoxo,

Sushi and Sangria Spread
- Yield: 8-10
Description
Homemade touches with restaurant ease come together in this semi-homemade Sushi and Sangria Spread. Fresh Summer Rolls and two delicious Sake Sangria recipes elevate your take-out sushi into entertaining perfection.
Ingredients
Spread Details:
- 12 Gyoza (Japanese dumplings): pan-fried, pork + veggie filled dumplings served with ¼ cup soy sauce or dumpling sauce
- 12 fried vegetable spring rolls
- ¼ cup sweet chili sauce
- 2 cups edamame, steamed and salted
- 2 cups seaweed salad
- 42 mosaic sushi squares: pressed sushi, cut into bite-sized squares and arranged in a gorgeous pattern with the following toppings: tuna, salmon, yellowtail, shrimp, unagi (broiled eel), avocado, cucumber, tamango (japanese omelet)
- 2 rainbow sushi rolls (8 pieces each)
- 12 nigiri (salmon, shrimp, tuna, yellowtail)
- Build-Your-Own Temaki Handroll Board:
- Nori seaweed sheets
- Seasoned sushi rice
- Crab Mix
- Spicy tuna with jalapeno
- Salmon
- Avocado
- Kappa (cucumber)
- Tamango (japanese omelet)
- ¼ cup Soy sauce
- ¼ cup Chili mayo sauce
- 16 Strawberry Cream Covered Chocolate Pocky sticks
- 1 cup Sweet & Spicy Wasabi Snack Mix: Wasabi Peas, Wasabi Peanuts, Honey Sesame Sticks, dried Pineapple, dried Cranberries, salted Peanuts
- Pickled Ginger
- Wasabi
- 16 Fresh Summer Rolls with ⅓ cup peanut dipping sauce (see recipe)
- Red Sake Sangria (see recipe)
- Cucumber Ginger Sake Sangria (see recipe)
- 12 assorted Mochi balls (strawberry, mango, green tea, chocolate)
Instructions
- Order most of the items from your favorite sushi restaurant or get them from a grocery store that carries them. Or do a mix of some items from the grocery store (like the edamame, spring rolls and dumplings) and the fresh sushi from your favorite sushi restaurant. Several grocery stores have sushi counters where they make fresh sushi so definitely check there for reasonable sushi for a crowd.
- Keep everything chilled in the refrigerator until you’re ready to serve the spread.
- Make the fresh summer rolls, but wait to cut them until you’re ready to serve the spread. These can be made a day in advance and stored in the refrigerator.
- Make the sangrias and keep them in the refrigerator until you’re ready to serve the spread.
- When you’re ready to serve the spread, start reheating the gyoza, spring rolls, and edamame according to package or restaurant instructions.
- Put all of the sauces in small serving bowls on the spread table. Put the snack mix in a serving bowl and pokey sticks on a small plate on the spread table.
- Arrange the Build-Your-Own Temaki Handroll ingredients on a wood board along with the serving bowls of soy sauce and chili mayo sauce.
- Cut the spring rolls and arrange them on a platter then set it on the spread table with the peanut sauce next to them. Put the seaweed salad in a small serving bowl on the spread table.
- Add a platter of mosaic sushi and a platter of sushi rolls and nigiri to the spread table.
- Put the sangrias on the spread table with a bucket of ice and glasses to serve them in.
- Add the warm foods (gyoza, spring rolls and edamame) to the spread table. Put some soy sauce or dumpling sauce on the plate with the gyoza and some sweet chili sauce on the plate with the spring rolls.
- Set out plenty of chopsticks and tongs for ladies to bring food to their plates with.
- Have the mochi balls prepped in the freezer and ready to bring to the spread when everyone is ready for sweet treats.
Notes
Spread Tips:
How To Make A Temaki Sushi Handroll:
- Place 1 ounce sushi rice on the seaweed and place 1 ounce of your favorite fillings on top of the rice.
- Pick up the bottom left corner of the seaweed and roll it toward the top right.
Keep the sushi plated and in the refrigerator until ready to add it to the spread.
Make it a potluck style gathering with your friends where each person or couple brings a different dish to complete the spread.
If everyone is willing to contribute and you want to keep it simple, have everyone contribute to the cost of the take-out foods. It’s much cheaper than everyone going out where you’ll likely pay more for drinks and service.
Leftovers?
Sushi is best eaten the day it is made. If it sits out for a long period of time, it is best not to eat the leftovers.
Supplies Needed:
- Chopsticks and serving tongs