
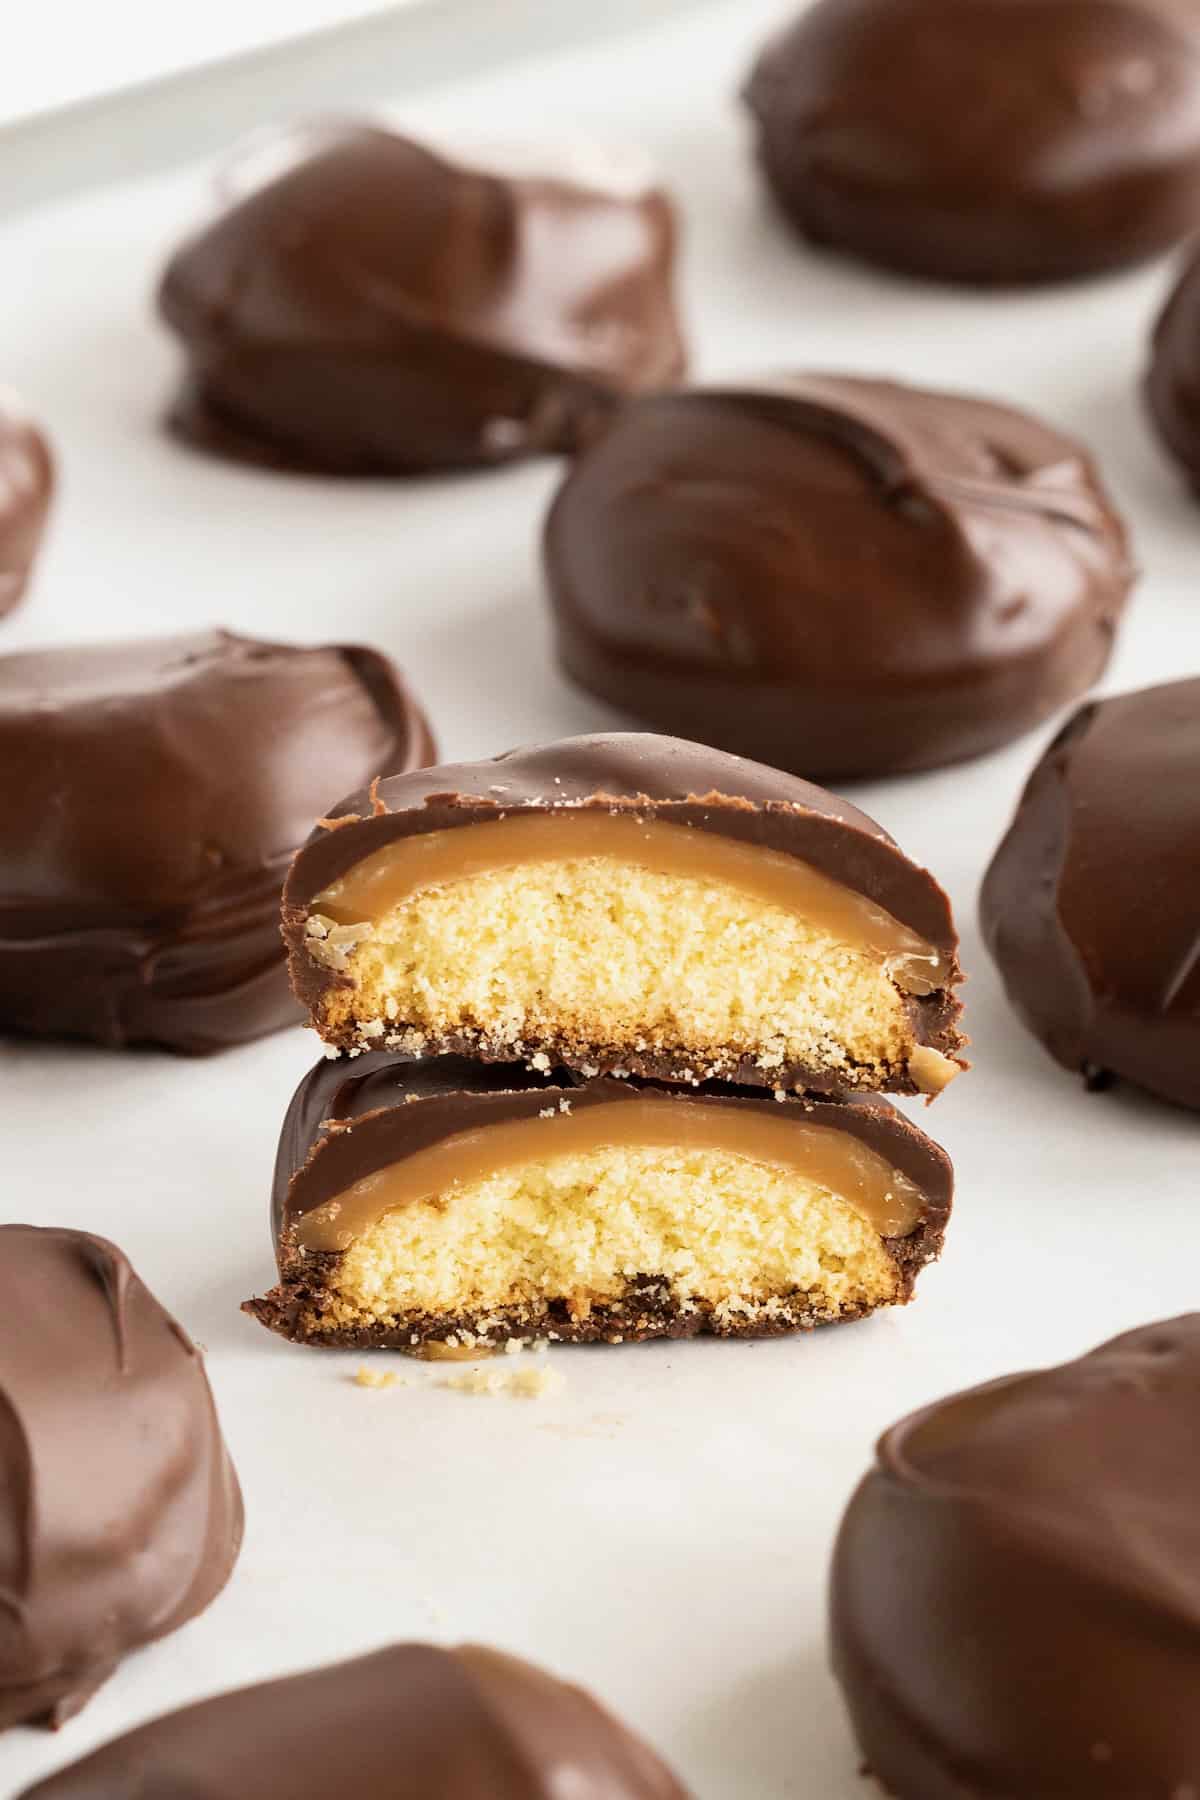
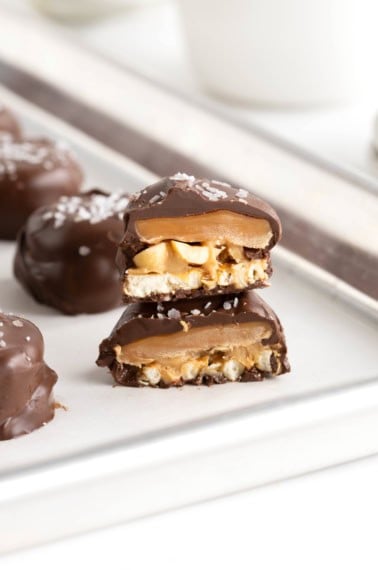
Vanilla wafer cookies topped with sweet, sticky caramel and a rich chocolate coating make Homemade Twix Bites irresistible!
Super Easy Homemade Twix Recipe
I am obsessed with making homemade mini versions of my favorite candy bars. First KitKat Bites, then Snickers Bites and now, drum roll please, these easy and amazingly delicious Homemade Twix Bites! Gooey caramel on top of crispy vanilla wafer cookies all covered up in a scrumptious chocolate coating. You won’t be able to put them down!

Two Bite Treats for the Holidays
If you’re one to make candy for the holidays, you can’t get any easier than these two-bite treats. Homemade candy bars are such a fun way to share something sweet. I keep a bowl of these Twix Bites out for parties and they go so quickly! They’re always a huge hit.

Homemade Twix Bites Ingredients and Supplies
See the recipe card at the bottom of this post for measurements and details. You can also shop my LTK to easily add all the ingredients to your shopping cart!
Ingredients:
- Caramel squares
- Round vanilla wafer cookies (I use Nilla Wafers)
- Semi-sweet chocolate chips
Supplies:

Watch Me Make It!
Step into the kitchen with me to make these scrumptious mini Twix!
How to Make Homemade Twix Bites
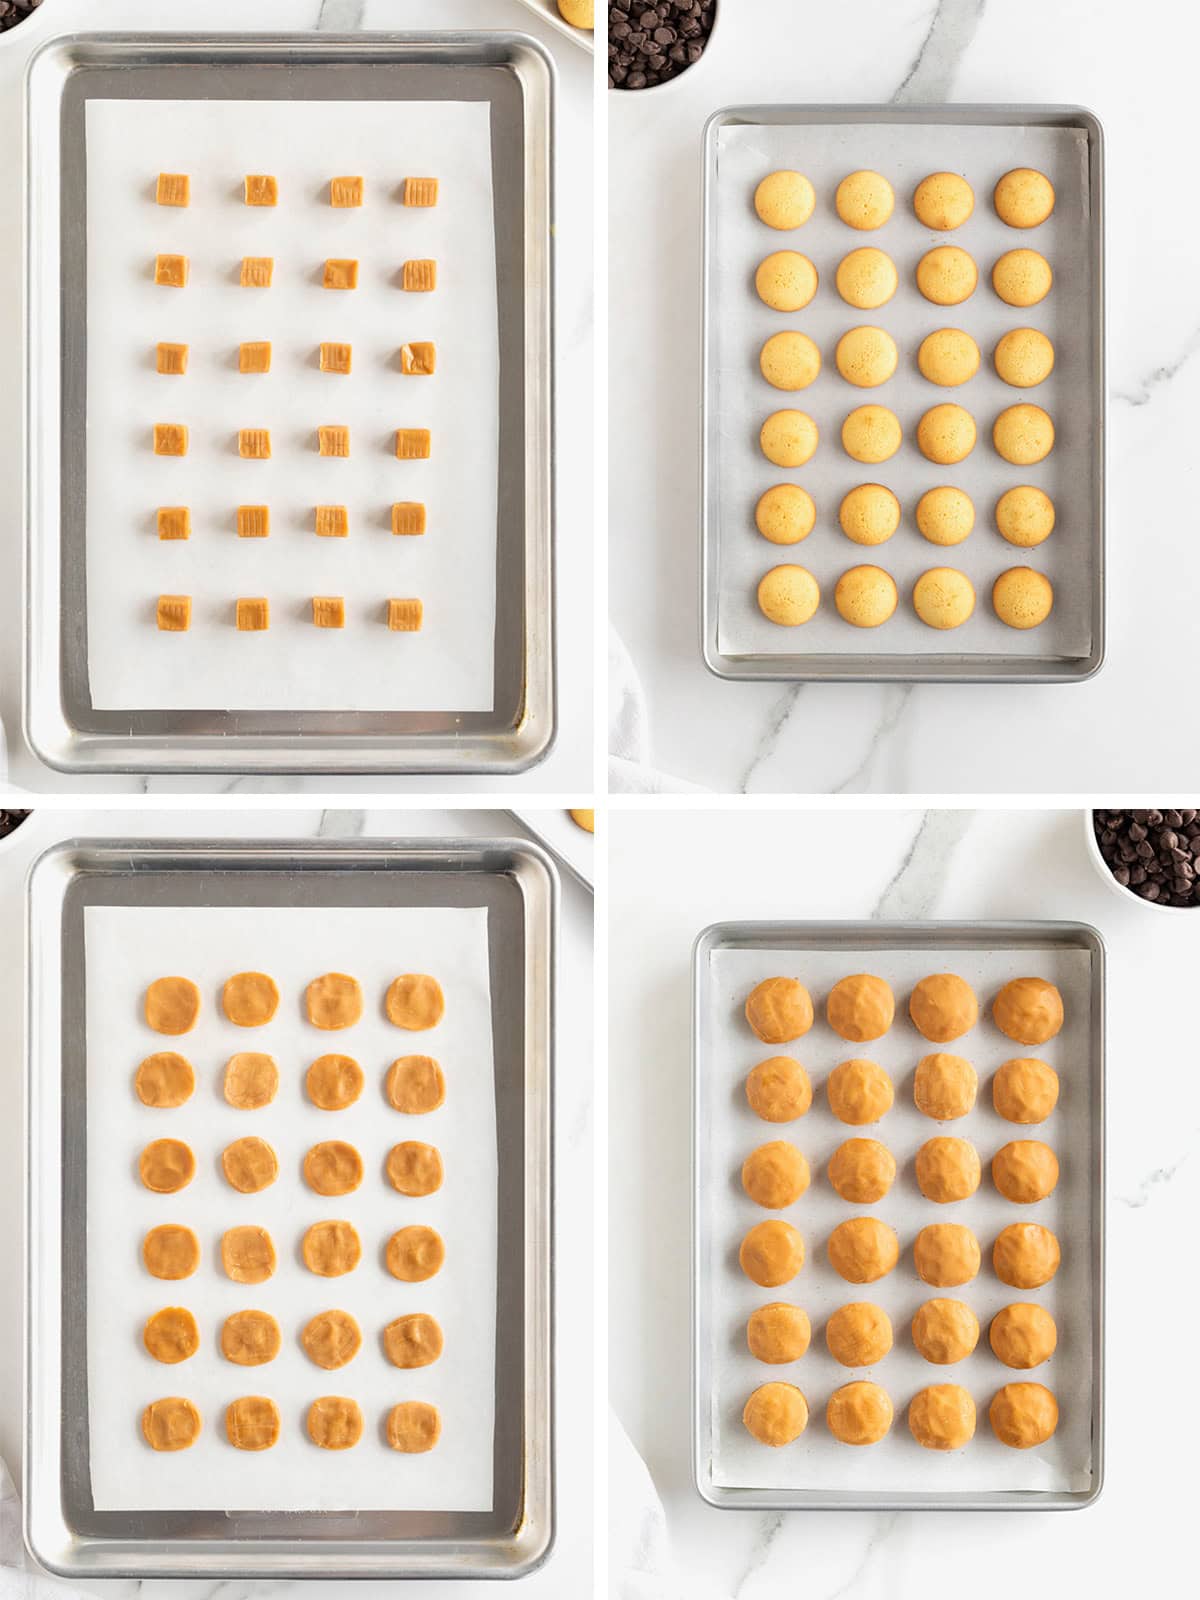
- Preheat the oven to 250°F. Unwrap and place the caramels a few inches apart on a parchment-lined baking sheet. Place the baking sheet on the middle rack of the preheated oven for 5 minutes to soften the caramels. They should not melt. They should just soften so that you can reshape them.
- Meanwhile, arrange the vanilla wafer cookies, bottom sides up, on a small parchment-lined sheet pan that will fit in your freezer.
- Remove the caramels from the oven and while they’re still warm slightly flatten each caramel into a circle shape that will fit the size of the wafer cookies. Place each flattened caramel on top of each cookie on the sheet pan.
- Place the sheet pan of bites in the freezer for 15 minutes to flash freeze them.
- When you’re ready to coat the bites in chocolate, place 1 cup of the chocolate chips in a microwave-safe bowl and microwave in 30 seconds intervals until melted and smooth, stirring between each interval.
- Remove half of the flash frozen bites from the freezer.
- Using a fork, dip and coat each bite completely in the melted chocolate, letting any excess chocolate drip back into the bowl before transferring the coated bite to a parchment-lined sheet pan.
- Repeat with the remaining 1 cup of chocolate chips and remaining bites that are in the freezer.
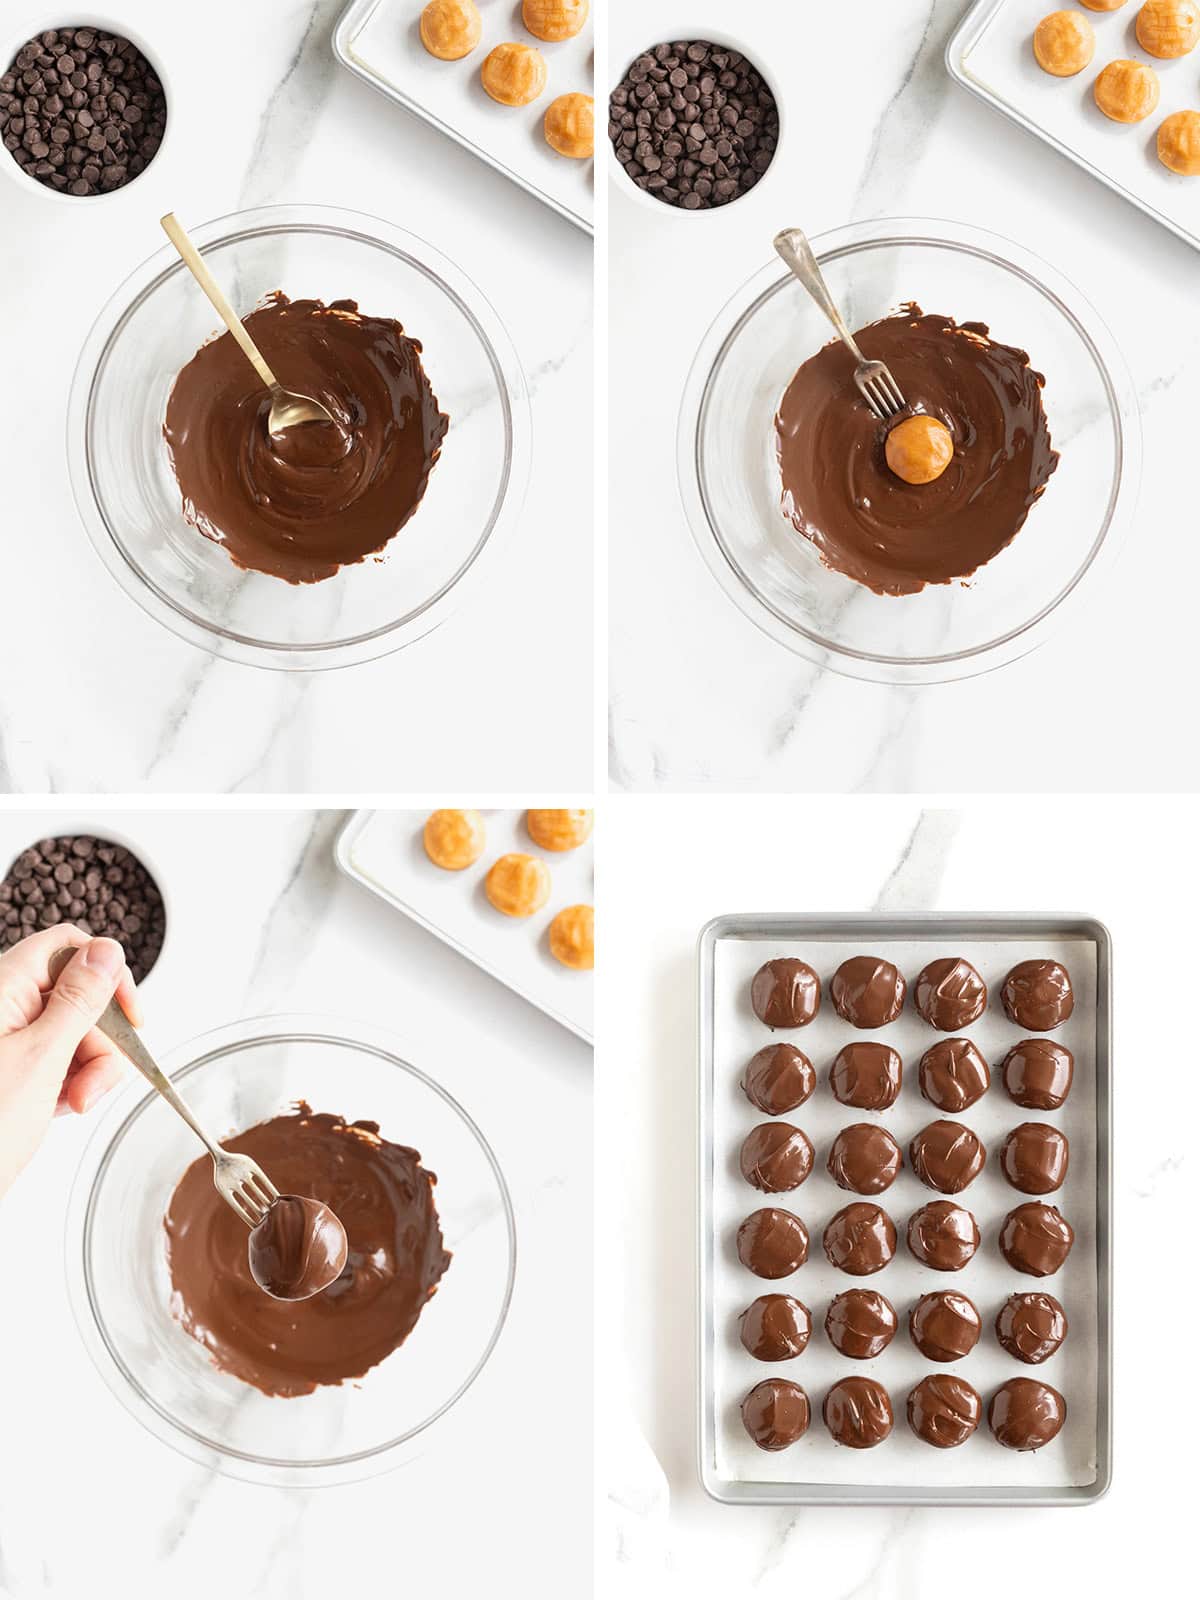
- Let the bites set at room temperature until the chocolate is completely set. Store in an airtight container at room temperature for up to 2 weeks.

Storage
Store in an airtight container at room temperature for up to 2 weeks.
To freeze, flash freeze in a single layer on a parchment lined sheet pan for about 1 hour. Then wrap each one in plastic wrap and place in a freezer safe plastic bag or container in the freezer for up to 3 months. Alternatively, flash freeze in a single layer for 1 hour and then space out in layers with parchment between each layer in a freezer-safe plastic bag or container to freezer for up to 3 months.
To defrost frozen candy bars, keep wrapped and allow to defrost in the refrigerator first and then let come to room temperature before enjoying.

More Homemade Candy Recipes You’ll Love
KitKat Bites: Crisp wafers covered in rich chocolate make these Easy Homemade KitKat Bites as delicious as they are simple to make. Only two ingredients and they taste just like the real thing!
Homemade Take 5 Candy Bars: Make Homemade Take 5 Candy Bars with just 5 of the most amazing ingredients on Earth: dark chocolate, peanut butter, pretzels, caramel and peanuts!
Snickers Bites: These Homemade Snickers Bites satisfy a sweet tooth with a creamy peanut butter nougat, gooey caramel, crunchy peanuts and a rich chocolate coating one bite-sized treat at a time.
If you make these Homemade Twix Bites, be sure to snap a picture and share it with me on Instagram @thebakermama so I can see. If you’re on Facebook, be sure to join my Friends of The BakerMama group to connect and share all the fun and yummy recipes of mine that you make! 😍 I just love seeing how inspired and creative y’all get with the ideas I share. Enjoy!
xoxo,


Homemade Twix Bites
- Prep Time: 10 Minutes
- Freezing Time: 15 Minutes
- Total Time: 25 minutes
- Yield: 24 bites
Description
Vanilla wafer cookies topped with sweet, sticky caramel and a rich chocolate coating make Homemade Twix Bites irresistible!
Ingredients
- 24 caramel squares
- 24 round vanilla wafer cookies
- 2 cups semi-sweet chocolate chips
Instructions
- Preheat the oven to 250°F. Unwrap and place the caramels a few inches apart on a parchment-lined baking sheet. Place the baking sheet on the middle rack of the preheated oven for 5 minutes to soften the caramels. They should not melt. They should just soften so that you can reshape them.
- Meanwhile, arrange the vanilla wafer cookies, bottom sides up, on a small parchment-lined sheet pan that will fit in your freezer.
- Remove the caramels from the oven and while they’re still warm slightly flatten each caramel into a circle shape that will fit the size of the wafer cookies. Place each flattened caramel on top of each cookie on the sheet pan.
- Place the sheet pan of bites in the freezer for 15 minutes to flash freeze them.
- When you’re ready to coat the bites in chocolate, place 1 cup of the chocolate chips in a microwave-safe bowl and microwave in 30 seconds intervals until melted and smooth, stirring between each interval.
- Remove half of the flash frozen bites from the freezer. Using a fork, dip and coat each bite completely in the melted chocolate, letting any excess chocolate drip back into the bowl before transferring the coated bite to a parchment-lined sheet pan.
- Repeat with the remaining 1 cup of chocolate chips and remaining bites that are in the freezer.
- Let the bites set at room temperature until the chocolate is completely set. Store in an airtight container at room temperature for up to 2 weeks.


Would putting these in the fridge instead of the freezer work also, before putting them in the chocolate. I only have a small freezer so don’t have room to put them in there.
Hi Kim! Yes, refrigerating the Twix bites is totally fine if you don’t have freezer space! Just be sure to chill them long enough for the caramel and shortbread to firm up well. They need to be nice and cold so they don’t melt or slide around when you dip them in the warm chocolate. I’d suggest at least 1 hour in the fridge, or until they feel very firm to the touch. Hope this helps and that you enjoy!
Hi, made this recipe today and it was so much harder than I expected.
Couple of questions; how do you keep the caramel from falling off and the chocolate chips seem so thick. Is there anything else I could use? Thanks
Hi Patti! Did you follow the instructions exactly? If so, after you’ve heated the squares of caramel until barely softened, you should be able to flatten them and stick them to the bottoms of the cookies. You then place them in the freezer to flash freeze them which makes them stick together even more. For the chocolate chips, did you microwave them in 30 seconds intervals, stirring between each interval? That is key to making sure the chocolate doesn’t over melt. If you over melted the chocolate, it would become too thick to dip and coat the cookie caramels. I hope this helps and that you’re able to try them again with better success!
If I want to make these in advance, can these stay in the freezer for a couple days before dipping in chocolate?
Hi Liz! Yes, after you flash freeze the caramels on the cookies, cover the sheet pan tightly with plastic wrap and then foil or transfer the cookies to a freezer-safe, sealed container with parchment paper between each layer to store in the freezer for up to 3 months. When you’re ready to coat the caramel topped cookies in chocolate, remove them from the freezer and coat them while they’re still frozen. Let set at room temperature until the caramels are defrosted and the chocolate is set. I hope this helps. Enjoy!
I would love to make your recipes but I can’t print them out. I have tried everything. Any ideas.
Hi, Sharon! I just printed one successfully – let’s see if I can help. After you hit the print button, what happens?
Why do they need to be individually wrapped to freeze?
Hi Helen! That will protect them from sticking together and prevent them from getting freezer burn. Also, it’s a nice way to be able to take a certain number from the freezer instead of having to defrost all of the frozen candies. You can definitely freeze them without individually wrapping them though. I would just recommend making sure they’re far enough apart in the container or baggie and put parchment paper between each layer. I hope this helps. Enjoy!