
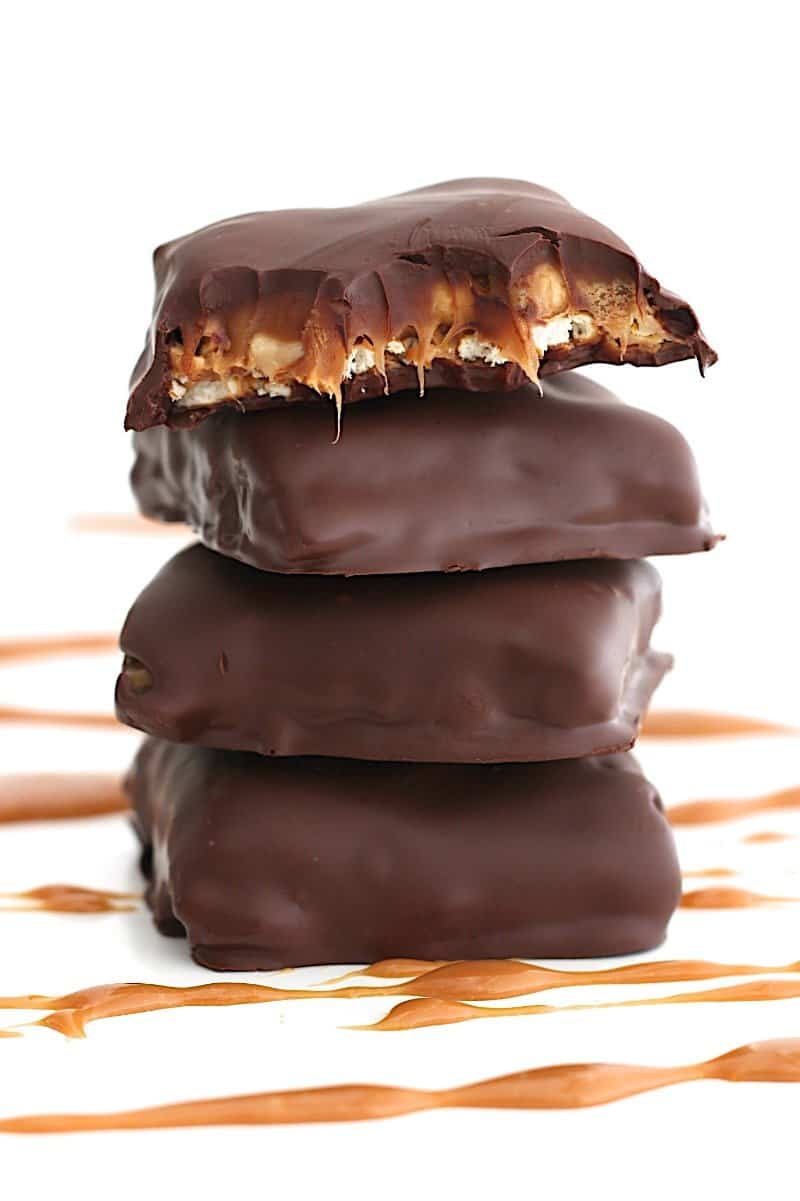
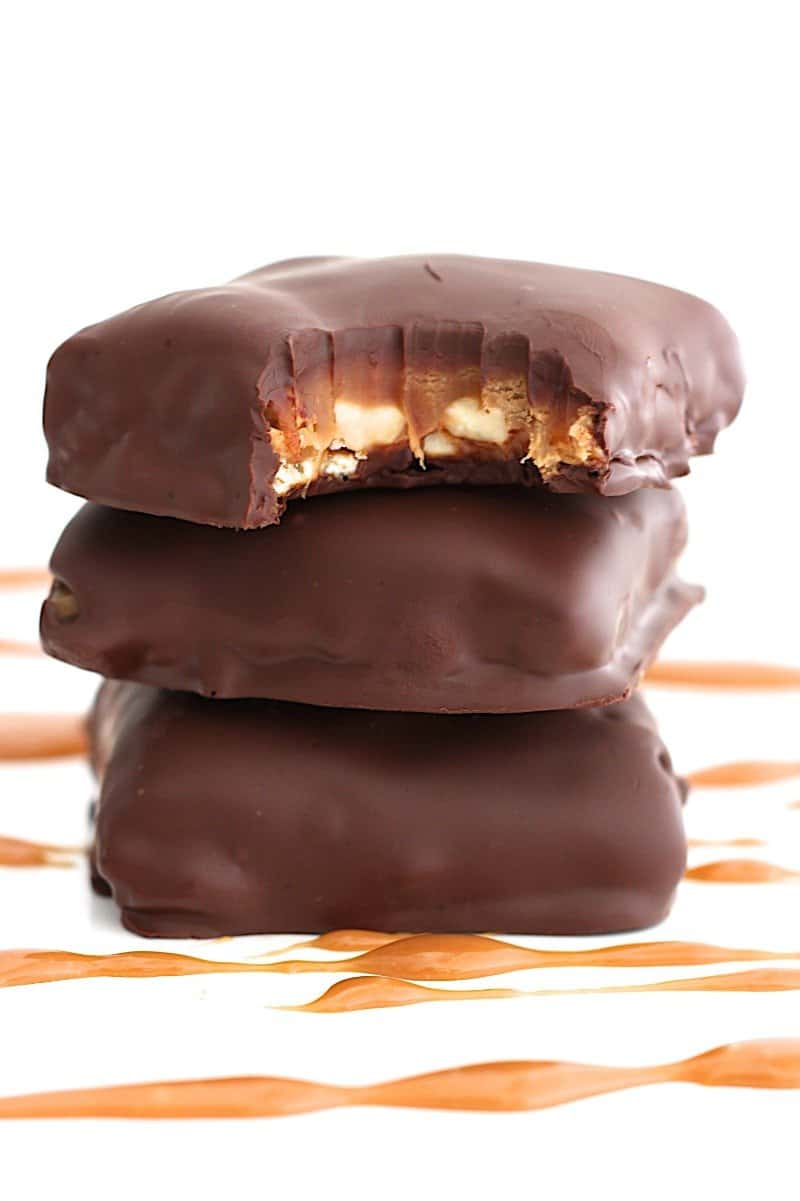
Make Homemade Take 5 Candy Bars with just 5 of the most amazing ingredients on Earth: dark chocolate, peanut butter, pretzels, caramel and peanuts!
Okay, I need to make this post short and sweet so you can make these candy bars ASAP! They’re one of the best things ever created in my kitchen and I want your kitchen to have the same bragging rights!
They’re so easy, but it was a labor of love getting the recipe just right. I was on a mission to make a homemade candy bar similar to Take 5 candy bars, but even better, of course! More pretzel crunch, a thicker layer of peanut butter, extra peanuts, gooier caramel and a richer chocolate.
Watch Me Make Homemade Take 5 Candy Bars
Step into the kitchen with me to make these easy homemade candy bars!
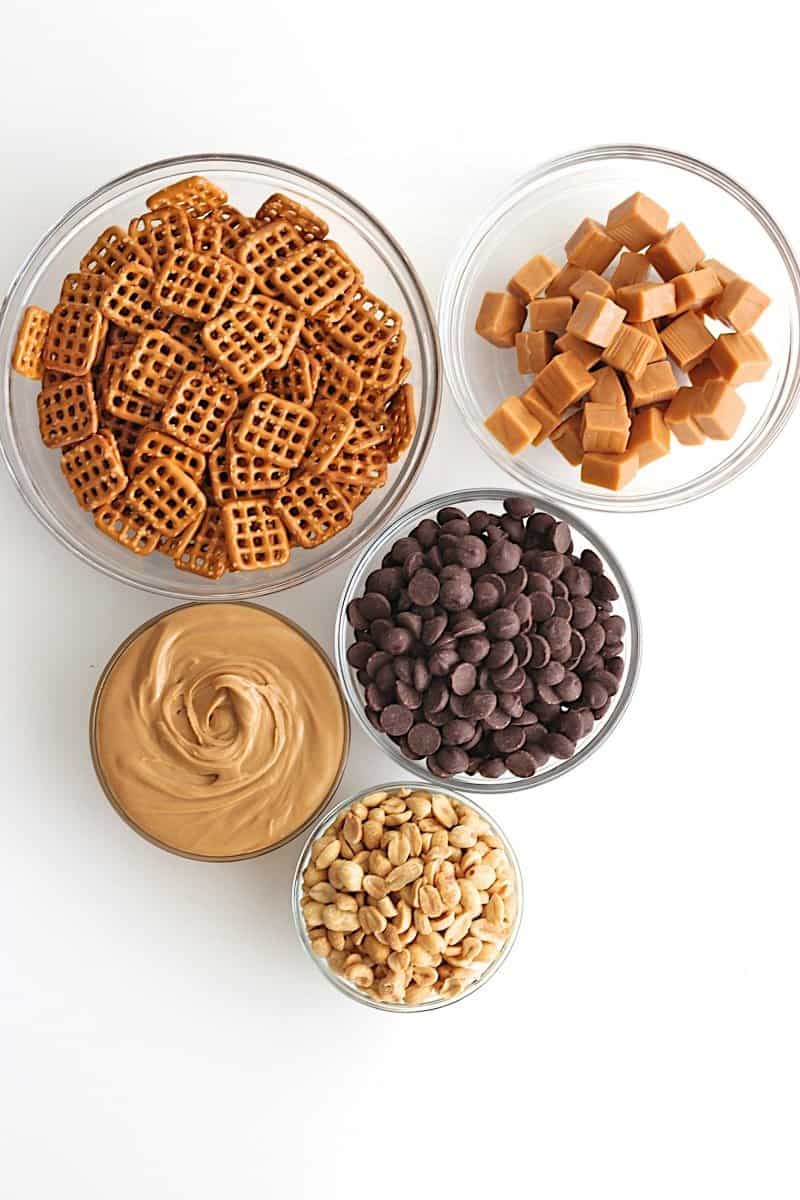
5 Simple Ingredients, One Amazing Candy Bar
I tried them every which way I could until I got them just right. I tried layering the chocolate with the other ingredients in the pan, but definitely felt coating the bars in the chocolate is much better. I tried using caramel sauce, but melted caramel squares gives the bars that perfect gooey caramel layer. I tried crushing the pretzels, but the whole pretzels gives a perfect pretzel crunch in every bite.
It all starts with just 5 simple ingredients that you probably already have on hand…
The sweet and salty combo of these 5 ingredients along with the different textures each one contributes to the layers makes these homemade candy bars one of the greatest things I ever ate! We’re talking salty crunchy pretzels, creamy peanut butter, roasted peanuts, gooey caramel…That’s all coated in rich smooth dark chocolate…
How to Make Homemade Take 5 Candy Bars
- Line a 9×13-inch rimmed baking pan with parchment paper and spray with non-stick cooking spray. Then place the pretzels snuggly in the bottom of the pan.
- Melt the peanut butter in the microwave for 30 seconds until of drizzling consistency. Drizzle peanut butter over pretzels. With a spatula, spread the peanut butter evenly to cover all of the pretzels.
- Sprinkle the peanuts evenly over the peanut butter layer and place the pan in the refrigerator for 30 minutes to set.
- While the peanut butter layer is setting, unwrap the caramels. Place them in a microwave-safe bowl with 1/4 cup water and melt in the microwave for 1 minute. Remove and stir. Place back in the microwave for 30 seconds. Remove and continue to stir until caramel is smooth and of drizzling consistency.
- Drizzle caramel evenly over all of the peanuts. Place pan back in the refrigerator for 1 hour.

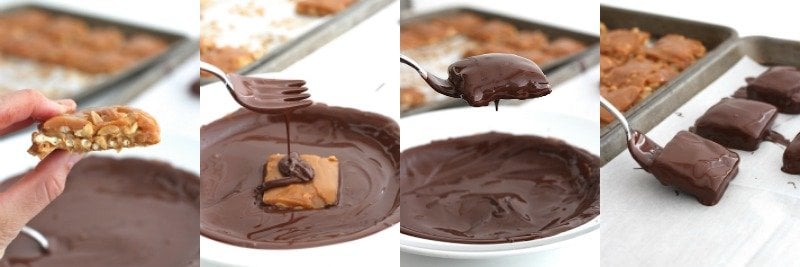
- Remove from the refrigerator and immediately cut into 2×2-inch squares with a sharp knife. Spread squares out on a parchment-lined baking sheet and freeze for 15 minutes.
- Melt the chocolate (1 bag at a time) in a shallow microwave-safe bowl for 1 minute. Remove and stir. Return to microwave for 30 seconds. Remove and continue to stir until all of the chocolate chips are melted.
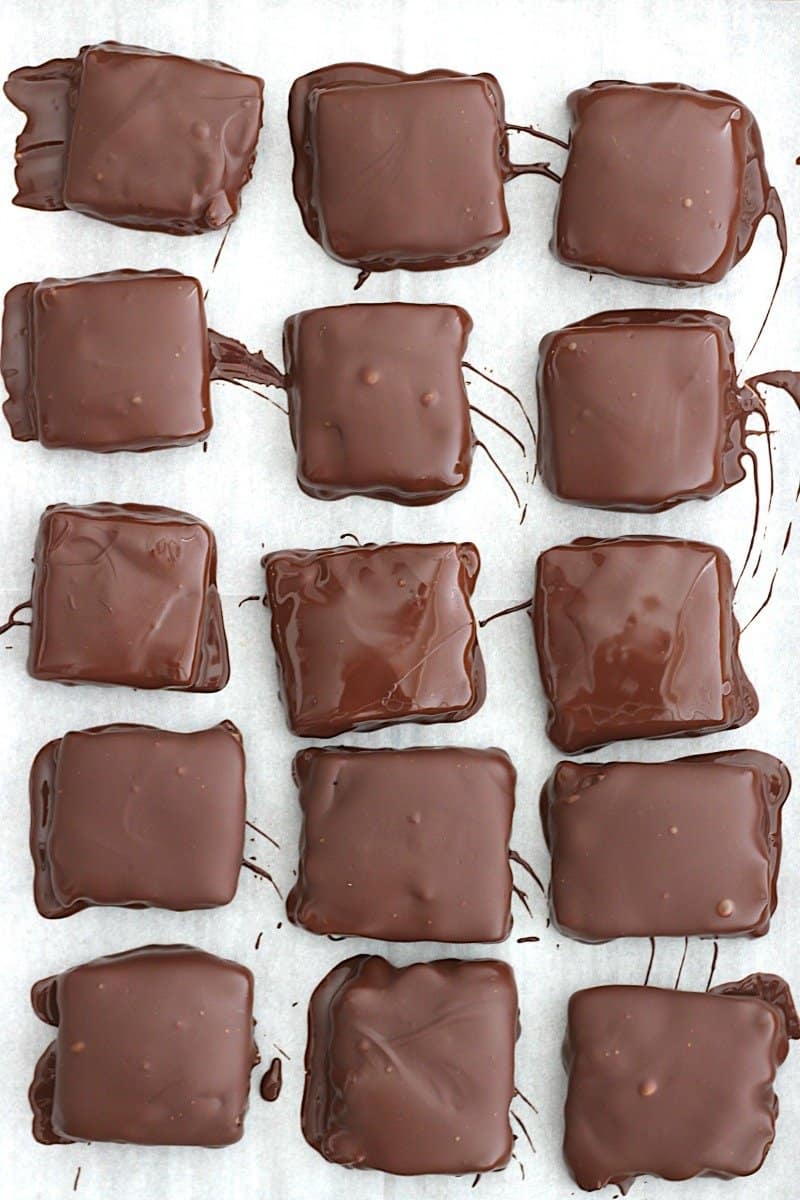
- Line another baking sheet with parchment paper. Remove the candy bars from the freezer. Using a fork, dip the candy bars one at a time into the melted chocolate until each one is completely coated in chocolate. Make sure the pretzel layer remains on bottom. Remove and let excess chocolate drip off of the candy bar and the fork before placing on the parchment-lined baking sheet. Repeat with remaining candy bars and remaining chocolate chips until all candy bars are coated. Place candy bars back in the refrigerator to set for at least 15 minutes before enjoying.
How to Store Homemade Take 5 Candy Bars
If you live in warm temperatures, store candy bars in an airtight container in the refrigerator. Let candy bars set out for about 5 minutes before eating to let the caramel soften a bit. Otherwise, store candy bars in a cool, dry place.
They’re off the charts when it comes to how delicious they are! The rave reviews from family and friends who have been my taste testers throughout this process had this to say about the finished product:
- speechless.
- gimme more!
- wow!!
- did you really make these?!
- you should sell these!
- these are unreal!!
- mmmmm…
I can’t wait for you to make and experience them too! If you make these Homemade Take 5 Candy Bars, be sure to snap a picture and share it with me or tag me on Instagram @thebakermama so I can see.😍 I love seeing how inspired and creative y’all get with the recipes I share. Enjoy!
xoxo,

Homemade Take 5 Candy Bars
- Prep Time: 2 hours 15 mins
- Total Time: 2 hours 15 mins
- Yield: 24 bars
- Category: Dessert
Description
Make Homemade Take 5 Candy Bars with just 5 of the most amazing ingredients on Earth: dark chocolate, peanut butter, pretzels, caramel and peanuts!
Ingredients
- 70 snaps pretzels
- 1–1/2 cups creamy peanut butter
- 2 cups dry roasted lightly salted peanuts
- 2 (11 ounce) bags caramel squares
- 2 (10 ounce) bags dark chocolate chips (I use Ghirardelli 60% bittersweet chips)
Instructions
- Line a 9×13-inch rimmed baking pan with parchment paper and spray with non-stick cooking spray.
- Place the pretzels snuggly in the bottom of the pan.
- Melt the peanut butter in the microwave for 30 seconds until of drizzling consistency. Drizzle peanut butter over pretzels. With a spatula, spread the peanut butter evenly to cover all of the pretzels.
- Sprinkle the peanuts evenly over the peanut butter layer and place the pan in the refrigerator for 30 minutes to set.
- While the peanut butter layer is setting, unwrap the caramels. Place them in a microwave-safe bowl with 1/4 cup water and melt in the microwave for 1 minute. Remove and stir. Place back in the microwave for 30 seconds. Remove and continue to stir until caramel is smooth and of drizzling consistency.
- Drizzle caramel evenly over all of the peanuts. Place pan back in the refrigerator for 1 hour.
- Remove from the refrigerator and immediately cut into 2×2-inch squares with a sharp knife. Spread squares out on a parchment-lined baking sheet and freeze for 15 minutes.
- Melt the chocolate (1 bag at a time) in a shallow microwave-safe bowl for 1 minute. Remove and stir. Return to microwave for 30 seconds. Remove and continue to stir until all of the chocolate chips are melted.
- Line another baking sheet with parchment paper. Remove the candy bars from the freezer. Using a fork, dip the candy bars one at a time into the melted chocolate until each one is completely coated in chocolate. Make sure the pretzel layer remains on bottom. Remove and let excess chocolate drip off of the candy bar and the fork before placing on the parchment-lined baking sheet. Repeat with remaining candy bars and remaining chocolate chips until all candy bars are coated. Place candy bars back in the refrigerator to set for at least 15 minutes before enjoying.
Notes
If you live in warm temperatures, store candy bars in an airtight container in the refrigerator. Let candy bars set out for about 5 minutes before eating to let the caramel soften a bit. Otherwise, store candy bars in a cool, dry place.

I hate dipping chocolate but I’m at the freezer stage right now. Sampled one with just caramel, pretzels, pb and cashews (cause that’s what I had) and I’m over the moon with these 4/5 flavors. I’ll get to the dipping part soon but I’m hooked already! Thanks for posting this recipe! I’m going to use Nestlé’s semi sweet chocolate chips because that’s what I have and am really looking forward to them!
Hi, Cat! I’m so happy you tried them! Even if they never get dipped in chocolate, they’re really yummy as is. Thank you for sharing!
The mess the peanut butter made was ridiculous. I used Jim. It stuck to the parchment paper even though it was sprayed with Crisco non stick spray. Even when I froze the squares, the peanut butter never got fully hard. I have researched other similar recipes and you need to change your recipe to follow their lead. Add butter and or powdered sugar to make the peanut butter layer less soft and greasy. I am enraged that I spent all the money on these ingredients to have a disaster on my hands. When I dipped the frozen squares in chocolate, the soft, “frozen” peanut butter melted into the chocolate. There is no way this did not happen to you. Be more responsible when posting recipes! PS The real Take 5 candy bars use milk chocolate, not dark chocolate.
Hi, Jennifer! Thank you for sharing your opinion. I’ve never had any problem making them this way, so that’s what I’ll stick with!
I’m wondering how I could incorporate marshmallows in this recipe.
Hi Debbie! You could just sprinkle them in when you sprinkle on the nuts. Great idea! Enjoy!
I can’t wait to try these as Take 5s are my favorite but are to find in my area! I appreciate no added sugar to the peanut butter that I’ve seen in other recipes. I also love the idea of dark chocolate, since I prefer that over milk chocolate and will also help make sure they aren’t too sweet
I gave these a try and the taste is delicious, but the carmel is far too watery when you add 1/4 cup of water. It never fully hardened even in the freezer. After about 1 minute at room temperature the carmel was oozing all over the place which made it almost impossible to dip in chocolate. The carmel even runs in the freezer.
Oh goodness, Katie! That certainly shouldn’t be the case. I’m trying to think what might have gone wrong as I make these all the time and that has never happened. Did you use caramel squares? Did you use a liquid measurer for the water? You should be able to easily drizzle it, but once it’s set, it should remain chewy.
I made these using almond bark instead of chocolate chips and they came out great! How do you think they would come out if I just melted the caramel and peanut butter together to save a step? Maybe even mix the peanuts in? Just curious and trying to be a little lazy, but I was scared to try it the first time. I made a double batch and took them to work and they are crazy about them!
Hi Jan! That’s so great to hear. Yes, I think you could definitely try melting the caramel, peanut butter and peanuts together if you’re okay with them not being in layers. No doubt they would still taste great! Enjoy!
Can I substitute heavy cream or condensed milk to the caramel’s instead of water to soften the caramel’s
Hi Ernst! Yes, but I don’t think I would recommend using 1/4 cup as I usually just use a few tablespoons of heavy cream or condensed milk when I use it to melt caramels. Water works great though. Enjoy!
Can these be made with a layer of chocolate on the bottom? I’m thinking that would be easier than dipping.
Hi Mar! Absolutely. I’ve seen a few people make them with a layer of chocolate on bottom and then a layer on top instead of dipping them. The bars just won’t be completely coated in the chocolate. Or you could layer chocolate on bottom and then cut them as instructed and lay them on a rack with a pan underneath before pouring the chocolate over each one so that the chocolate flows down and around each bar and coats it. Hope this helps. Enjoy!
I looked up the take 5 candy bar and it is made with milk chocolate. So I will be using milk chocolate
Instead of dark chocolate.
Sounds great, Heather! Enjoy! 🙂