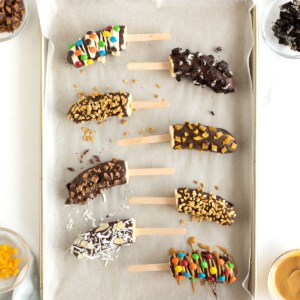
Chocolate Covered Frozen Banana Pops are a super fun and customizable sweet treat! They make for such a great healthy snack or kid-friendly addition to any celebration!

Make Your Own Banana Pop!
Just in time for summer, the classic, beloved combo of bananas and chocolate gets a popsicle makeover with these adorable chocolate covered frozen banana pops. The whole crew can get involved in decorating their own banana and choosing all their favorite add-ons – the possibilities are truly endless!
These pops are naturally sweet from the bananas, and the chocolate makes them taste just indulgent enough to be a satisfying treat. After a little time in the freezer, the bananas get cold, creamy, and irresistible!

The Perfect Amount of Chocolate
The addition of a little oil to the chocolate helps it drizzle more easily after melting, so you get a very even coating of chocolate around the bananas. This way, there’s the perfect amount of delicious chocolate in every bite!

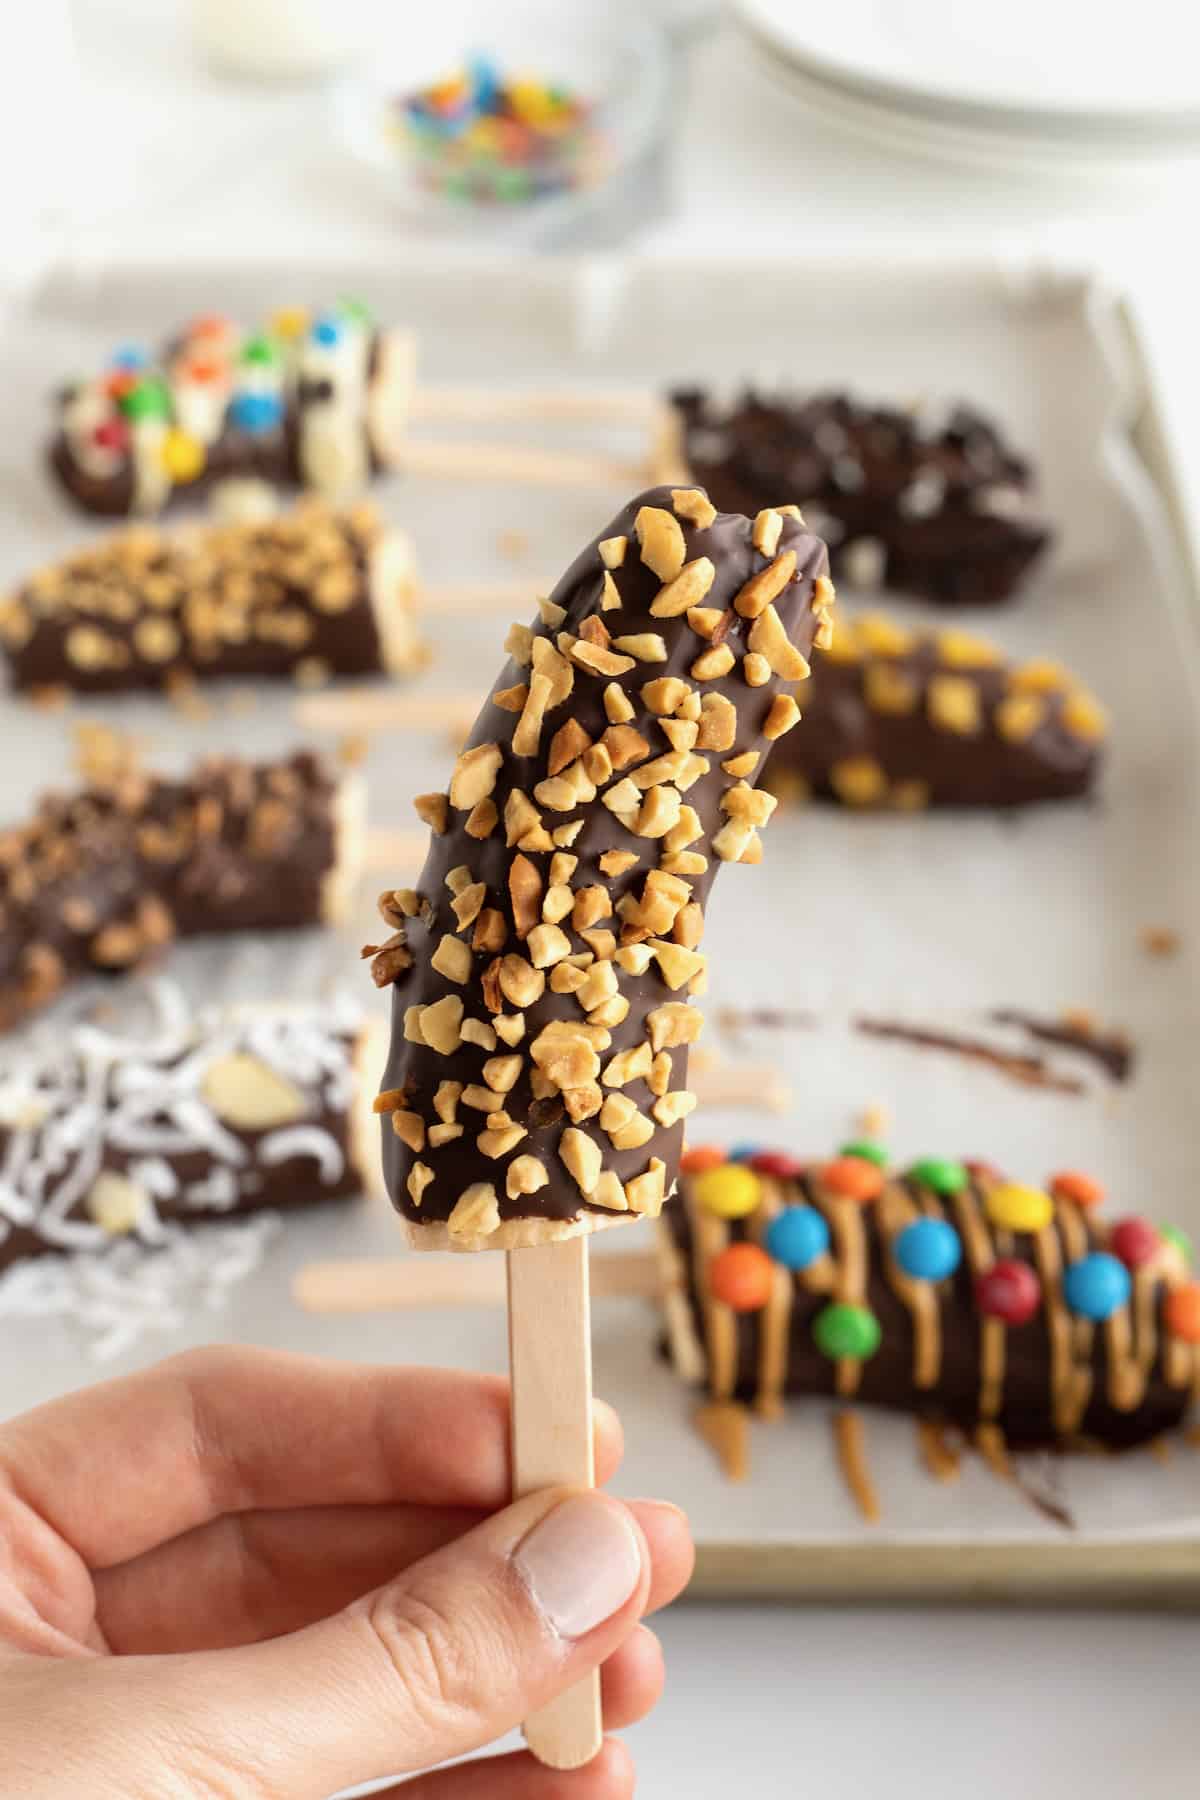
These frozen bananas are amazing with just the smooth coating of chocolate, but sprinkling and drizzling them with yummy toppings makes them all the more fun and yum. Some of our favorite combos include
- Shredded coconut and almonds
- Crushed oreos and white chocolate
- Peanut butter and mini M&M candies
- Crushed pistachios and dried cranberries
- Heath bar crumbles and chopped pecans

Easy to Make, Easy to Store
The best part is that they are quick and easy to make and, once they’re done, they keep in the freezer just like regular ice cream pops. Although, they certainly don’t keep for very long around here, because we just can’t get enough of their creamy, dreamy deliciousness.
Here’s to a great summer filled with lots of fun memories and sweet treats!

What Do I Need to Make Chocolate Covered Frozen Banana Pops?
- Bananas
- Chocolate chips (about 2 cups)
- Cooking oil (melted coconut oil, canola oil or vegetable oil)
- Popsicle sticks or skewers
- White chocolate or colorful candy melts, melted
- Peanut butter or almond butter, melted
- Shredded coconut
- Granola
- Mini M&M’s
- Heath bar crumbles
- Sliced almond
- Crushed peanuts
- Crushed oreo cookies
- Small dried fruits or crushed freeze-dried fruits
- Baking sheet
- Parchment paper

How to Make Chocolate Covered Frozen Banana Pops
- Prepare the bananas by peeling them and cutting each in half. Stick a skewer or popsicle stick into the cut end of the banana. Press it in far enough so that the banana is stable, but that there is enough sticking out so that you can hold it.
- In a microwave-safe bowl, combine the chocolate chips and oil. Give it a quick stir so that all of the chocolate is coated in the oil.
- Microwave the chocolate and oil in 20 to 30 second intervals, stirring after each. Repeat until the mixture is smooth and completely melted. Watch carefully to make sure that the chocolate in the bottom of the bowl doesn’t burn.
- Line a baking tray with parchment paper and set it next to the bananas and melted chocolate. Set out any toppings you want to sprinkle or drizzle onto the bananas once they’re covered in the chocolate.
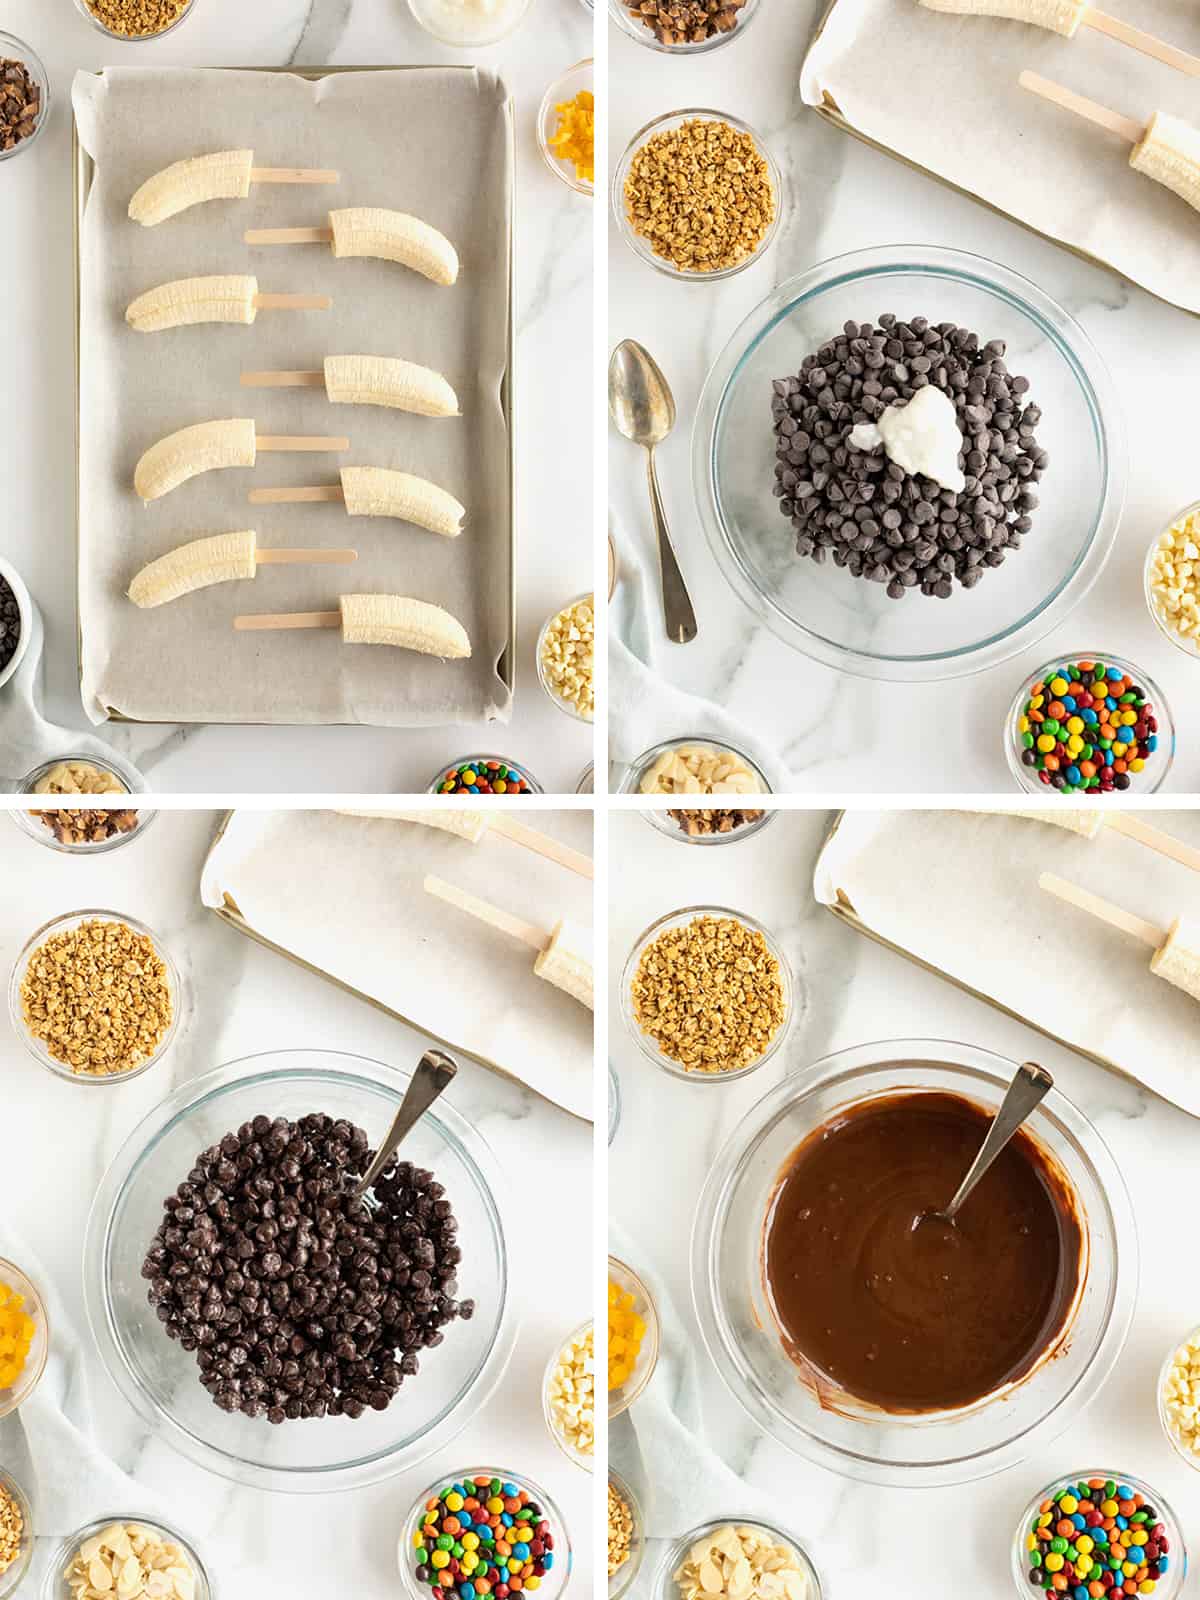
- Dip the bananas in the melted chocolate mixture. You can use a spoon to spoon more melted chocolate around the banana and get a more even coating or just dunk the banana in a bowl.

- Wait for the excess chocolate to drip off before lying flat on the parchment-lined sheet.
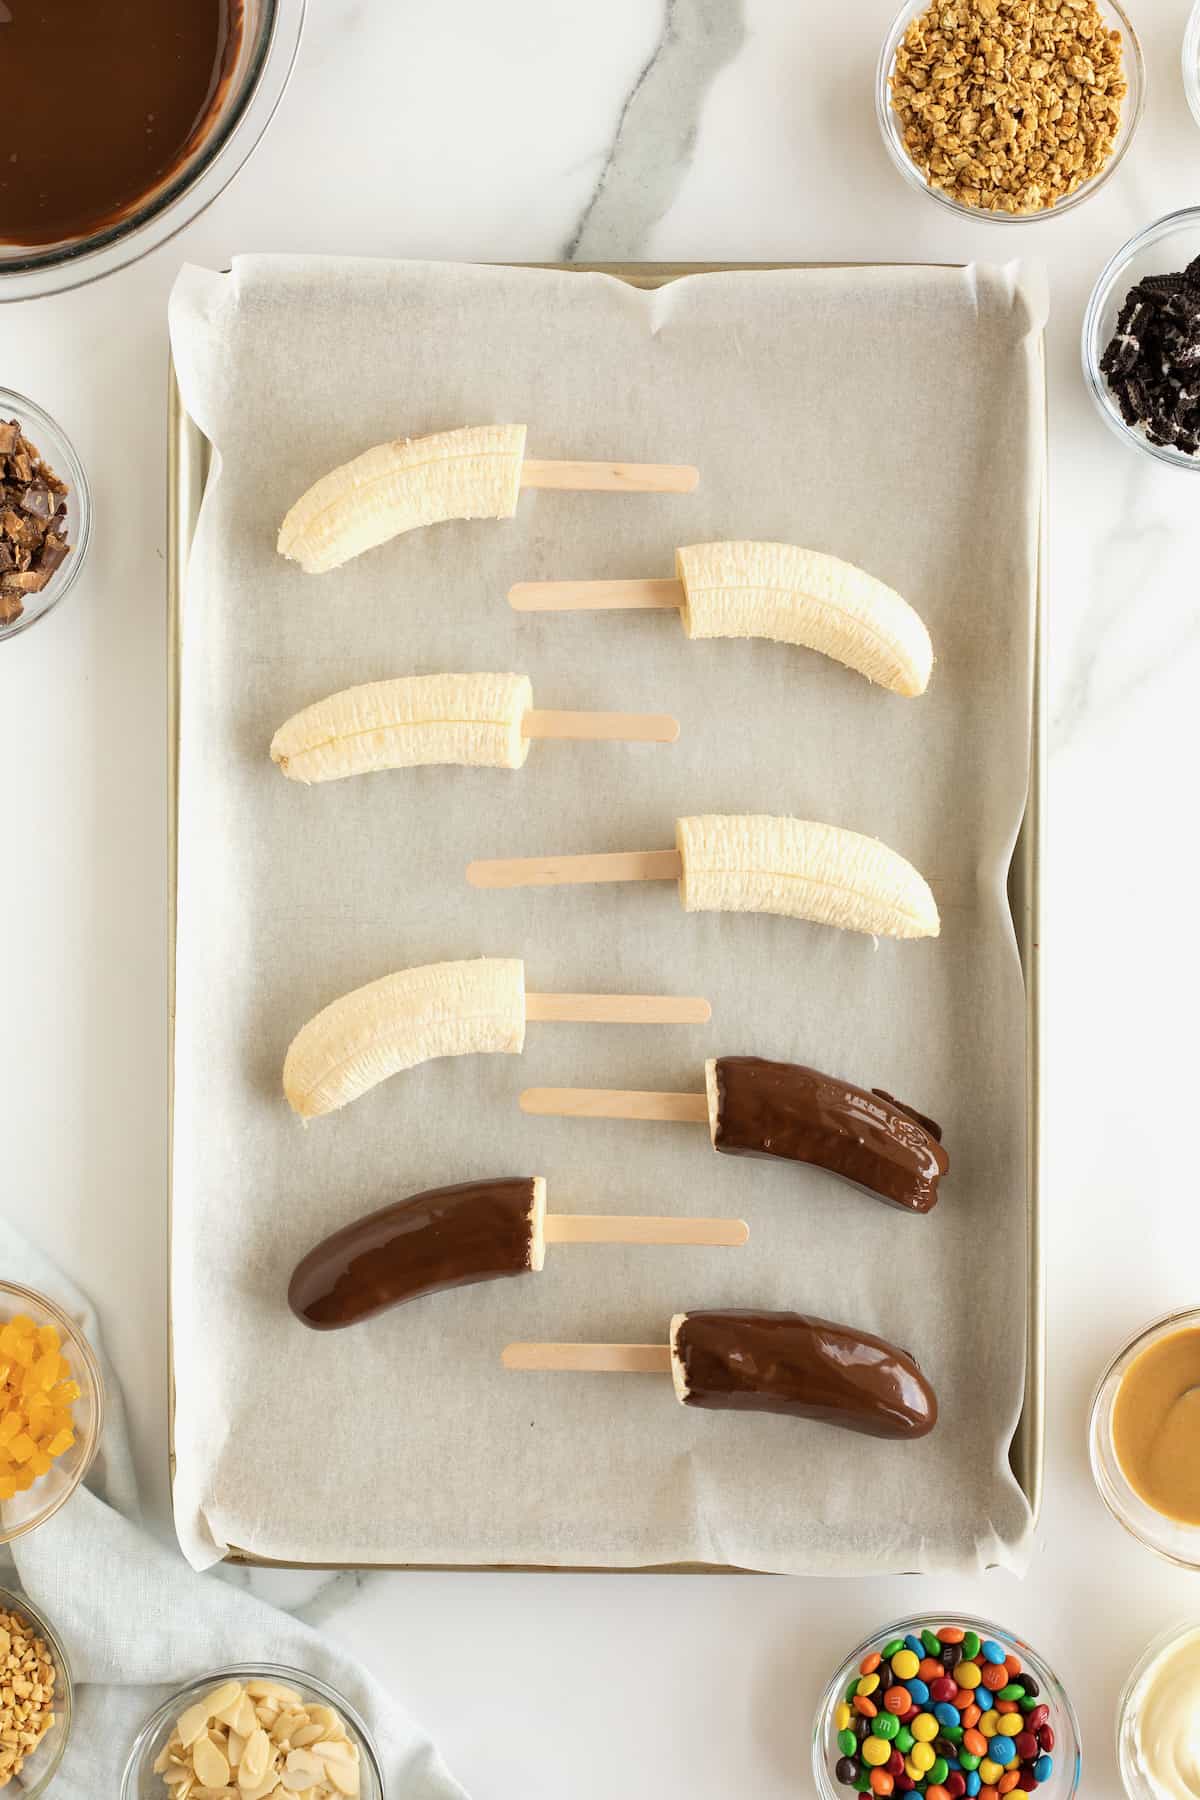
- Sprinkle any toppings over the top of the bananas now, while the chocolate is still liquid.*
- Put the tray of bananas in the freezer for 10 minutes for the chocolate to harden.
Note: If you plan on drizzling any peanut butter or more melted chocolate over the already coated bananas, you’ll want to do this after the initial layer of chocolate has hardened in the freezer for 10 minutes.

How to Store Chocolate Covered Frozen Banana Pops
Store the frozen banana pops in an airtight container in the freezer for up to a week.
If you make these Chocolate Covered Frozen Banana Pops, be sure to snap a picture and tag me on Instagram @thebakermama so I can see! 😍 I just love seeing how inspired and creative y’all get with the ideas I share. Enjoy!
xoxo,

Chocolate Covered Frozen Banana Pops
- Prep Time: 15 mins
- Total Time: 15 mins
- Yield: 8
- Category: Dessert
Description
Chocolate covered frozen banana pops are super fun and customizable – the perfect sweet treat to beat the summer heat! They make for such a great healthy snack or kid-friendly addition to any celebration!
Ingredients
- 4 bananas
- 12 ounces chocolate chips (about 2 cups)
- 3 tablespoons oil (melted coconut oil, canola oil or vegetable oil)
- 8 popsicle sticks or skewers
Topping Options:
- White chocolate or colorful candy melts, melted
- Peanut butter or almond butter, melted
- Shredded coconut
- Granola
- Mini M&M’s
- Heath bar crumbles
- Sliced almond
- Crushed peanuts
- Crushed oreo cookies
- Small dried fruits or crushed freeze-dried fruits
Instructions
- Prepare the bananas by peeling them and cutting each in half. Stick a skewer or popsicle stick into the cut end of the banana. Press it in far enough so that the banana is stable, but that there is enough sticking out so that you can hold it.
- In a microwave-safe bowl, combine the chocolate chips and oil. Give it a quick stir so that all of the chocolate is coated in the oil.
- Microwave the chocolate and oil in 20 to 30 second intervals, stirring after each. Repeat until the mixture is smooth and completely melted. Watch carefully to make sure that the chocolate in the bottom of the bowl doesn’t burn.
- Line a baking tray with parchment paper and set it next to the bananas and melted chocolate. Set out any toppings you want to sprinkle or drizzle onto the bananas once they’re covered in the chocolate.
- Dip the bananas in the melted chocolate mixture. You can use a spoon to spoon more melted chocolate around the banana and get a more even coating or just dunk the banana in a bowl. Wait for the excess chocolate to drip off before lying flat on the parchment-lined sheet.
- Sprinkle any toppings over the top of the bananas now, while the chocolate is still liquid.*
- Put the tray of bananas in the freezer for 10 minutes for the chocolate to harden.
- Store the bananas in an airtight container in the freezer for up to a week.
Notes
*If you plan on drizzling any peanut butter or more melted chocolate over the already coated bananas, you’ll want to do this after the initial layer of chocolate has hardened in the freezer for 10 minutes.


Great
Thanks, Ed! Glad you enjoyed.
Made these for dessert tonight…omg…they were amazing!!
I can’t wait to catch up with all your ‘Recipe’!!