Cinnamon Roll Lasagna is a fun and delicious twist to everyone’s favorite breakfast indulgence!
Layers and Layers of Goodness
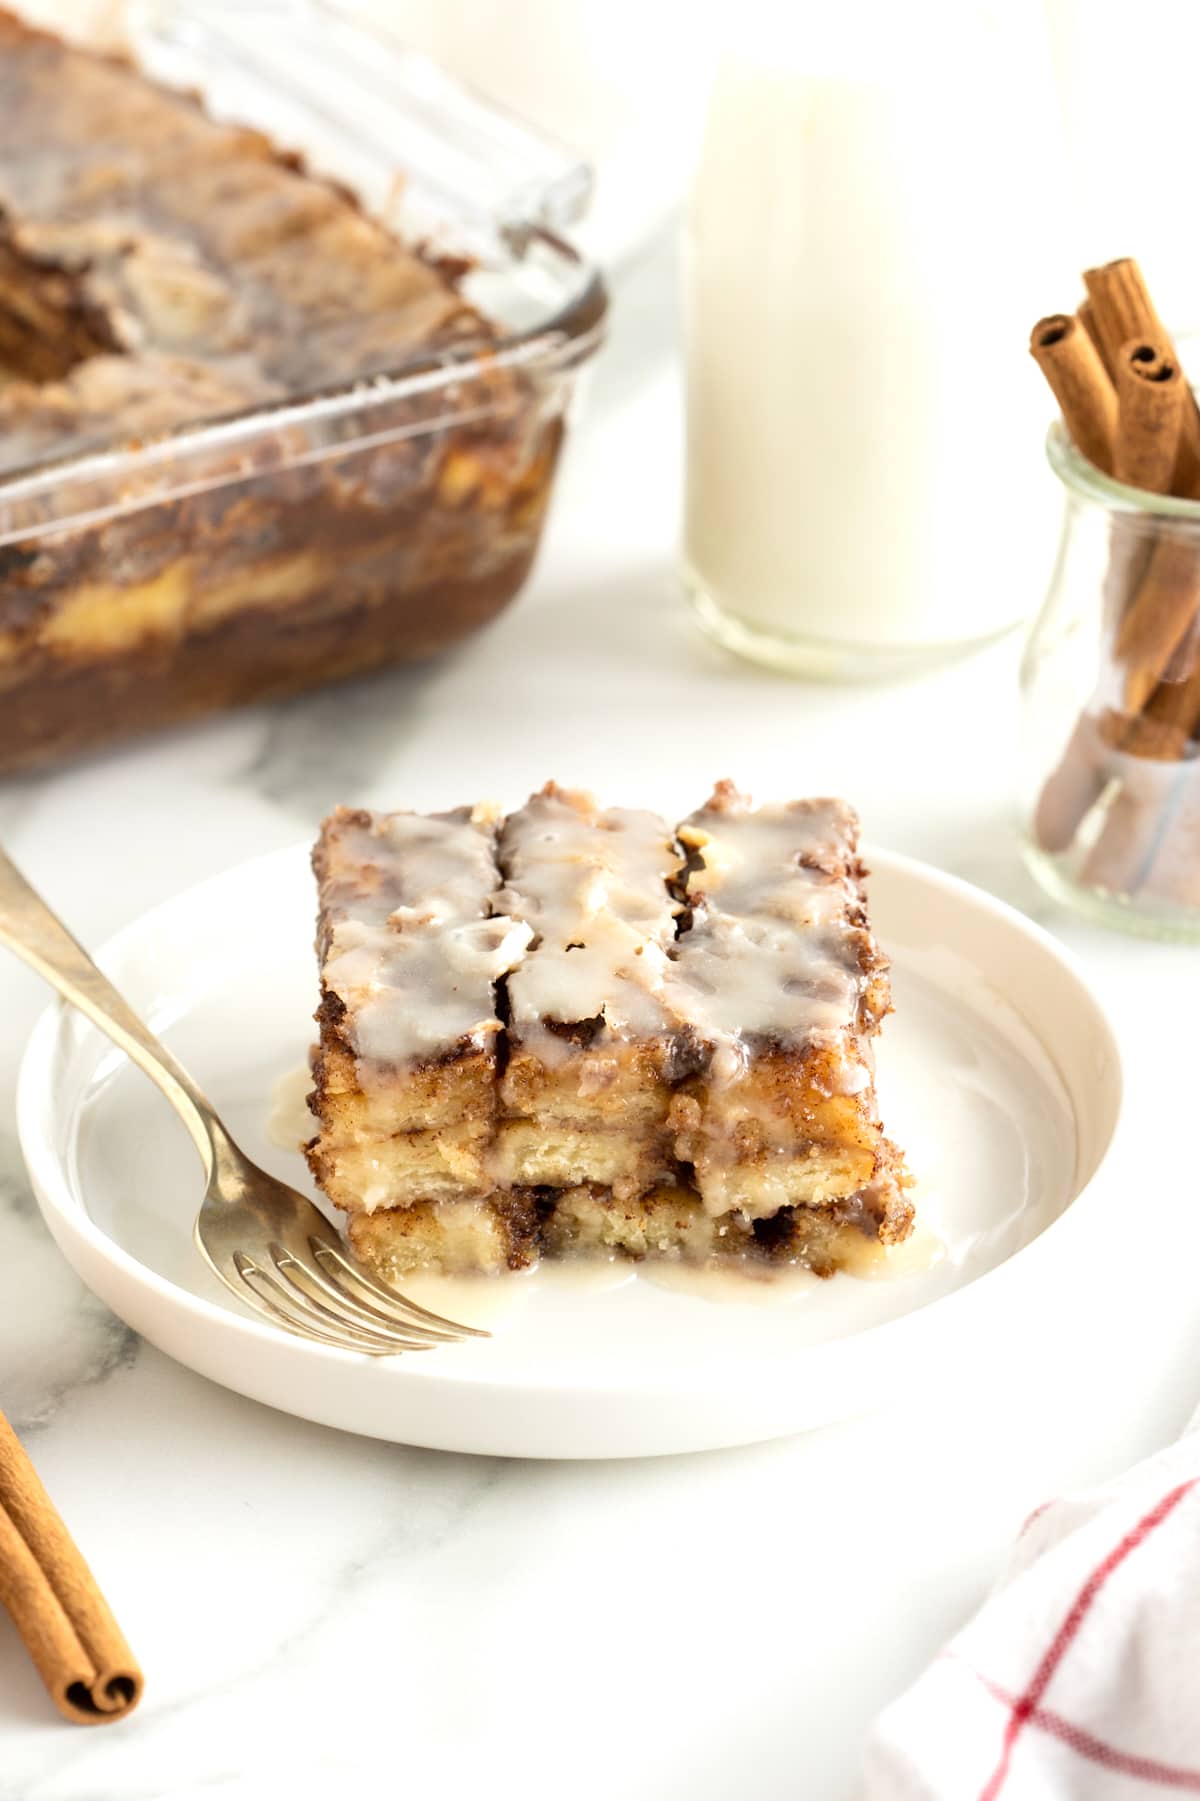
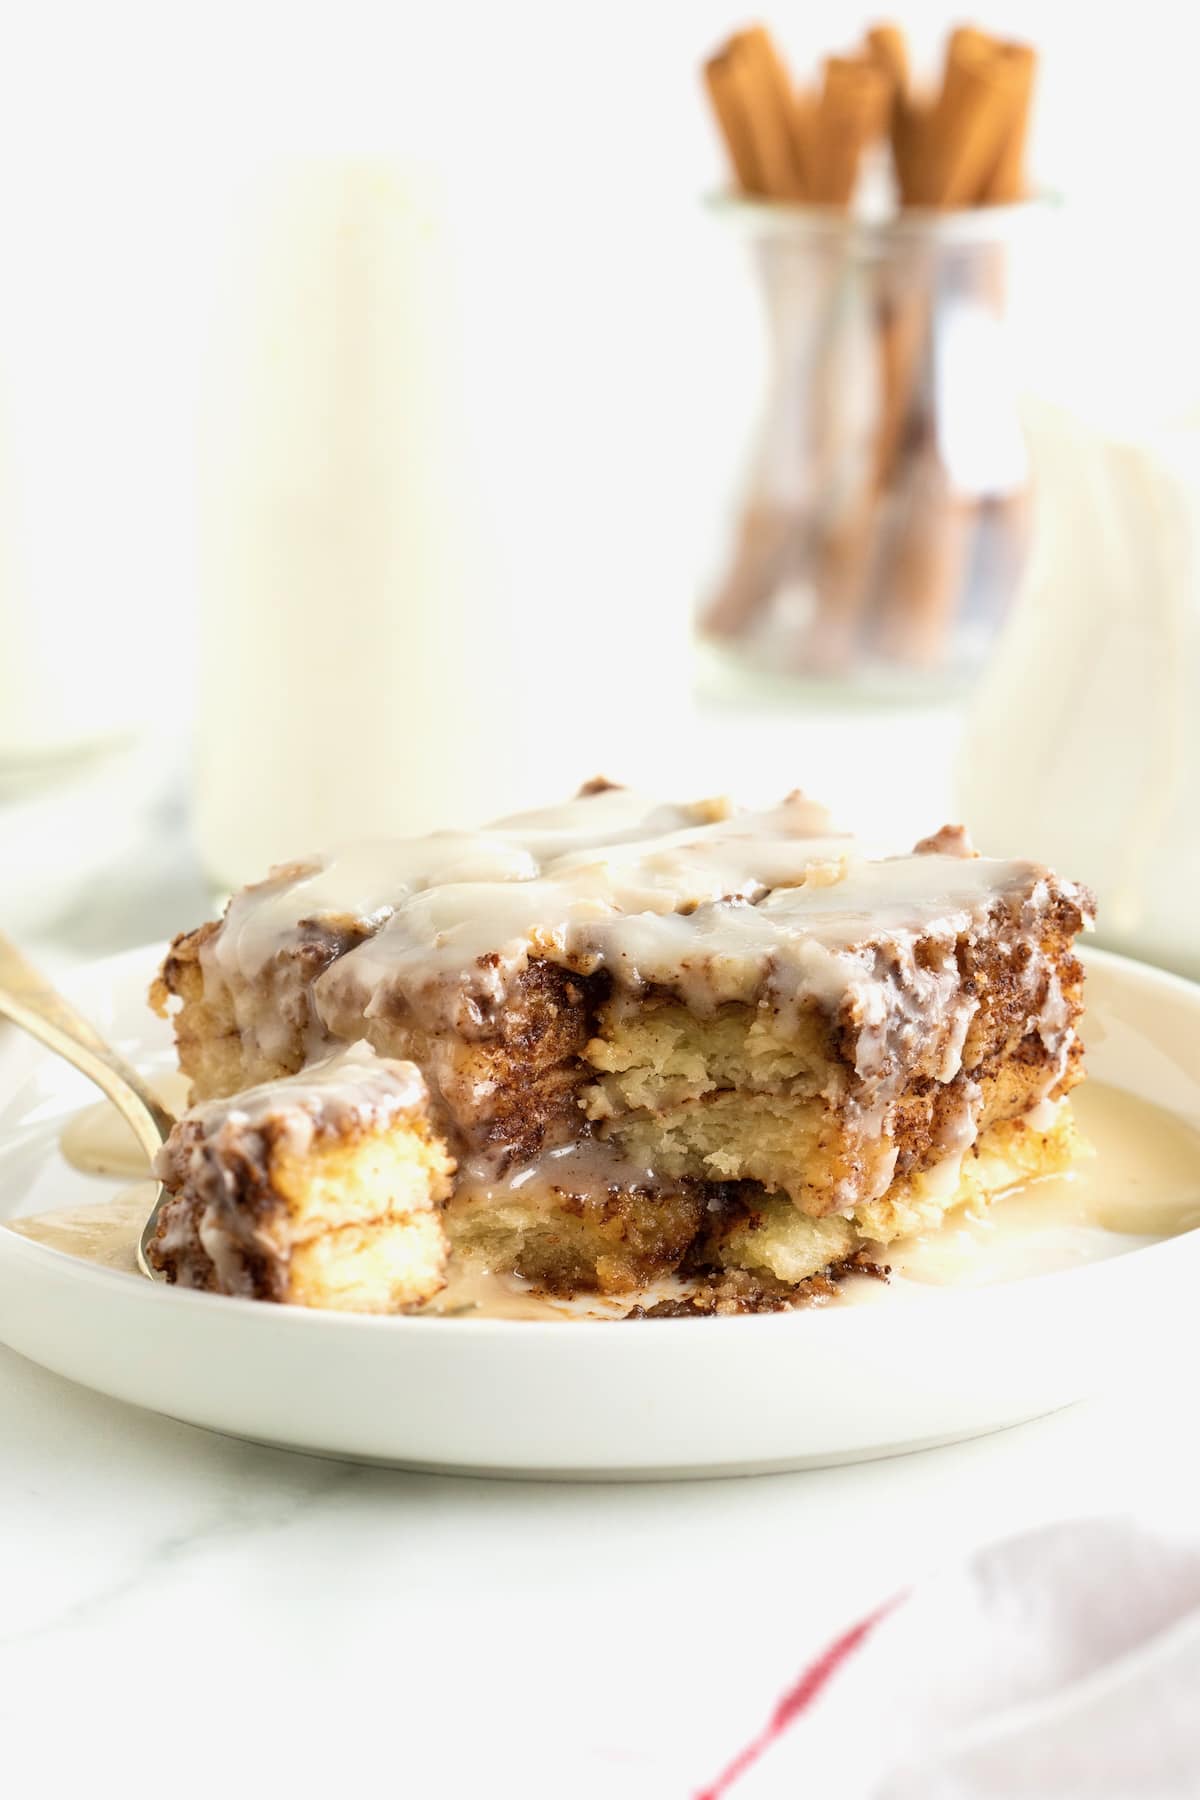
Cinnamon Roll Lasagna is quite possibly the greatest greatness to ever come out of my oven! It’s cinnamon rolls that are layered like a lasagna and every single bite tastes like the doughy middle that everyone loves! Enough said, right?!
So Decadent and Delicious!
This decadent dish actually happened on a whim one morning when I was planning to make mini cinnamon rolls, but they kept unrolling so I just layered them in a baking dish and breakfast brilliance was born!
We were amazed by how great it turned out and I was so relieved because I had volunteered to bring cinnamon rolls to breakfast with the parents that morning at Baker’s school. Needless to say, this dish disappeared within minutes and I can’t even tell you how many people have asked for the recipe since!
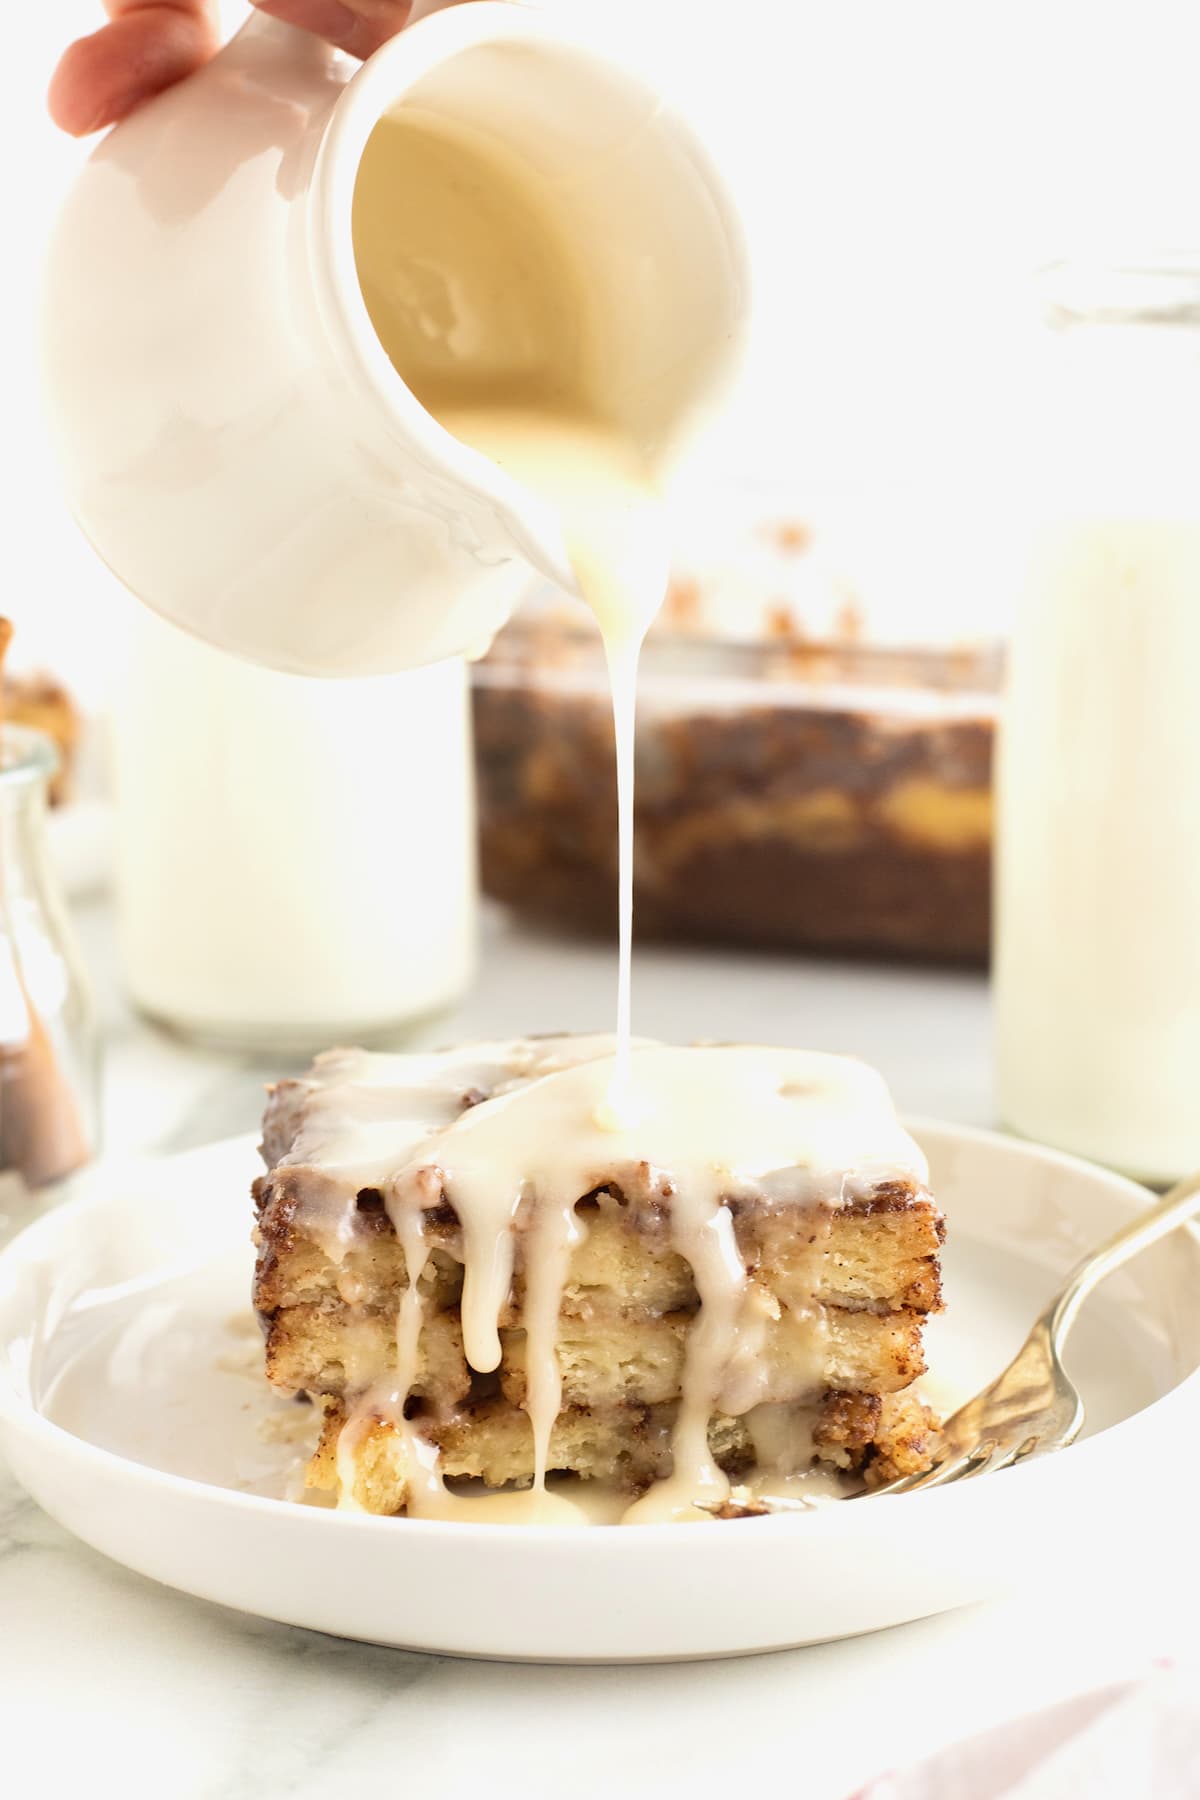
Layer after layer of soft dough, butter, cinnamon sugar and a sweet vanilla glaze. A simple breakfast treat that will blow your loved ones away! Let me show you how simple it is to make this delicious breakfast treat! No rising required…just layer and bake! Seriously, the best! I don’t know if I’ll ever make regular cinnamon rolls again!
What Do I Need to Make Cinnamon Roll Lasagna?
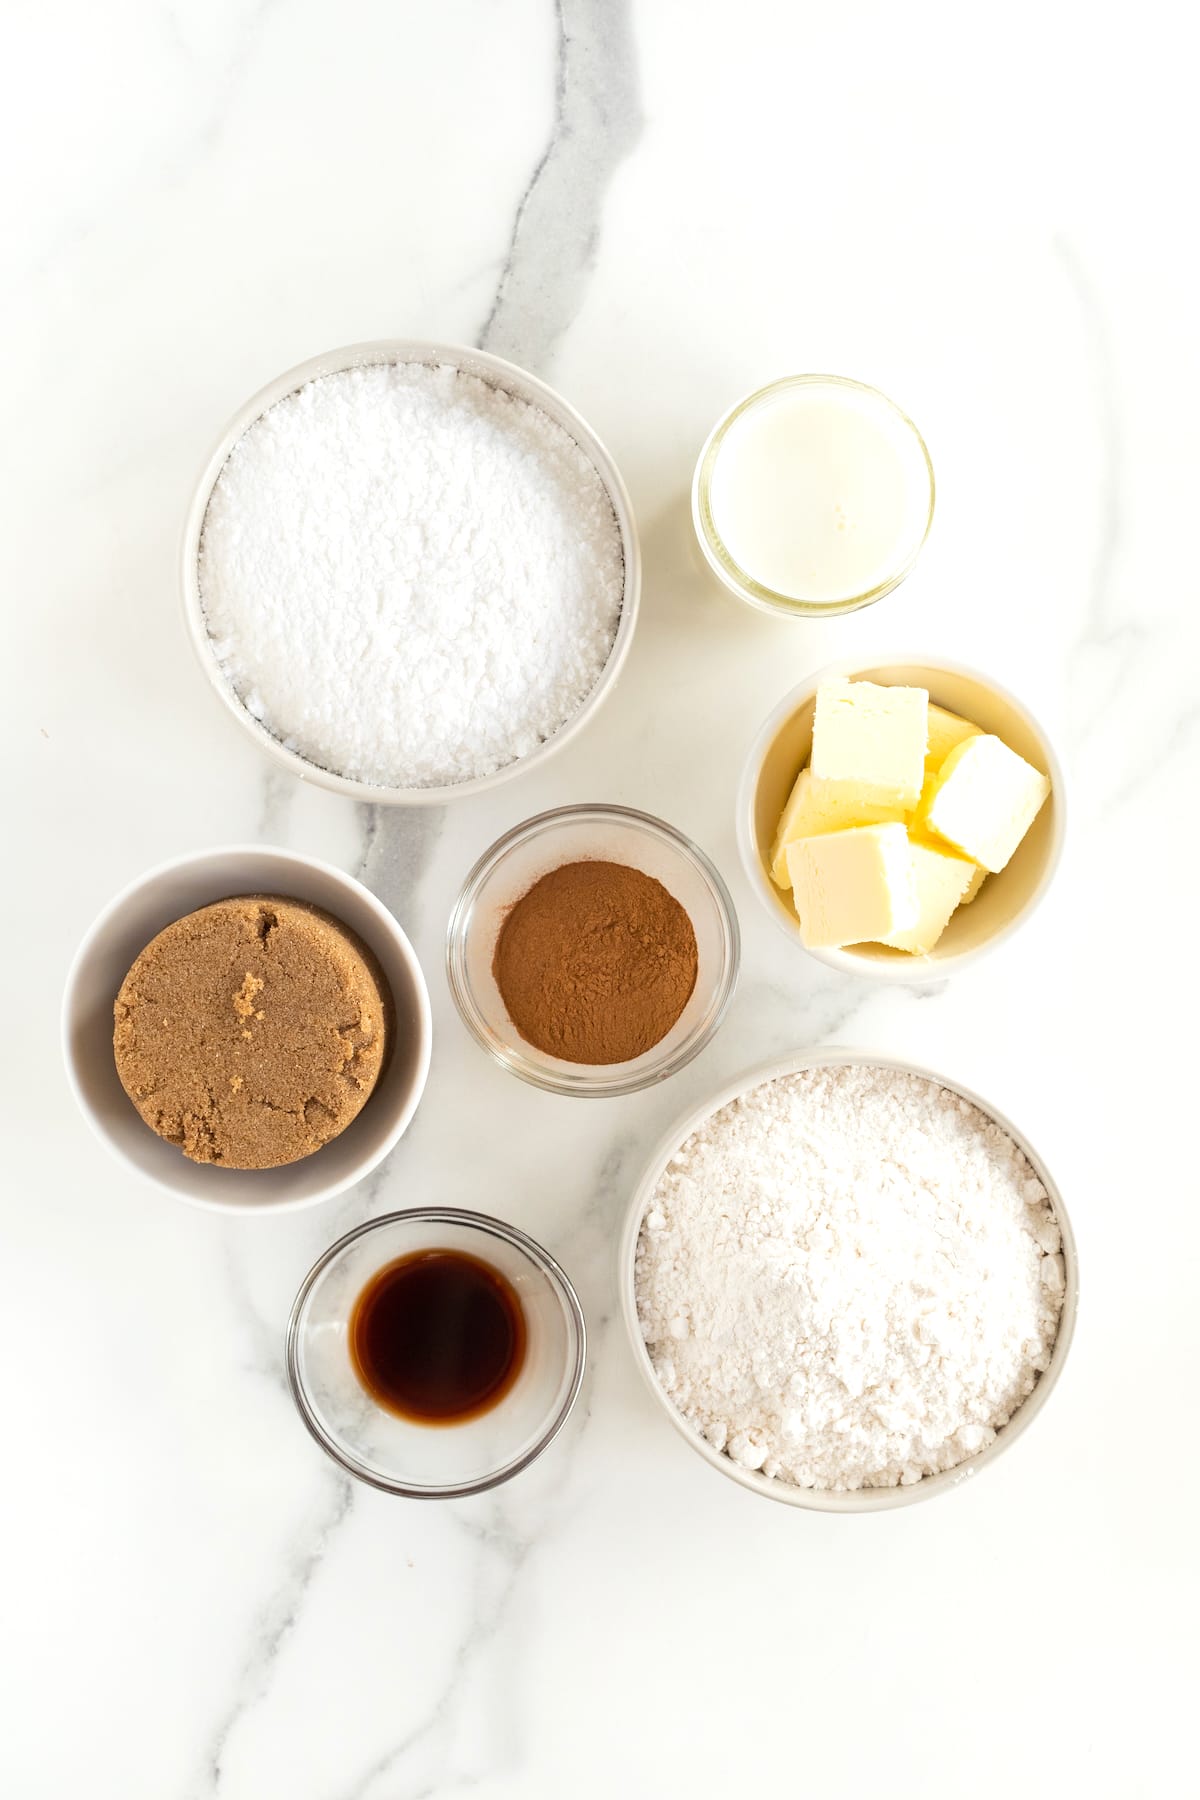
- Self-rising flour
- Unsalted butter
- Buttermilk
- Dark brown sugar
- Cinnamon
- Powdered sugar
- Vanilla extract
- 8 inch square baking dish
How to Make Cinnamon Roll Lasagna
- Preheat oven to 375°F. Butter an 8-inch square baking dish and set aside.
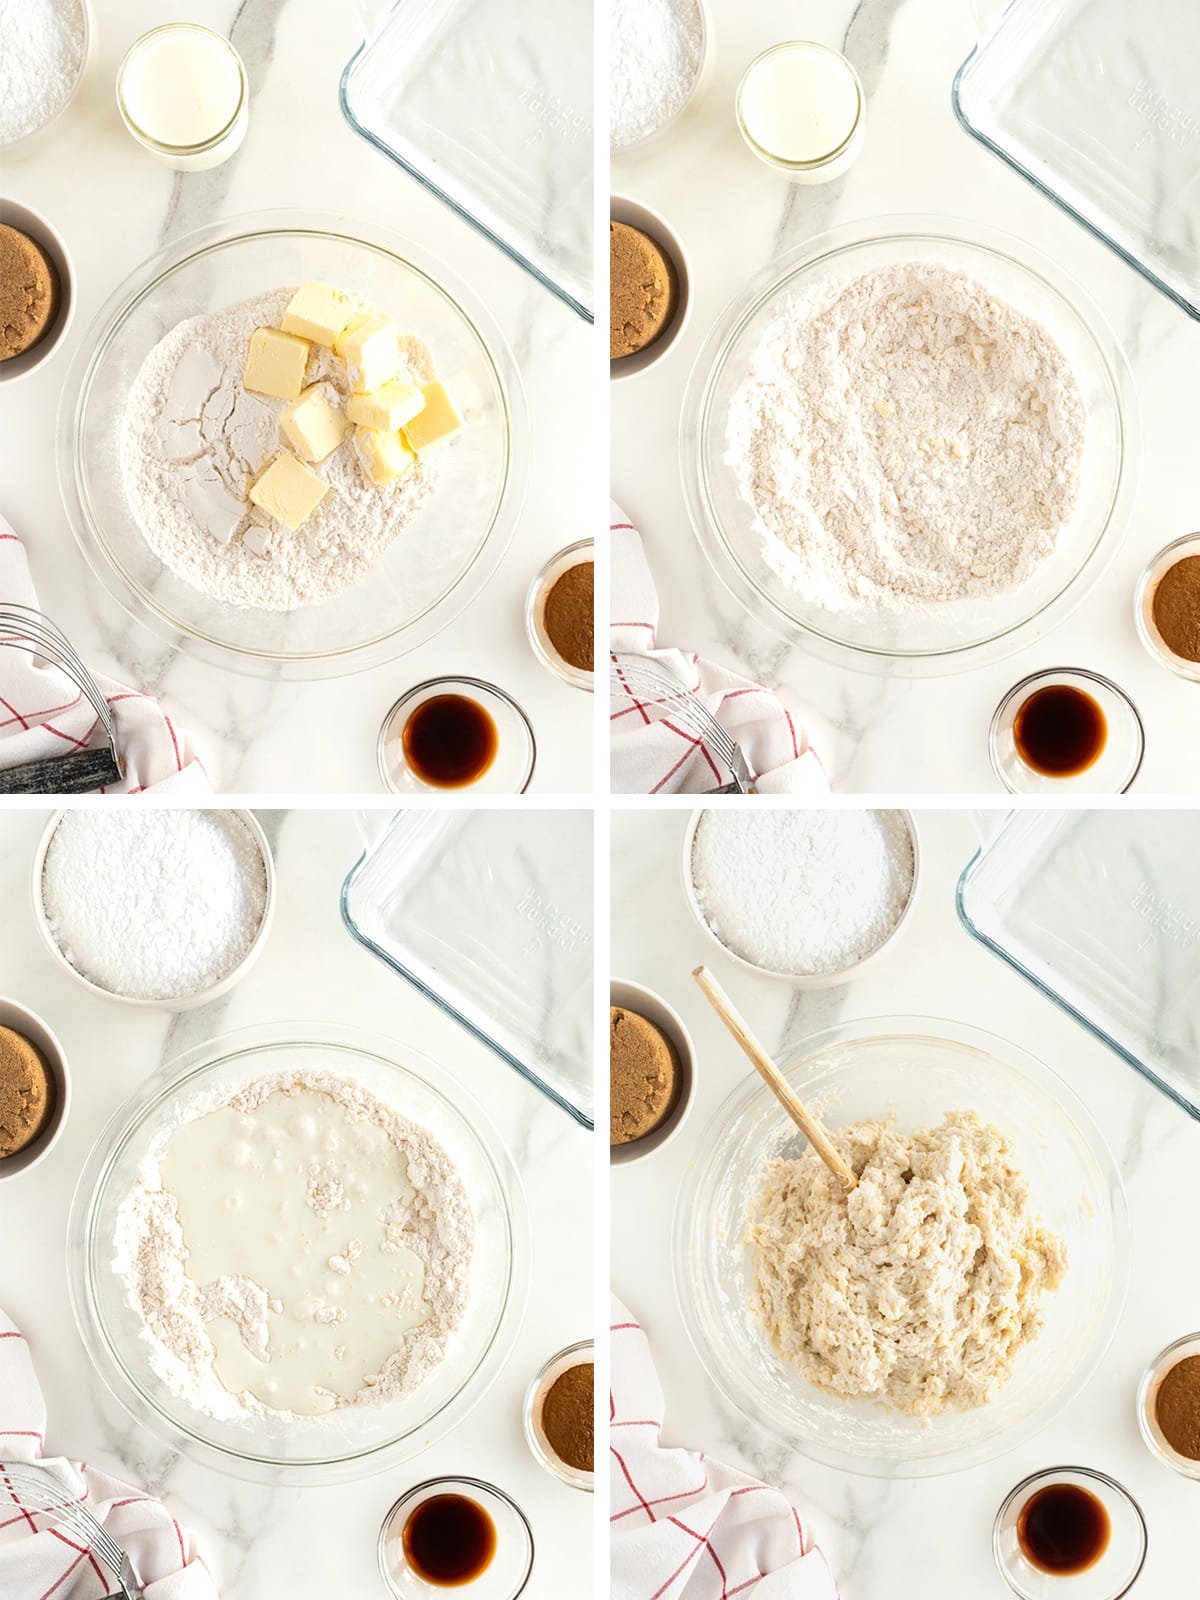
- In a large bowl, add the flour and cut the 1/2 cup softened butter in with a pastry blender or two knives until well combined and mixture is crumbly.
- Stir in the buttermilk until a thick dough forms.
- Let rest in the bowl while preparing the filling and glaze.
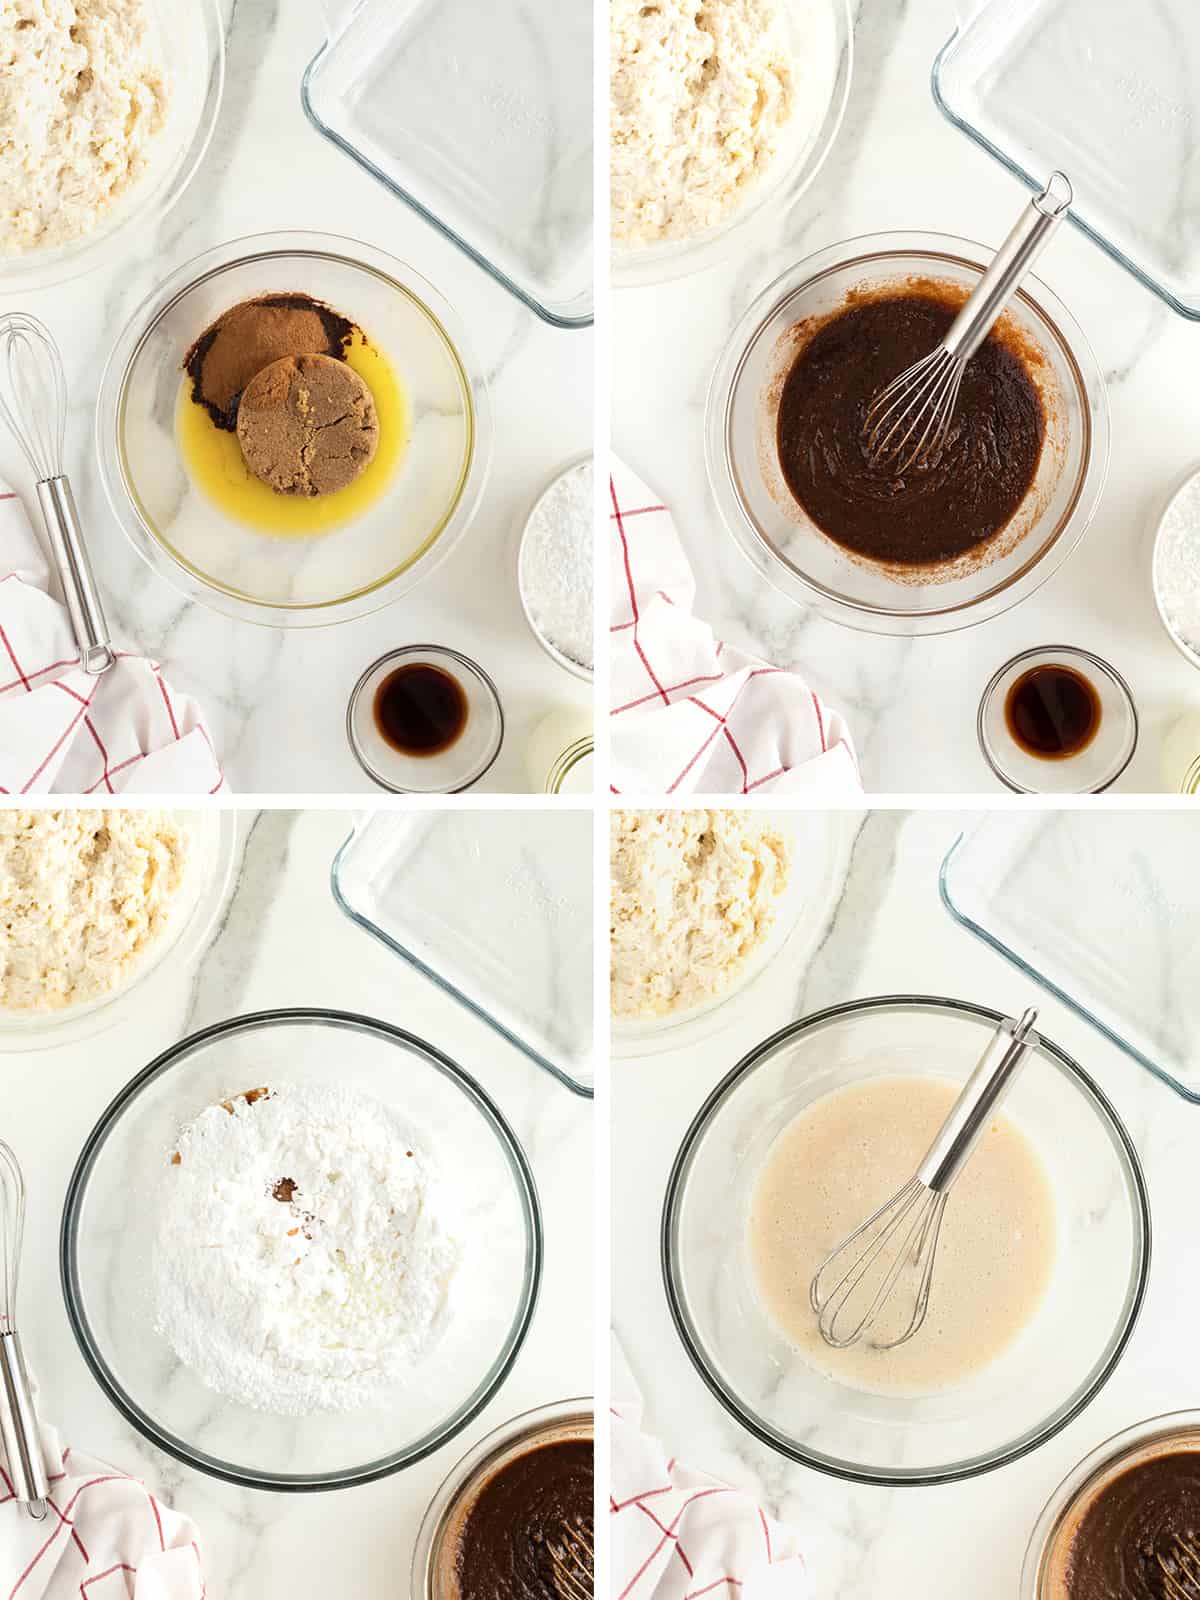
- In a small bowl, melt the 1/2 cup butter for the filling.
- Once melted, whisk in the brown sugar and cinnamon until well combined and smooth. Set aside.
- In a medium bowl, whisk together the glaze ingredients until smooth. Set aside.
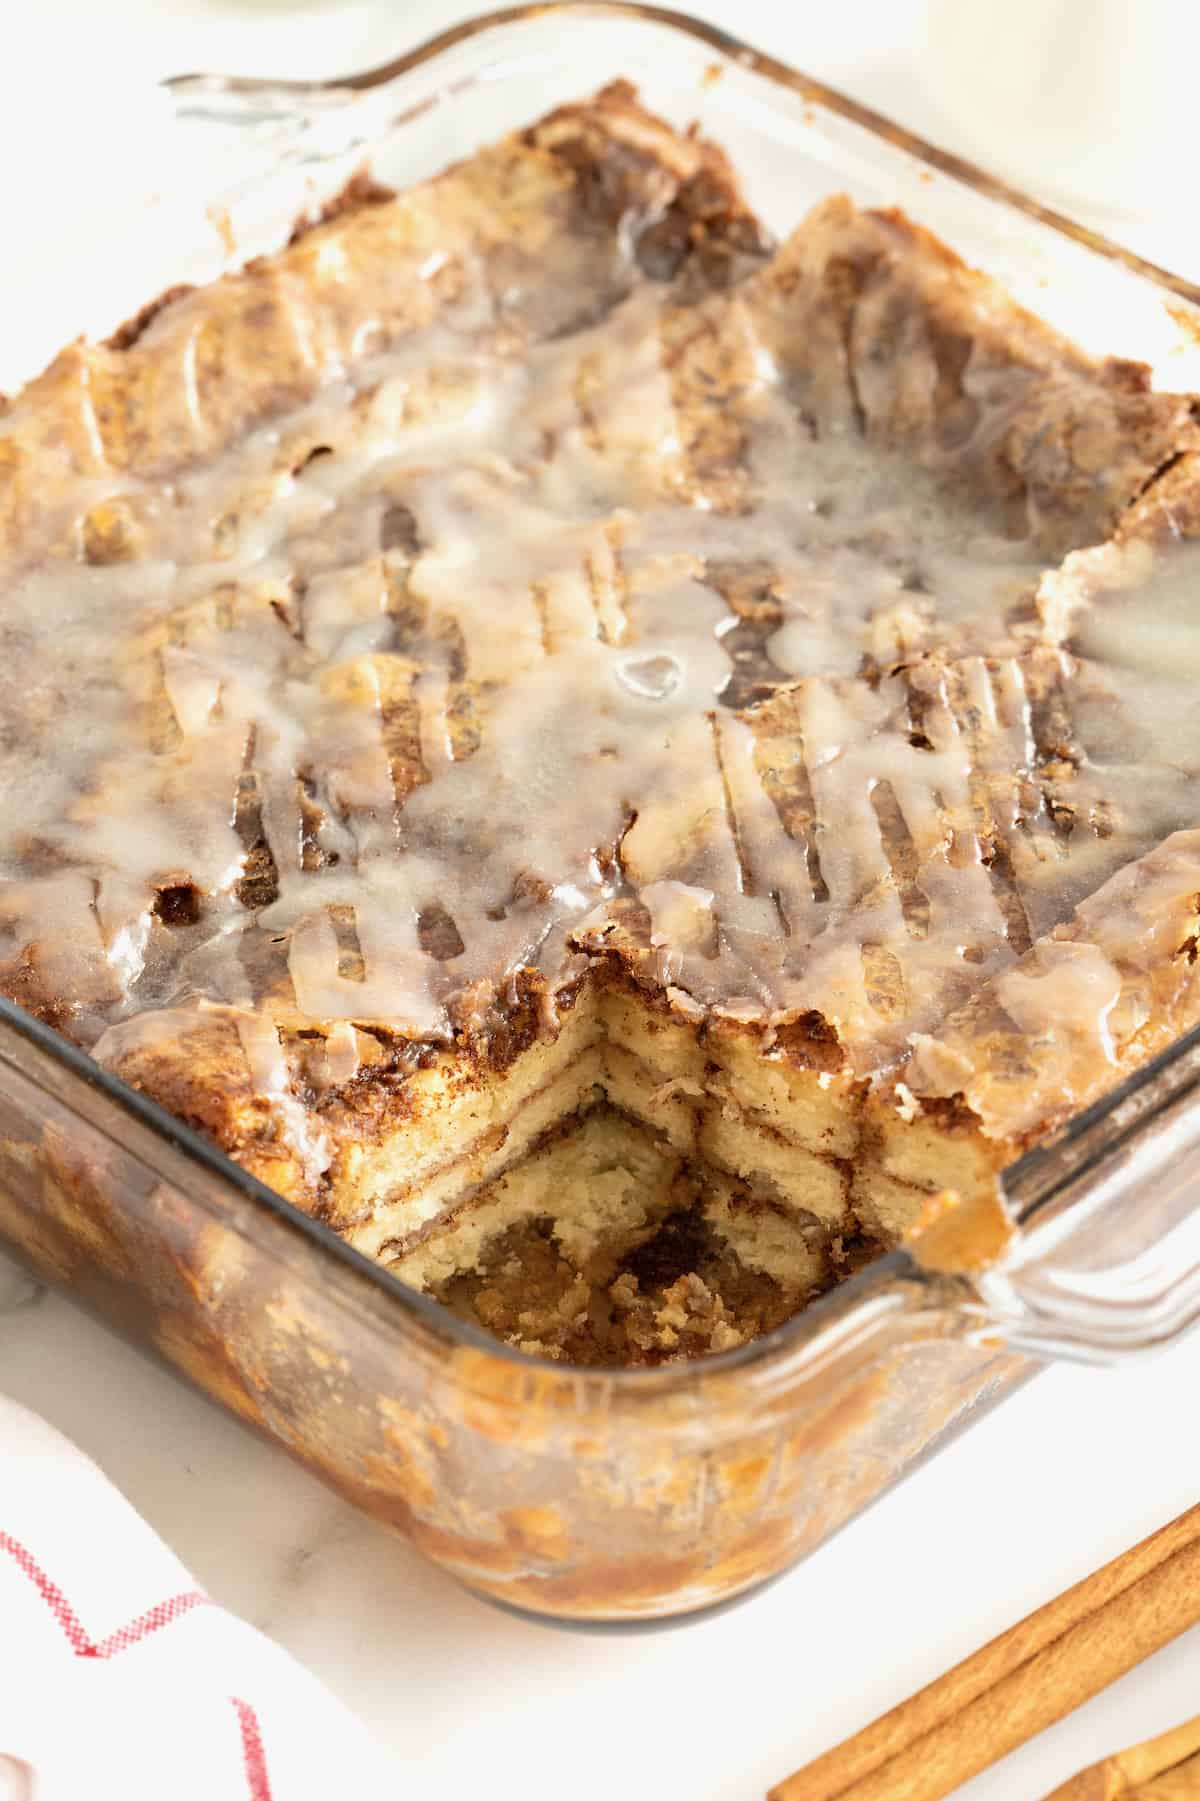
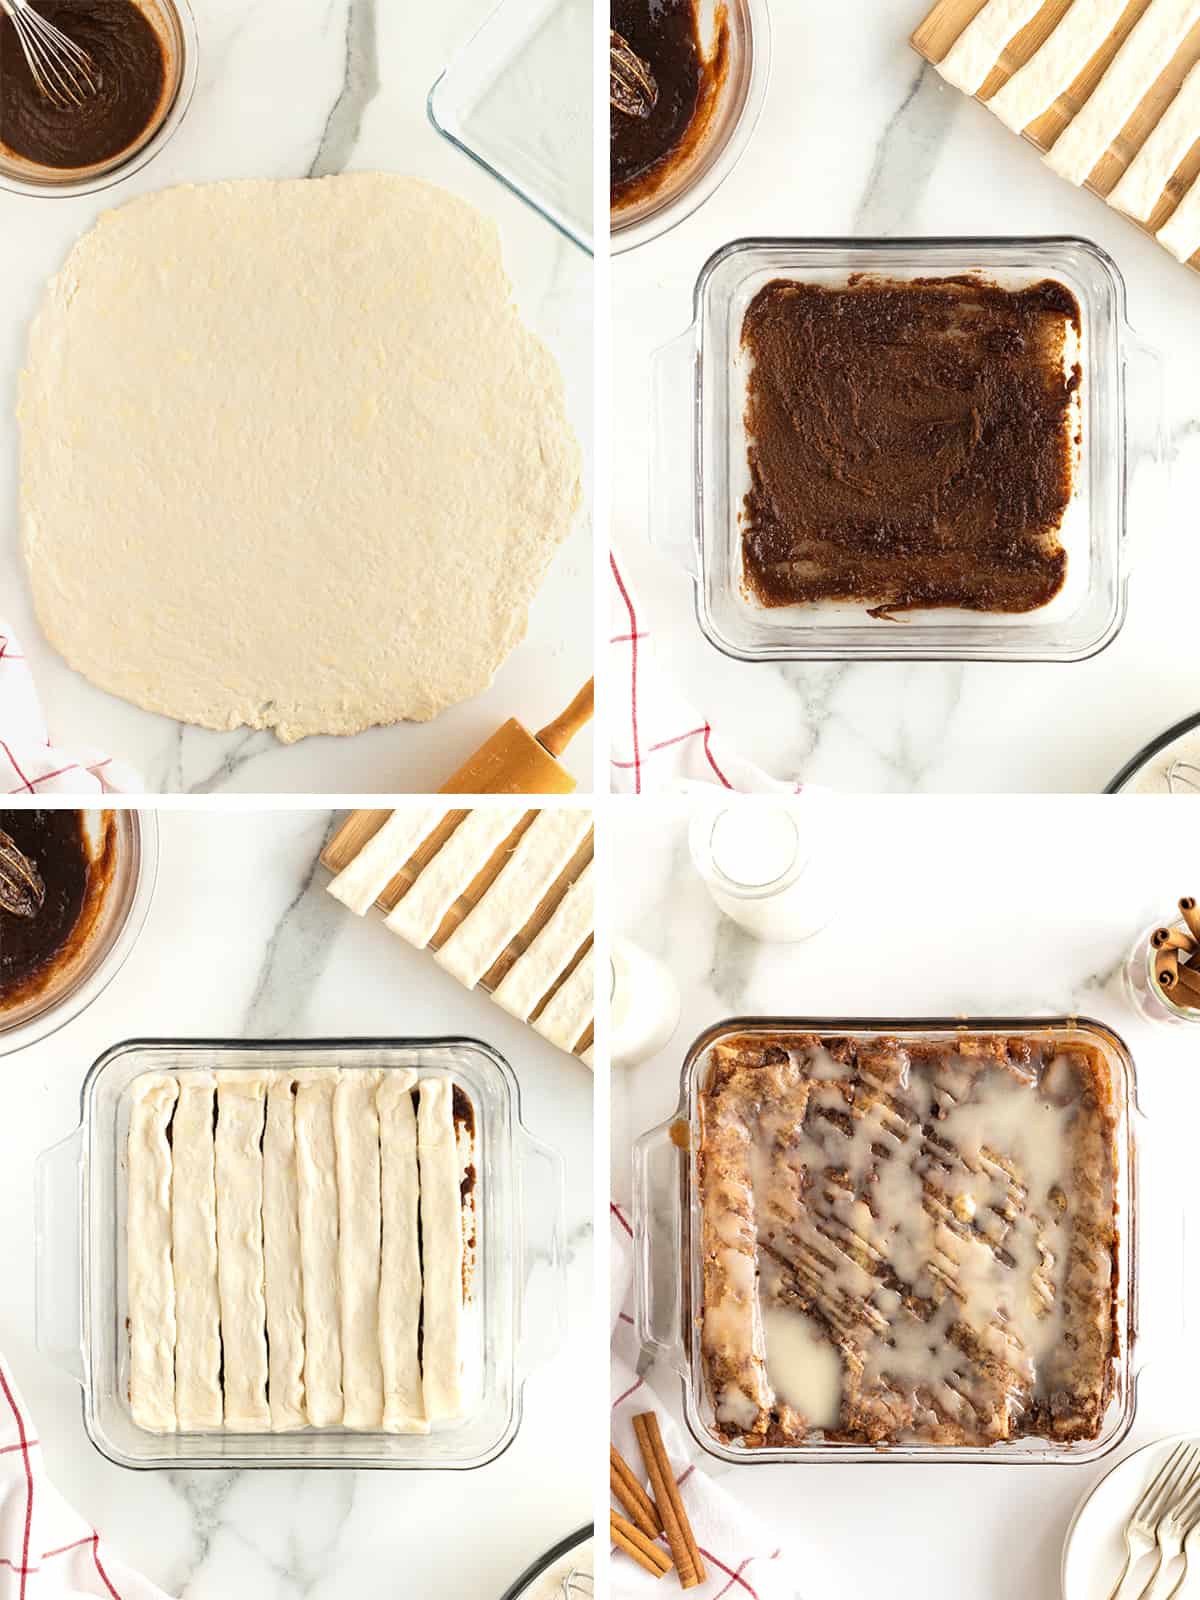
- Roll the dough out into a rough 16×16-inch square. Cut the dough into 1-inch strips and cut each strip in half.
- Spread a few tablespoons of filling evenly over the bottom of the prepared baking dish. Place enough strips of dough into the bottom of the baking dish so it is completely covered and the dough strips are touching.
- Spread with about 1/4 cup filling. Drizzle with about 1/2 cup glaze.
- Repeat with remaining dough strips, filling and glaze until you have three layers in the baking dish, covering the top layer with filling and glaze, but reserving about 1/4 cup glaze for drizzling over the lasagna once it’s baked.
- Bake for 30-35 minutes or until the top is starting to crisp and brown. Let set at least 10 minutes before serving. Drizzle with remaining glaze just before serving.
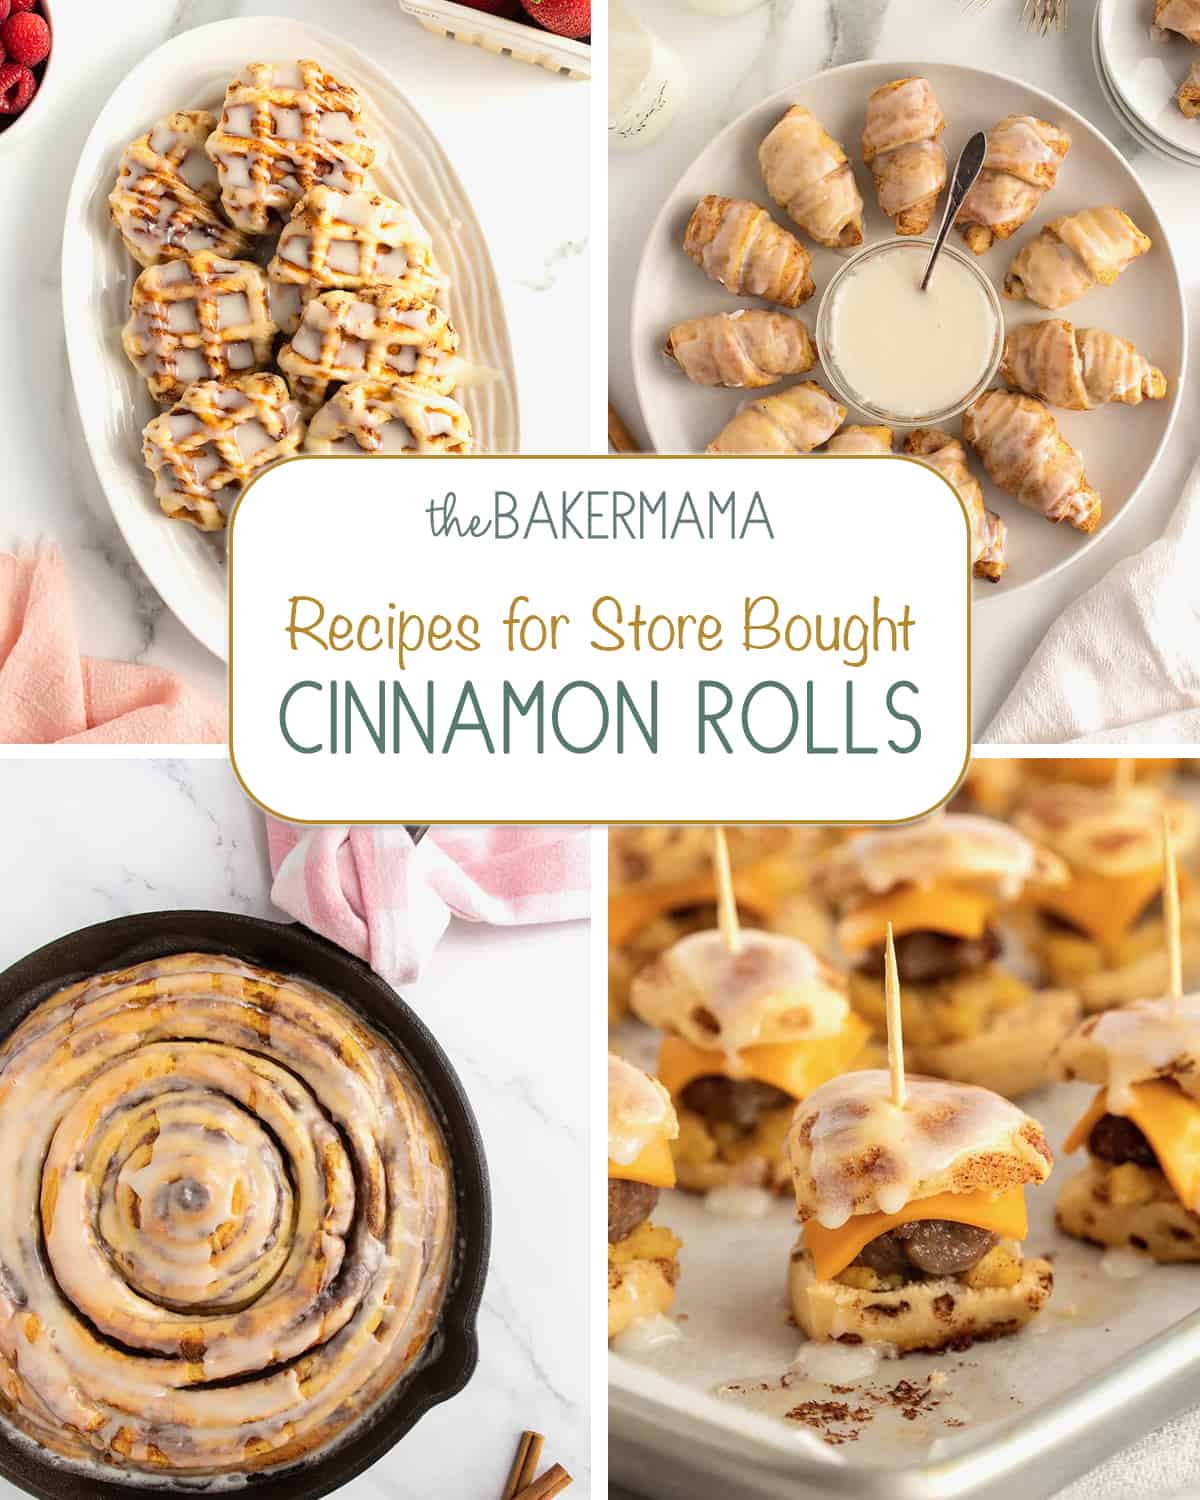
Recipes for Store Bought Cinnamon Rolls
Doesn’t have to be homemade to be ah-mazing! Turn canned cinnamon rolls into dreamy, delicious treats with my favorite Recipes for Store Bought Cinnamon Rolls. They’re creative, fun and easy!
If you make this Cinnamon Roll Lasagna, be sure to snap a picture and tag me on Instagram @thebakermama so I can see! 😍 I just love seeing how inspired and creative y’all get with the recipes and ideas I share. Enjoy!
xoxo,

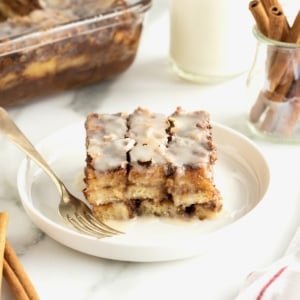
Cinnamon Roll Lasagna
- Prep Time: 20 mins
- Cook Time: 35 mins
- Total Time: 55 minutes
- Yield: 12
- Category: Breakfast
Description
Cinnamon Roll Lasagna is a fun and delicious twist to everyone’s favorite breakfast indulgence!
Ingredients
Dough:
- 3 cups self-rising flour
- 1/2 cup (1 stick) unsalted butter, softened a bit
- 1 and 1/4 cups buttermilk
Filling:
- 1/2 cup (1 stick) unsalted butter, melted
- 1 cup dark brown sugar
- 2 tablespoons cinnamon
Glaze:
- 3 cups powdered sugar
- 2 teaspoons vanilla
- 1 cup buttermilk
Instructions
- Preheat oven to 375°F. Butter an 8-inch square baking dish and set aside.
- In a large bowl, add the flour and cut the 1/2 cup softened butter in with a pastry blender or two knives until well combined and mixture is crumbly. Stir in the buttermilk until a thick dough forms. Let rest in bowl while preparing the filling and glaze.
- In a small bowl, melt the 1/2 cup butter for the filling. Once melted, whisk in the brown sugar and cinnamon until well combined and smooth. Set aside.
- In a medium bowl, whisk together the glaze ingredients until smooth. Set aside.
- Roll the dough out into a rough 16×16-inch square. Cut dough into 1-inch strips and cut each strip in half.
- Spread a few tablespoons of filling evenly over the bottom of the prepared baking dish. Place enough strips of dough into the bottom of the baking dish so it is completely covered and the dough strips are touching.
- Spread with about 1/4 cup filling. Drizzle with about 1/2 cup glaze. Repeat with remaining dough strips, filling and glaze until you have three layers in the baking dish, covering the top layer with filling and glaze, but reserving about 1/4 cup glaze for drizzling over the lasagna once it’s baked.
- Bake for 30-35 minutes or until the top is starting to crisp and brown. Let set at least 10 minutes before serving. Drizzle with remaining glaze just before serving.


I am going to make this tomorrow but can you use canned cinnamon rolls and unroll to fix a pan with the filling and the glaze? We love the Cinnamon roll Waffles made them yesterday. You are so full of great ideas.
Hi Eva! Yes, you definitely can. It takes about 5-10 extra minutes to bake. If the top starts to brown too much before the inside is baked through, just tent with foil until baked all the way through. Enjoy!
Wow, never thought about making them that way, it gives a nice twist. Does adding more levels influence a lot cooking time ?
Hi! Yes, the thicker it is, the longer it will take to bake all the way through. I would suggest covering it with foil once you notice the top is baked so the middle continues to bake. You can stick a toothpick or thin knife in the center through the dough to test it for doneness. If it comes out with wet dough on it, the lasagna needs to bake longer. Hope this helps. Enjoy!
This is delicious but has a lot of liquid in it. Is this normal? It almost seems like I could have used half instead
Hi Wendy! The cinnamon sugar should be like a syrup all around the layers of dough…like the middle of a cinnamon roll. The ratio of dough to syrup should be a nice balance. Did you bake it in an 8-inch square dish and have about 6 layers of dough?
hi! what do u mean by 1-1/4 buttermilk? do u mean a cup and a quarter?
Hi Sylvia! Yes, 1 cup and a quarter cup of buttermilk. Enjoy!
Are you using salted or unsalted butter?
Hi Katie! I use unsalted. I just updated the recipe to clarify. Thanks so much for asking. Enjoy!
Oh, I just saw someone else already asked this. Never mind. 🙂
Just wondering, if you are going to have the strips of dough touching why do you need to cut them into strips? Why not just roll out 8″ x 8″ squares of dough?
Hi – looks amazing, can’t wait to try. Wondering why you cut into strips to form each layer, rather than adding 1 whole piece for each layer? Is it to do with how well it cooks?
Hi Danielle! I cut them into strips so the filling cooks all around and between each strip, similar to a lasagna. You could certainly use 1 whole layer or larger strips and it should still bake up great, there just might not be as good of a coverage of filling with each serving. Enjoy!
[…] Cinnamon Roll Lasagna via The Baker Mama […]
Thanks for sharing, it looks and sounds really yummy. I’ll try it when my parents come to stay.
Two questions, please:
1. How soft does the butter need to be fit into the cup?
2. You say 1 stick of butter. How much does a stick weigh – grams or ounces. Here, in Australia, we buy butter in 250 or 500 gram block.
Thanks again.
Hi Jan! One stick of butter is 4 ounces, 113 grams or 1/2 cup. The butter should be soft to touch, but not at all melted. If you press on it with your finger, it should make and keep an indention. Hope this helps! Enjoy!
Thank you for this conversion! UK (I’m in Scotland) doesn’t do ‘stick’ either so your conversion makes it so much easier, thank you!!
This recipe sounds just PERFECT for Christmas breakfast, made on Christmas Eve, ready to pop in the oven on getting up on Christmas morning! I think I might add some raisins/sultanas to the filling too as that was how Mom made her cinnamon buns, so kind of a tradition. LOL!
Thank you for sharing your recipe! Can’t wait to try it out!
Best wishes to you & yours!
[…] via The Baker Mama […]
[…] Cinnamon Roll Lasagna | The Baker Mama. I layered cinnamon rolls like a lasagna for a delicious twist to everyone’s favorite breakfast indulgence! […]
Hi!I made these Thanksgiving morning. All I can say is YUMMY! I have been requested to make a double batch for an ornament exchange breakfast this weekend. Thank you so much for this delicious recipe.
Thank you for the suggestions! I will be trying them soon!!!
This recipe is seriously DELICIOUS! You are definitely right with using buttermilk. The bottom layer seemed to remain a bit mushy but not raw (BUT in no way did that take away from how yummy it is), do you have any suggestions on what I could do differently, or where I may have gone wrong? Aside from it being wonderful right out of the oven, it is an amazing treat for breakfast, the next day! I will definitely make this again. Thanks for sharing!
Hi Cam! So glad you baked and enjoyed it! Some of the filling does drip to the bottom while it’s baking so the bottom layer absorbs it. You could definitely bake it a little longer next time or place it on the bottom rack of the oven for the last 10 minutes to get more heat on the bottom of the dish. Enjoy!
So I Made this in pan and at temperatures and time directed and the middle came out pretty doughy. Did I do something wrong or should just left in longer??
Hi Shelley! It sounds like it needed to bake longer. It should be more tender like a biscuit than doughy. Try inserting a knife in the center of the dough and if it feels to doughy or dough sticks to the knife when you life it, it needs to bake longer. Hope this helps!
Kathy, my husband makes bread and was having trouble with the kneading part. We purchased a Kitchenaide mixer with the dough hooks. He’s been very pleased so far. Watch for sales!!!
Hi Meagan, this recipe looks delish!! I just wanted to say thank you for giving the recipe if using all purpose flour…I am going to try this with gluten free flour. Just wanted to say thanks on behalf of those who are gf:) hope this message finds you well!
Thanks so much, Christy! Enjoy!
Thanks for sharing the recipe !!!! I tried it with pumpkin filling and I love it completely!!!
Oh my yumminess! That sounds amazing! Can’t wait to try it with pumpkin filling! Thanks for sharing! 🙂
Looks wonderful
Thank you so much. Check the site. Slenda is a good substitute and the make a brown sugar. Who knew. Have a wonderful blessed Happy Thanksiving.
Great! Same to you and your loved ones! Enjoy!
Hi first of all this recipe looks AMAZING i want to make it for breakfast for the famiky Thanksgiving but alot of family members are diabetic, which sugar substitute would be best to use in this recipe? Thanks
Hi Shelli! I’ve never baked with sugar substitutes, so I can’t confidently recommend any substitutes for the brown sugar and powdered sugar in this recipe. I did come across this article online that might be helpful: http://allrecipes.com/howto/baking-with-sugar-and-sugar-substitutes/. Enjoy!
Did you use the shortening or butter?
Hi Angie! I’ve used both, but the buttered flavored shortening is what I use most often and is what I created the recipe with. Enjoy!
Hey Meagan. I have never heard of self rising flour?? Also My bread recipe rises twice would i layer rise then bake. Like normal?
Hi Sarah! You can find self-rising flour in most grocery stores. As a substitute for 1 cup of self-rising flour, place 1-1/2 teaspoons baking powder and 1/2 teaspoon salt in a measuring cup. Add all-purpose flour to measure 1 cup. If you use a different dough recipe that has yeast, I would let it rise as you normally would and then layer and bake it. Hope this helps! Enjoy!
Would this work, doubled, in a 9×13 pan?
Hi Robin! It might be a tight squeeze, but it should fit. Just place the dish on a rimmed baking sheet when you’re baking it in case it rises above the baking dish and some of the filling drips out. Enjoy!
This sounds easy and so good. I used to make a lot of yeast breads and rolls,but now my hands don’t last through the mixing,kneading and rolling. I have some ideas on different fillings. I will keep you posted.
Sounds so very delicious
Sounds delicious
The first thing I notice about this recipe is a 16X16 rectangle????? Last time I looked that would be a square.
Thanks for catching that Jodi! I just updated the recipe. Enjoy!
This recipe looks awesome. Thanks for sharing
Could this be made using canned crescent rolls laid in layers? I am semi-invalid and need short cuts. thanks
It’s worth a try. Enjoy!
I am going to try this but instead of the icing, butter them and use syrup like pancakes, with link sausages. I will let you know how they turn out.
Sounds awesome, Karen! Definitely, let me know how it turns out! Enjoy!
what do you think about making this in a crock pot? would be amazing coming home to this ready for after dinner.
Great idea, Kathy! Let me know how it turns out! I’ll have to try it. Enjoy!
Did you say to use buttermilk in the icing ? I had never heard of that but will try
Yes, Willia! Buttermilk balances out the sweetness of the powdered sugar perfectly. Enjoy!
Anyway to work cream cheese layer into?? Your thoughts
Hi Katie! Oh goodness…a cream cheese layer sounds mmmm-azing! Maybe make a thin cream cheese icing to replace the glaze with and spread or drizzle it between the layers and on top. Let me know how it turns out if you give it a try! Enjoy!
Hi Maegan, Could I use my own cinnamon roll recipe or would you recommend using your recipe? Thanks
Hi Heather! I’m not sure how a normal cinnamon roll recipe would work, but it’s definitely worth a try. Enjoy!
Can you make the dough part in advance? Would you store the pre-made dough in the fridge, freezer, or on the counter? How long for each storage option until it would go bad? Thanks for the recipe, looks amazing. I hope to try it soon! I’m gonna try to do it w/regular flour, and gluten free as well.
Hi Tuhlulah! I would recommend preparing the whole lasagna still reserving 1/4 glaze for drizzling once it’s been baked. Then you would wrap it tightly in plastic wrap and refrigerate it until you’re ready to bake it or up to 2 days. You’ll want to let it come to room temperature though. If you freeze it, wrap it tightly in plastic wrap and then foil before placing it in the freezer. When you’re ready to bake it, unwrap it and let it come to room temperature before baking. You’ll need to make some fresh glaze for topping it with if you’ve frozen it. It should freeze well for up to a month. Enjoy!
Thanks for sharing the yummy recipe!
2 questions:
1.) can it be put together & frozen before cooking?
2.) If I really wanted to put pecans in there would it be better to place them in the pan 1st or sprinkle them in between the layers?
Hi Nikki! You could definitely freeze or refrigerate it and bake it later. I would recommend preparing the whole lasagna still reserving 1/4 glaze for drizzling once it’s been baked. Then you would wrap it tightly in plastic wrap and refrigerate it until you’re ready to bake it or up to 2 days. You’ll want to let it come to room temperature though. To freeze it, wrap it tightly in plastic wrap and then foil before placing it in the freezer. When you’re ready to bake it, unwrap it and let it come to room temperature before baking. You’ll need to make some fresh glaze for topping it with if you’ve frozen it. It should freeze well for up to a month.
I love the idea of adding pecans to it! I would add them to the bottom, in between layers and on top! I’m definitely going to add them next time I make it! Yum! Enjoy!